系统简介 Introduction
釜电 专注于 NFC 无源智能锁产品的研发与创新,为客户提供安全、可控、低成本的访问管理解决方案。
Fudian focuses on the R&D and innovation of NFC passive smart lock products, providing customers with secure, controllable, and cost-effective access management solutions.
在开始之前,请根据您的使用场景选择合适的方案:
Before getting started, please choose the appropriate solution based on your use case:
下载部署包 Deployment Package
经过商业落地验证的一站式解决方案,包含服务端程序、后台管理系统、数据库及配套移动端 APP。开箱即用,可快速上线投入业务使用。
A commercially proven turnkey solution comprising server, admin console, database and companion mobile app. ready-to-use for rapid production launch.
部署完成后,可在后台「5.7 系统设置 → APP 版本管理」中下载手机应用,使用全部系统功能(设备管理 / 授权开锁 / 记录查询等)。 After deployment, download the mobile app from "5.7 System Settings → APP Version Management" in the admin console to access all features (device management / authorization / records, etc.).
前往下载 → Go to Download →SDK 开发包 SDK Development Kit
面向开发者的模块化集成方案,提供 Android / iOS / UniApp 三端 SDK,支持将 NFC 智能锁核心能力(开锁、授权、状态查询等)快速集成至自有移动应用或物联网平台。
A modular integration toolkit for developers. Provides Android / iOS / UniApp SDKs to embed NFC smart lock capabilities (unlocking, authorization, status query) into existing mobile apps or IoT platforms.
包含完整的开发文档、API 参考及示例代码,助力快速完成定制化开发。 Includes comprehensive documentation, API reference and sample code to accelerate custom development.
前往下载 → Go to Download →环境要求 Environment Requirements
操作系统支持 Supported Operating Systems
釜电 服务端支持主流 Linux 发行版,推荐在以下系统中部署以获得最佳体验:
Fudian server supports mainstream Linux distributions. We recommend the following systems for the best experience:
浏览器内核兼容 Browser Kernel Compatibility
| 浏览器 Browser | 最低版本 Minimum Version |
|---|---|
| Chrome | 85+ |
| Edge | 85+ |
| Firefox | 79+ |
| Safari | 14.1+ |
| iOS Safari | 14.5+ |
下载部署包 Download Deployment Package
釜电 服务端部署包 Fudian Server Deployment Package
Forti-Lock.zip
包含:Windows 版 / Linux 版 可执行程序 + 配置文件 + SQL 初始化脚本 Includes: Windows / Linux executables + config files + SQL init scripts
部署方式 Deployment Methods
部署包提供三种部署方式,可根据您的实际情况选择:
The deployment package provides three methods, choose based on your situation:
宝塔面板部署(推荐) BaoTa Panel Deployment (Recommended)
推荐使用宝塔面板进行可视化部署,可在宝塔面板中一键安装 MySQL 数据库、管理服务进程,简化环境配置流程。
We recommend using BaoTa Panel for visual deployment. You can install MySQL database, manage service processes, and simplify environment configuration all in one panel.
手动部署 Manual Deployment
手动部署需要提前安装
MySQL 5.7+ 数据库。程序首次运行时会自动创建数据库和数据表,无需手动执行 SQL 脚本。
Manual deployment requires installing MySQL 5.7+ database in advance. The
program will automatically create the database and tables on first run.
下载后解压,根据需要选择 windows_amd64 或 linux_amd64
目录下的可执行文件进行部署。详细安装步骤请参阅下方「快速开始」章节。
After downloading and extracting, select the executable in either windows_amd64
or linux_amd64 folder according to your system. For detailed installation
steps, refer to the Quick Start section below.
Linux 一键自动部署脚本 Linux One-Click Deployment Script
使用一键脚本前,需要提前安装
MySQL 5.7+ 数据库。程序首次运行时会自动创建数据库和数据表。
Before using the one-click script, you need to install MySQL 5.7+ database in
advance. The program will automatically create the database and tables on first run.
CentOS / Ubuntu / Debian 系统可直接复制下方整条命令,使用 root 权限一键完成下载、解压、配置、后台启动全套流程。
For CentOS / Ubuntu / Debian systems, copy the full command below and run with root privileges to complete download, extract, configuration and background startup automatically.
sudo curl -fsSL https://doc-nfc.lcxxjs.cn/install.sh -o /tmp/install.sh && sudo bash /tmp/install.sh默认管理员账号:13501234567 密码:123456,首次登录后请及时修改密码。
Default admin account: 13501234567 password: 123456. Please change the password after first login.
SDK 开发包 SDK Development Kit
SDK 开发包专为二次开发设计,提供完整的开发文档和示例代码,帮助您快速将智能锁功能集成到您自己的移动应用或物联网项目中。
The SDK packages are designed for secondary development, providing complete documentation and sample code to help you quickly integrate smart lock features into your own mobile applications or IoT projects.
如果您需要将智能锁功能集成到现有的 App 或物联网平台中,请使用 SDK。如果您希望直接使用我们提供的完整平台解决方案,请查看上方「下载部署包」。
If you need to integrate smart lock features into an existing app or IoT platform, use the SDK. If you prefer to use our complete platform solution directly, please refer to the Deployment Package section above.
Android SDK 开发包 Android SDK Package
AndroidDemo.zip
包含:Android SDK 库 + API 文档 + 示例项目 Includes: Android SDK library + API documentation + sample project
iOS SDK 开发包 iOS SDK Package
IOSDemo.zip
包含:iOS SDK 库 + API 文档 + 示例项目 Includes: iOS SDK library + API documentation + sample project
UniApp SDK 开发包 UniApp SDK Package
UniappDemo.zip
包含:UniApp SDK 库 + API 文档 + 示例项目 Includes: UniApp SDK library + API documentation + sample project
解压 SDK 压缩包后,可查阅包内的开发文档了解详细的集成步骤和 API 接口说明。
After extracting the SDK package, refer to the development documentation inside for detailed integration steps and API interface descriptions.
快速开始 Quick Start
安装步骤 Installation Steps
步骤 1:下载并解压 Step 1: Download and Extract
- 下载 Forti-Lock.zip 压缩包(点击上方下载按钮) Download Forti-Lock.zip package (click the download button above)
- 解压到目标目录 Extract to target directory
-
进入目录,找到适合您系统的安装包
Enter
directory, find the installation package suitable for your system
- Windows 系统:选择 windows_amd64 目录 Windows: Choose windows_amd64 directory
- Linux 系统:选择 linux_amd64 目录 Linux: Choose linux_amd64 directory
- 将选中的系统包解压到新的目录 Extract the selected system package to a new directory
步骤 2:初始化数据库(可以忽略这一步,程序运行时会自动创建数据库) Step 2: Initialize Database (you can ignore this step, the database will be created automatically when the program runs)
- 创建 MySQL 数据库(例如:forti-lock) Create MySQL database (e.g., forti-lock)
- 执行 SQL 文件初始化数据库:mysql/forti-lock.sql Execute SQL file to initialize database: mysql/forti-lock.sql
步骤 3:修改配置文件 Step 3: Modify Configuration File
以下两个配置项必须修改为您自己的配置!
The following two configuration items must be modified to your own configuration!
- 打开 manifest/config/config.yaml 配置文件 Open manifest/config/config.yaml configuration file
-
修改 domain 配置为您的服务器地址或域名
Modify domain to your server
address or domain name
# Example domain: https://www.nfc-fudian.com # OR domain: http://192.168.1.100 -
修改数据库连接配置
Modify database connection
configuration
# Example
database:
  default:
    link: mysql://username:password@tcp(127.0.0.1:3306)/forti-lock?loc=Local&parseTime=true
步骤 4:运行系统 Step 4: Run System
Windows 系统运行方法 Windows System Running Method
- 打开命令提示符(CMD)或 PowerShell Open Command Prompt (CMD) or PowerShell
-
进入解压后的目录
Enter the extracted directory
cd G:\FortiLock\windows_amd64 - 双击运行 FortiLockServer-v.1.0.1.exe 文件 Double-click to run FortiLockServer-v.1.0.1.exe
-
或在命令行中运行:
Or run in command line:
FortiLockServer-v.1.0.1.exe
Linux 系统运行方法 Linux System Running Method
- 打开终端 Open terminal
-
进入解压后的目录
Enter the extracted directory
cd /opt/FortiLock/linux_amd64 -
赋予执行权限
Grant execute permission
chmod +x FortiLockServer-v.1.0.1 -
运行程序
Run the program
./FortiLockServer-v.1.0.1 -
(可选)后台运行
(Optional) Run in background
nohup ./FortiLockServer-v.1.0.1 > output.log 2>&1 &
服务启动后,可以在控制台看到类似 "Server started at :8000" 的提示。
After the service starts, you can see a message like "Server started at :8000" in the console.
步骤 5:登录系统 Step 5: Login to System
-
打开浏览器,访问系统地址
Open browser and visit system
address
http://localhost:8000 # 或 http://your-domain.com:8000 -
使用默认账号密码登录
Login with default account and
password
默认账号: Default Account:
13501234567默认密码: Default Password:
123456 - 输入图形验证码 Enter CAPTCHA
- 点击“登录”按钮 Click the "Login" button
首次登录后,请立即修改密码!请使用强密码(包含大小写字母、数字和特殊字符)。
After first login, please change the password immediately! Please use a strong password (including uppercase and lowercase letters, numbers and special characters).
如果无法访问系统,请检查:1) 防火墙是否开放 8000 端口;2) 配置文件是否正确;3) 数据库是否正常连接。
If you cannot access the system, please check: 1) Whether the firewall has opened port 8000; 2) Whether the configuration file is correct; 3) Whether the database is connected normally.
后台操作手册 Admin Console User Guide
本章面向在浏览器中使用 釜电 管理后台的运维与管理员,涵盖登录、锁具/柜体/授权/记录/人员/系统配置等菜单操作。与手机 App 相关的现场装锁、调试与授权申请流程,请参阅独立的《移动端操作手册》。
This chapter is for operators and administrators using the Fudian admin web console in a browser. For on-site lock installation, commissioning, and mobile authorization flows, see the separate Mobile App User Guide.
5.1 系统登录 5.1 System Login
访问系统后,输入账号和密码完成登录。
After accessing the system, enter the account and password to complete the login.
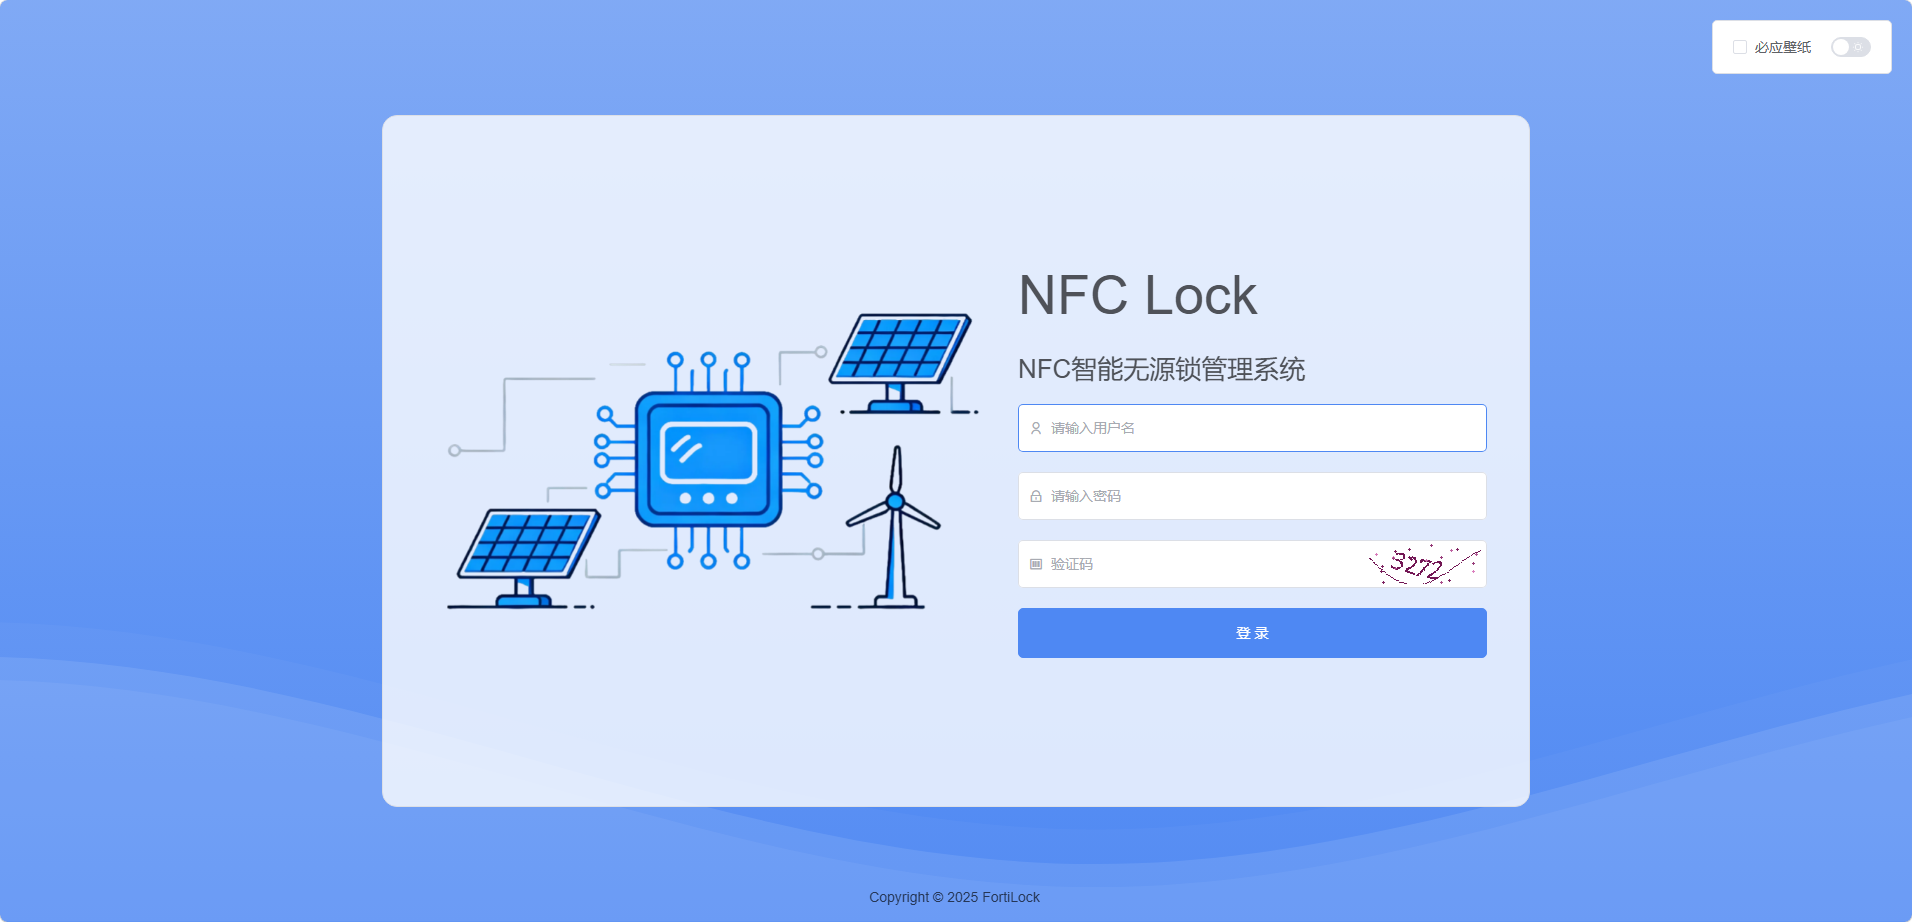
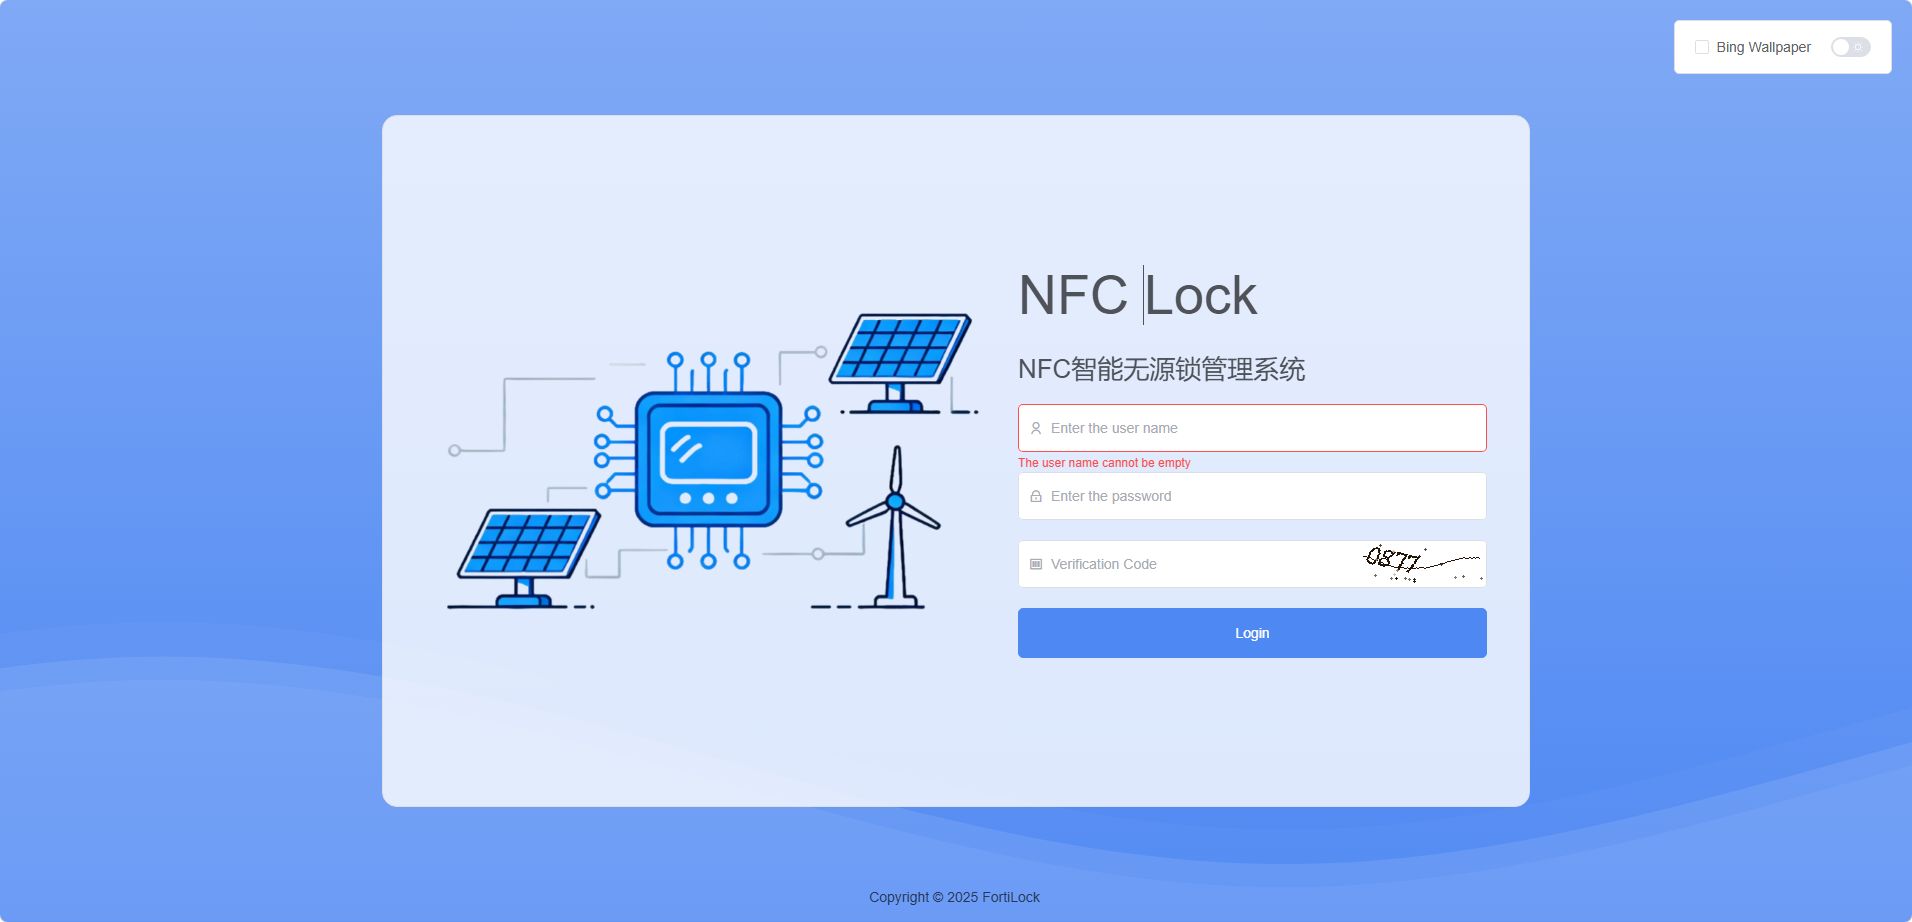
图 4-1:系统登录界面
登录步骤 Login Steps
- 在浏览器中输入系统地址 Enter the system address in the browser
- 输入用户名(手机号或工号) Enter username (phone number or employee ID)
- 输入密码 Enter password
- 输入图形验证码 Enter CAPTCHA
- 点击“登录”按钮 Click the "Login" button
连续多次登录失败将触发账户锁定,请联系管理员解锁。
Multiple consecutive failed login attempts will trigger account lockout. Contact the administrator to unlock.
安全机制 Security Mechanism
- RSA 加密传输登录凭据 RSA encrypted transmission of login credentials
- JWT Token 身份认证 JWT Token authentication
- 图形验证码防止暴力破解 CAPTCHA to prevent brute force attacks
- 会话超时自动退出 Automatic logout on session timeout
5.2 锁具管理 5.2 Device Management
锁具管理是系统的核心功能,用于管理所有智能锁具设备。
Device management is the core function of the system, used to manage all smart lock devices.
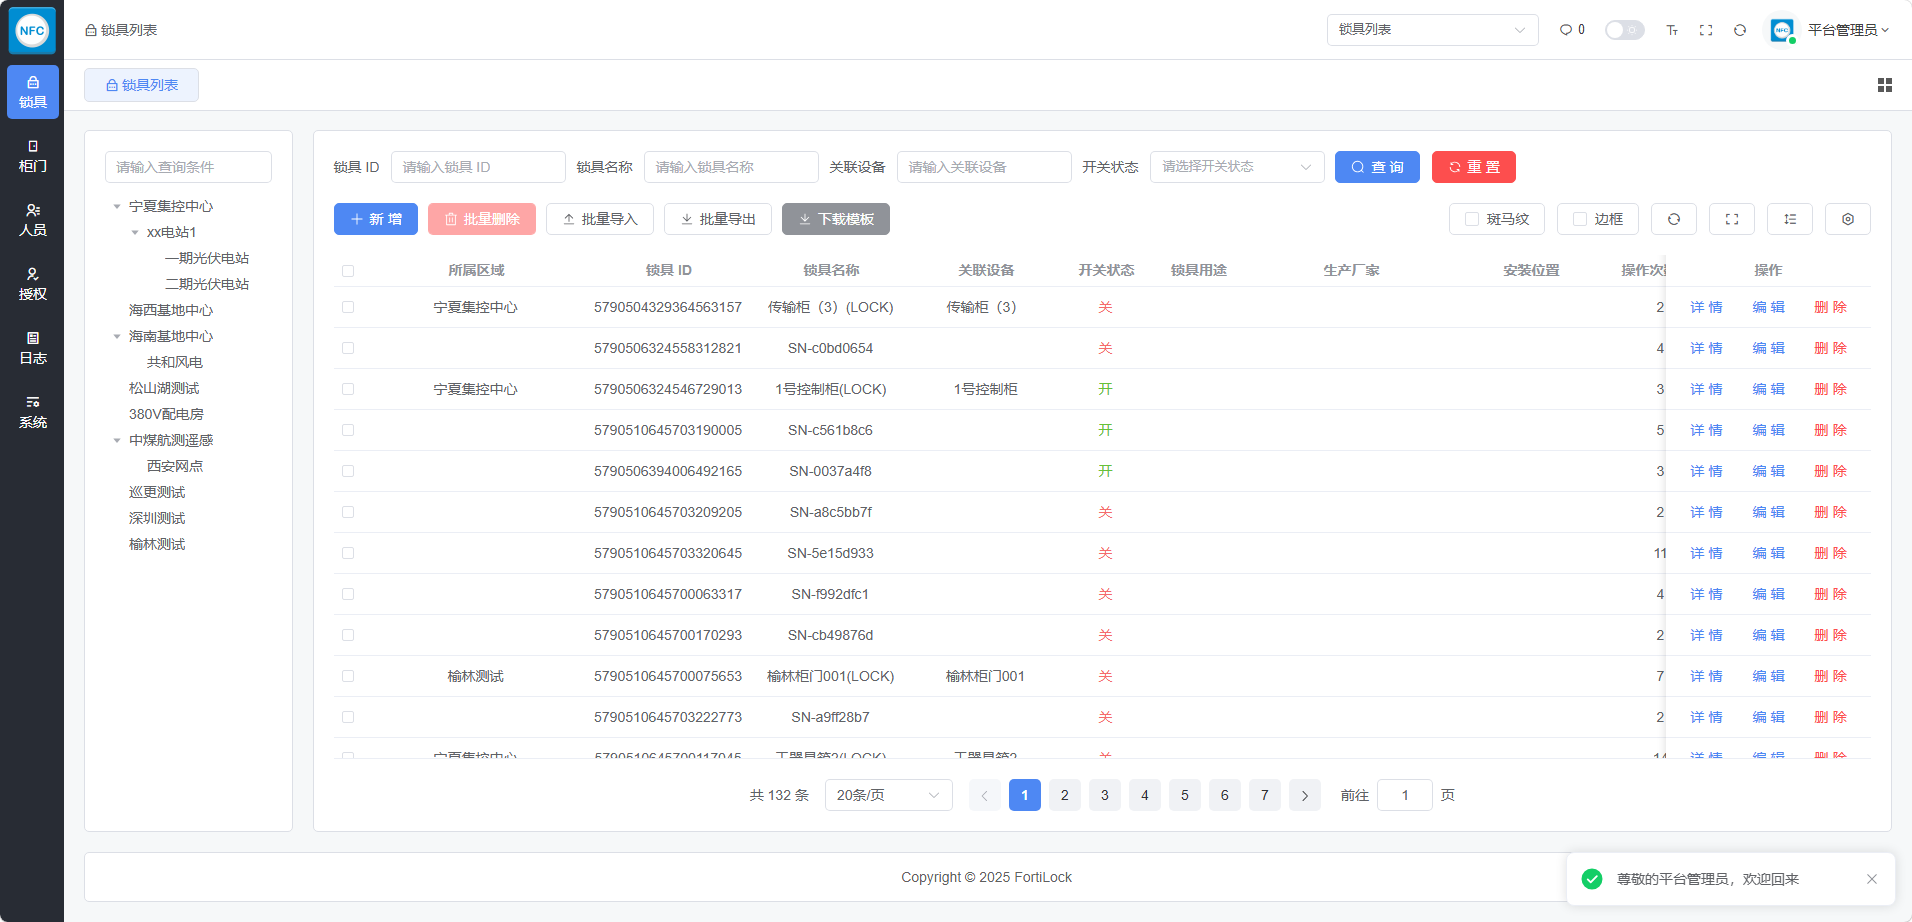
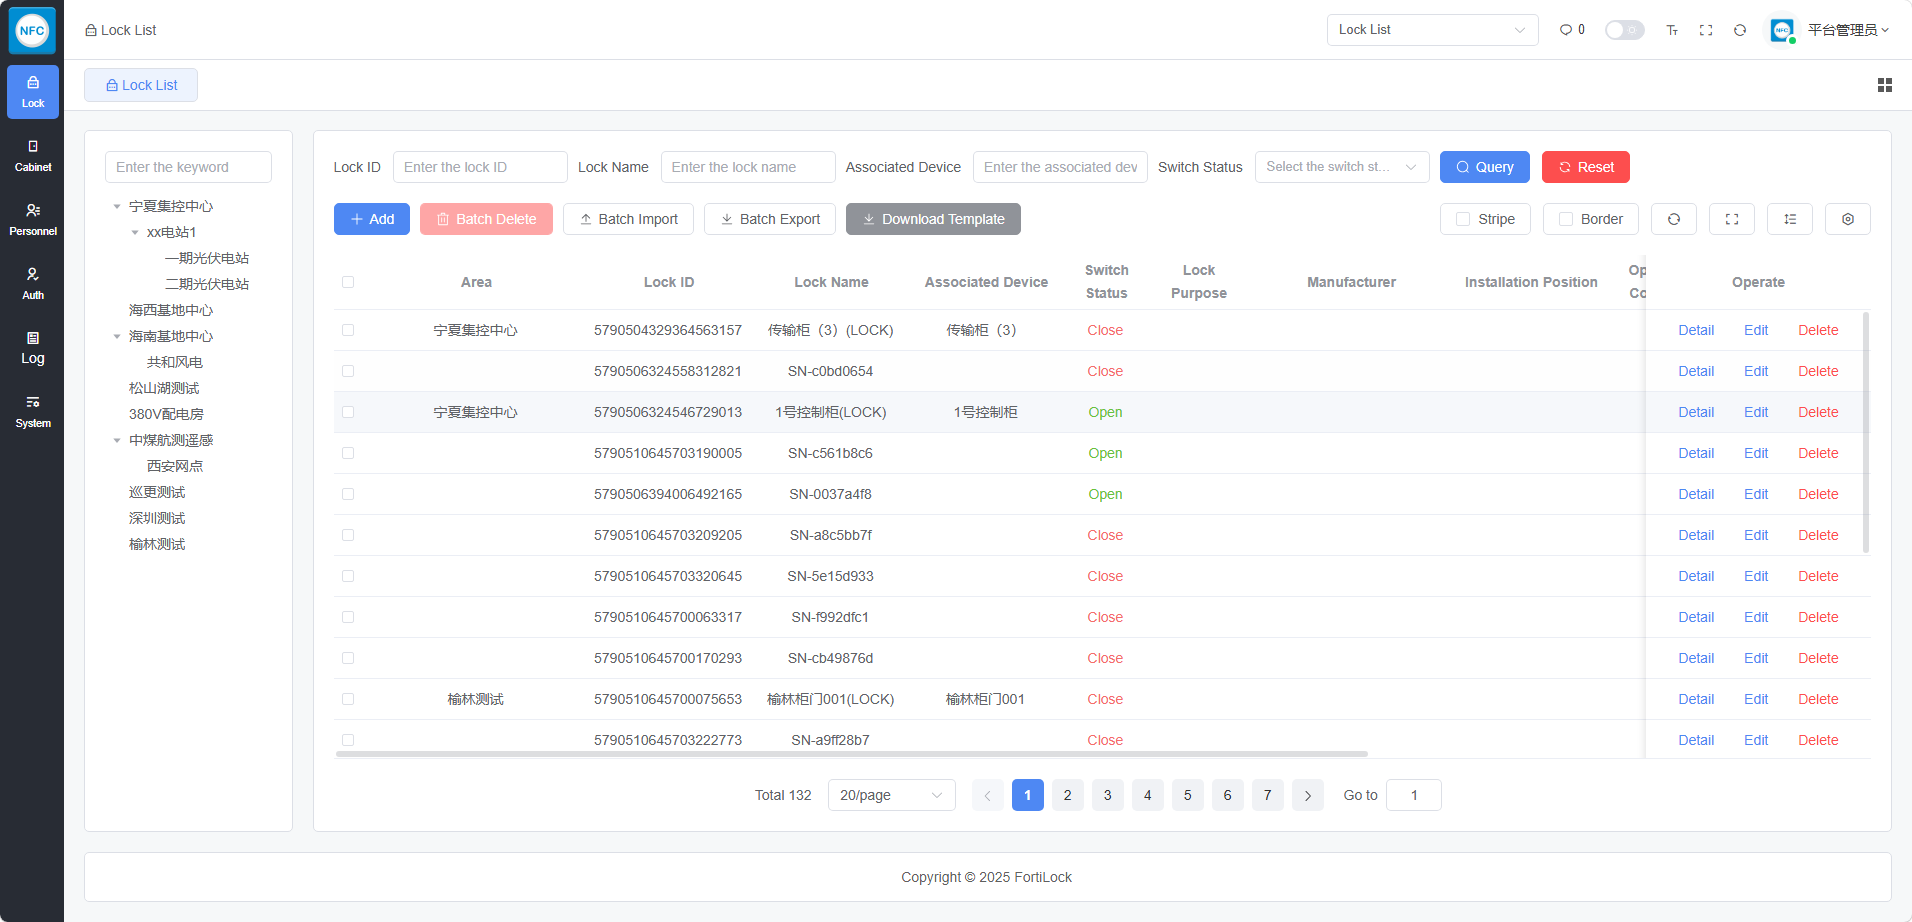
图 4-2:锁具管理主界面
功能列表 Feature List
设备列表 Device List
- 支持按名称、实体ID、状态筛选 Filter by name, entity ID, status
- 分页显示,可自定义每页数量 Pagination with customizable page size
- 查看设备详细信息 View device details
添加设备 Add Device
必填字段: Required fields:
- 必填 Required 设备名称 Device Name
- 必填 Required 实体ID(唯一标识) Entity ID (unique identifier)
- 必填 Required 所属区域 Region
选填字段: Optional fields:
- 选填 Optional 设备地址 Device Address
- 选填 Optional 经纬度 Longitude and Latitude
- 选填 Optional 备注 Remarks
批量导入 Batch Import
- 点击下载模板 Download template
- 按模板格式填写数据 Fill in data according to template format
- 上传 Excel 文件 Upload Excel file
- 查看导入结果 View import results
删除设备操作不可恢复,请谨慎操作!删除前请确认设备已不再使用。
Device deletion cannot be undone. Please operate with caution! Confirm that the device is no longer in use before deleting.
设备状态 Device Status
| 状态 Status | 说明 Description |
|---|---|
| 未配置 Not Configured | 设备尚未配置 Device has not been configured |
| 配置失效 Configuration Invalid | 设备配置已失效 Device configuration is invalid |
| 正常 Normal | 设备正常运行 Device is operating normally |
| 故障 Fault | 设备存在故障 Device has a fault |
5.3 柜体管理 5.3 Cabinet Management
管理设备柜体信息,包括柜体的添加、编辑和绑定设备。
Manage device cabinet information, including adding, editing cabinets and binding devices.
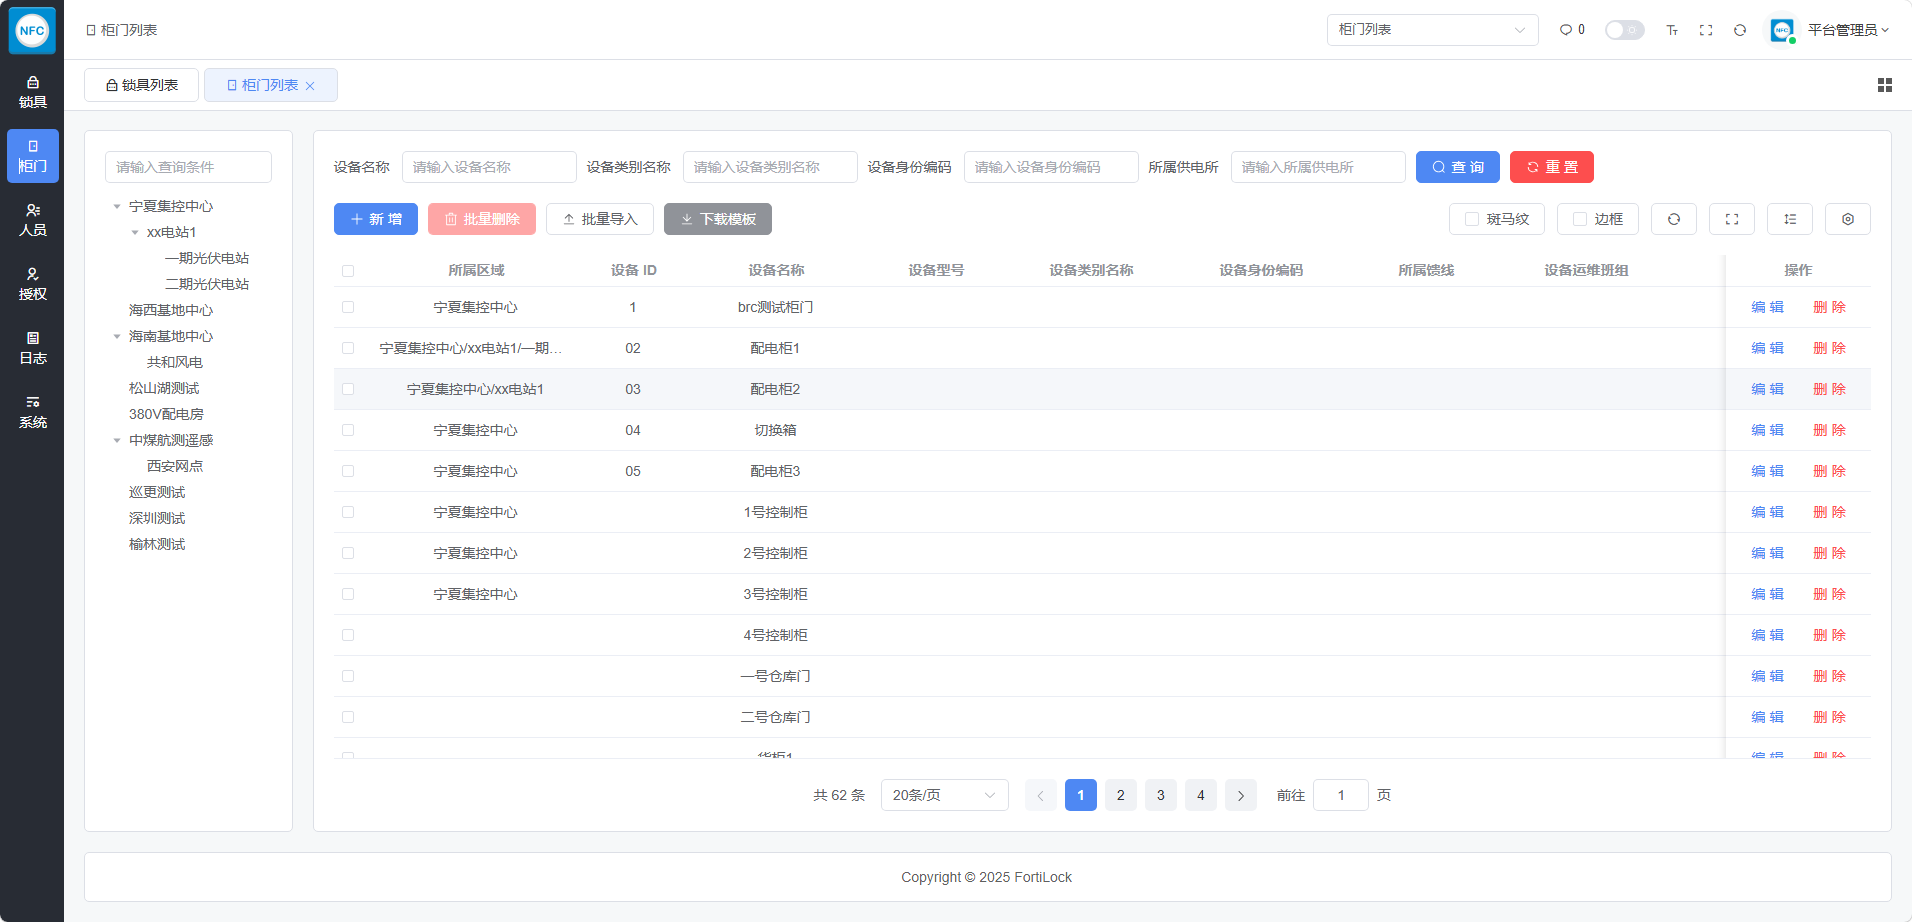
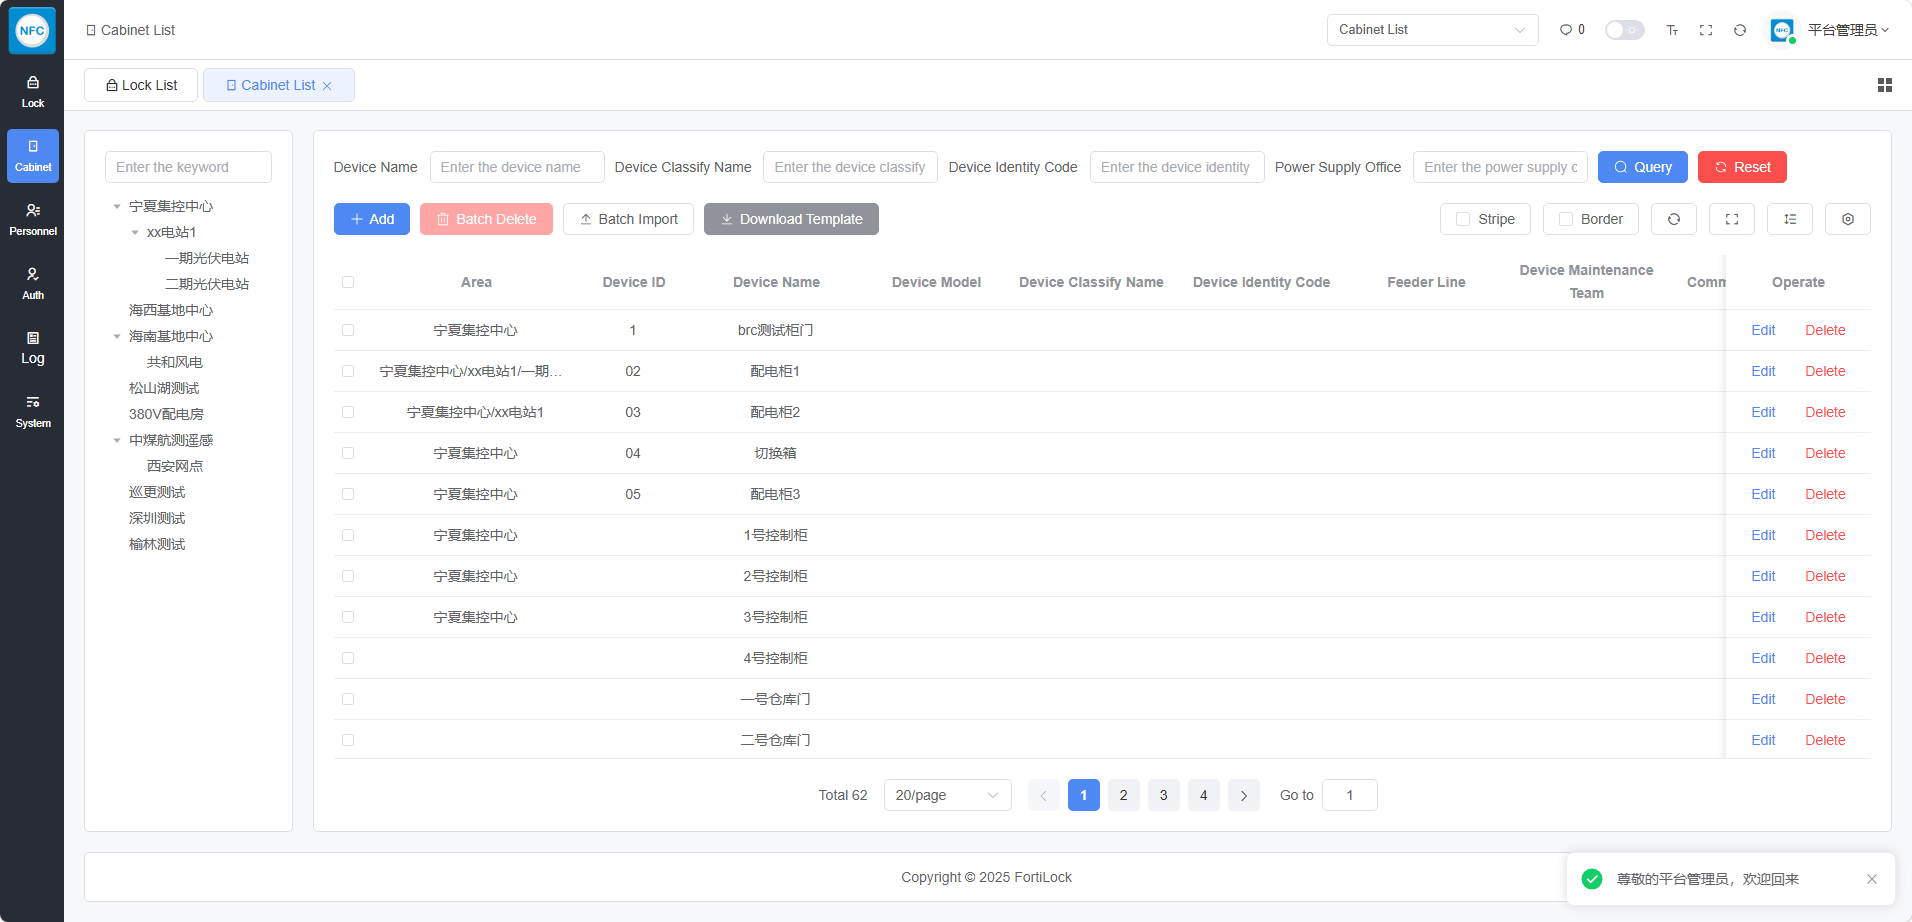
图 4-3:柜体管理界面
主要功能 Main Features
- 新增柜体: Add Cabinet: 填写柜体名称、编码、型号等信息 Fill in cabinet name, code, model and other information
- 绑定设备: Bind Device: 将锁具与柜体建立关联 Associate locks with cabinets
- 上传照片: Upload Photos: 记录柜体现场安装情况 Record cabinet installation status on site
- 编辑信息: Edit Information: 修改柜体属性和状态 Modify cabinet properties and status
安装完成后及时上传柜体照片,便于后期维护和巡检参考。
Upload cabinet photos promptly after installation for future maintenance and inspection reference.
5.4 授权管理 5.4 Authorization Management
管理人员对设备的访问权限,支持单个和批量操作。
Manage user access permissions to devices, supporting single and batch operations.
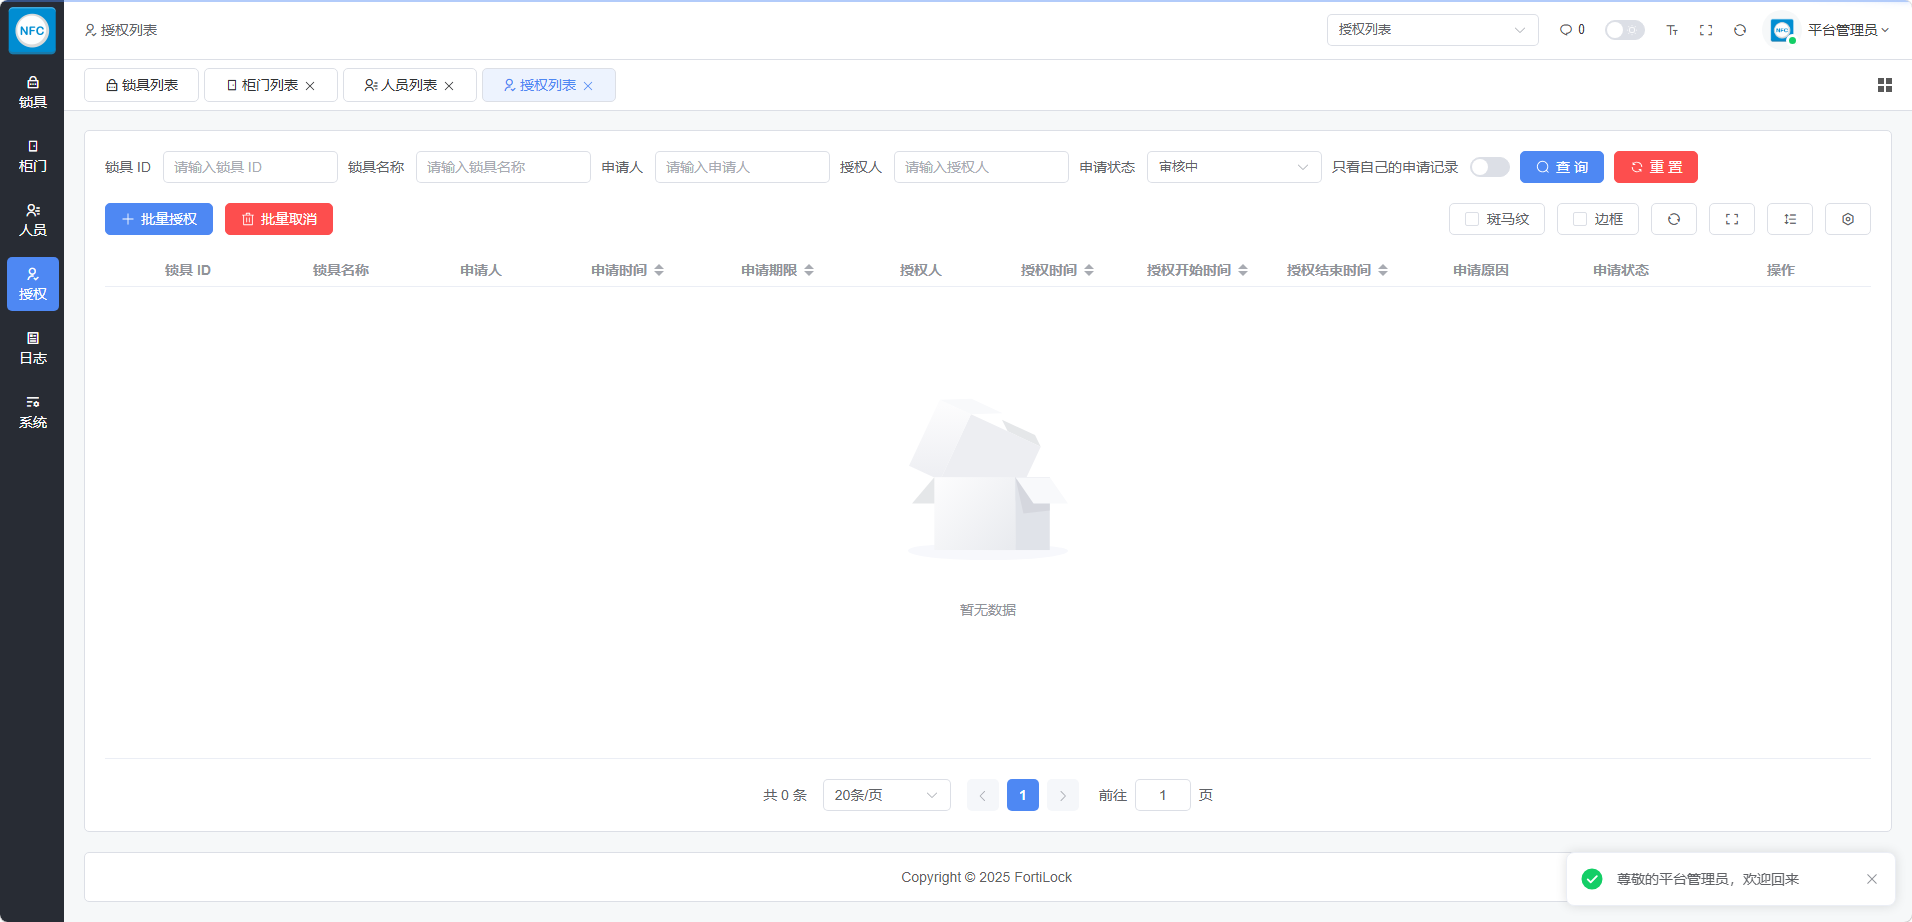
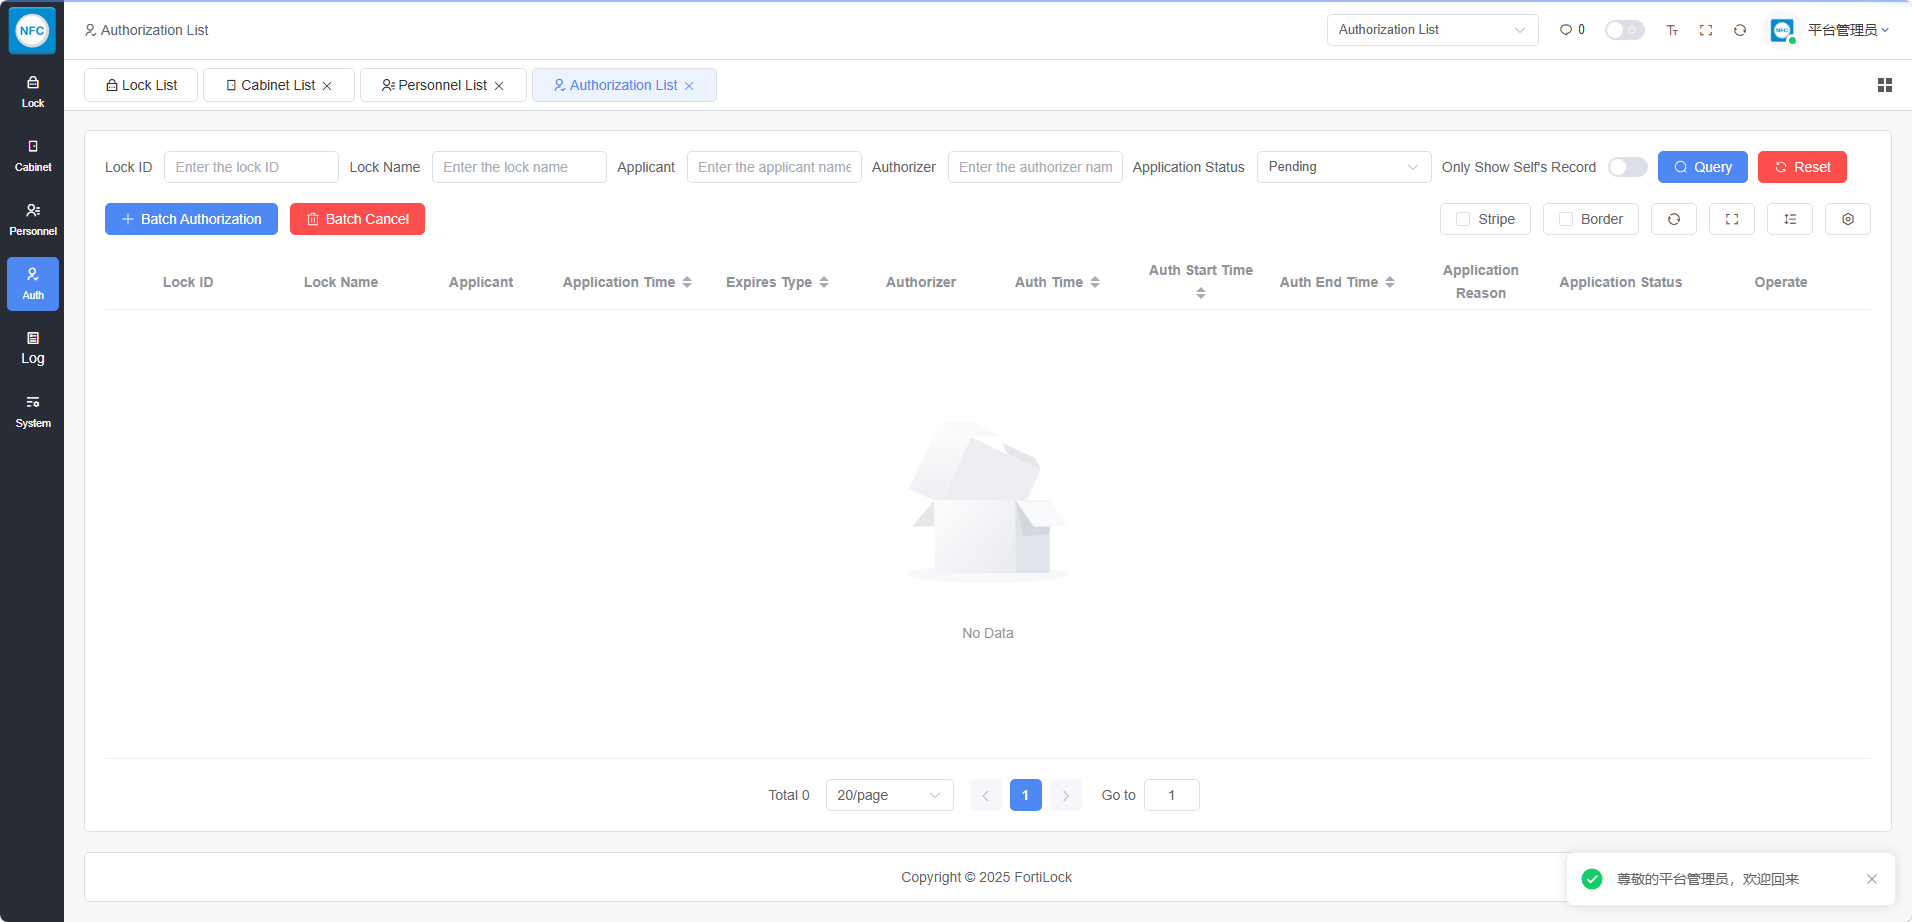
图 4-4:授权管理主界面
单个授权 Single Authorization
- 点击“新增授权” Click "Add Authorization"
- 选择用户和设备 Select user and device
- 设置授权类型(默认 7 天) Set authorization type (default: 7 days)
- 设置生效时间(可选) Set effective time (optional)
- 提交申请 Submit application
批量授权 Batch Authorization
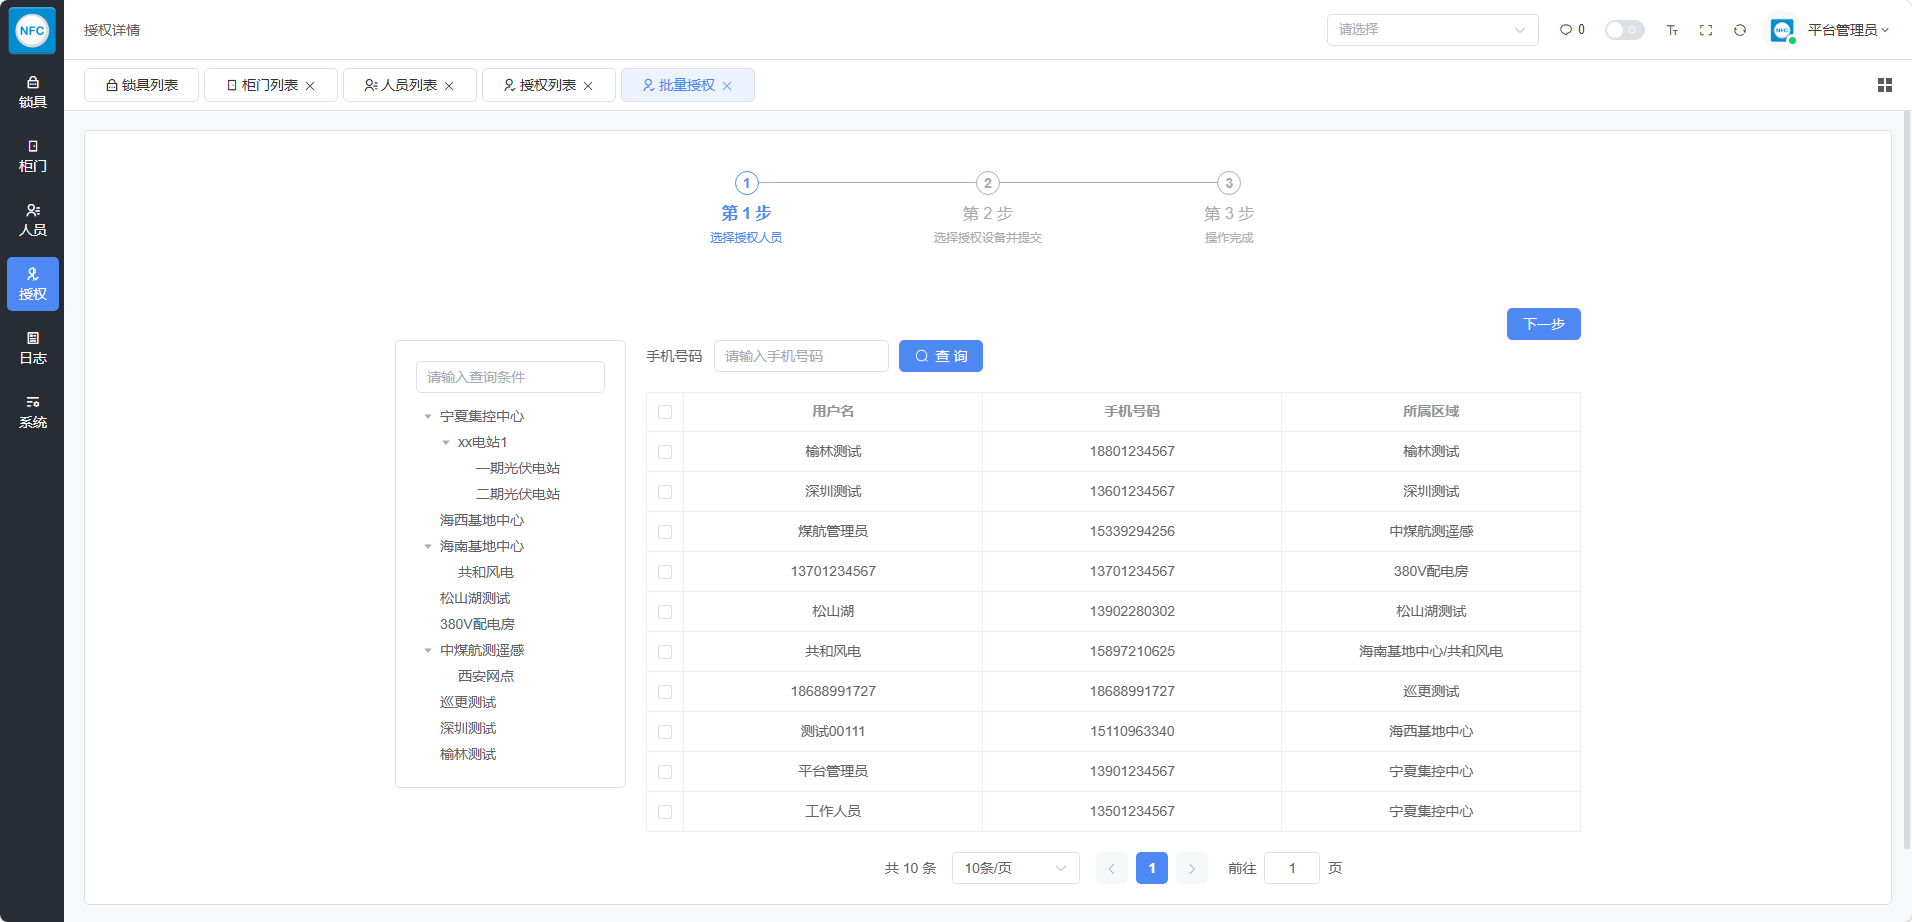
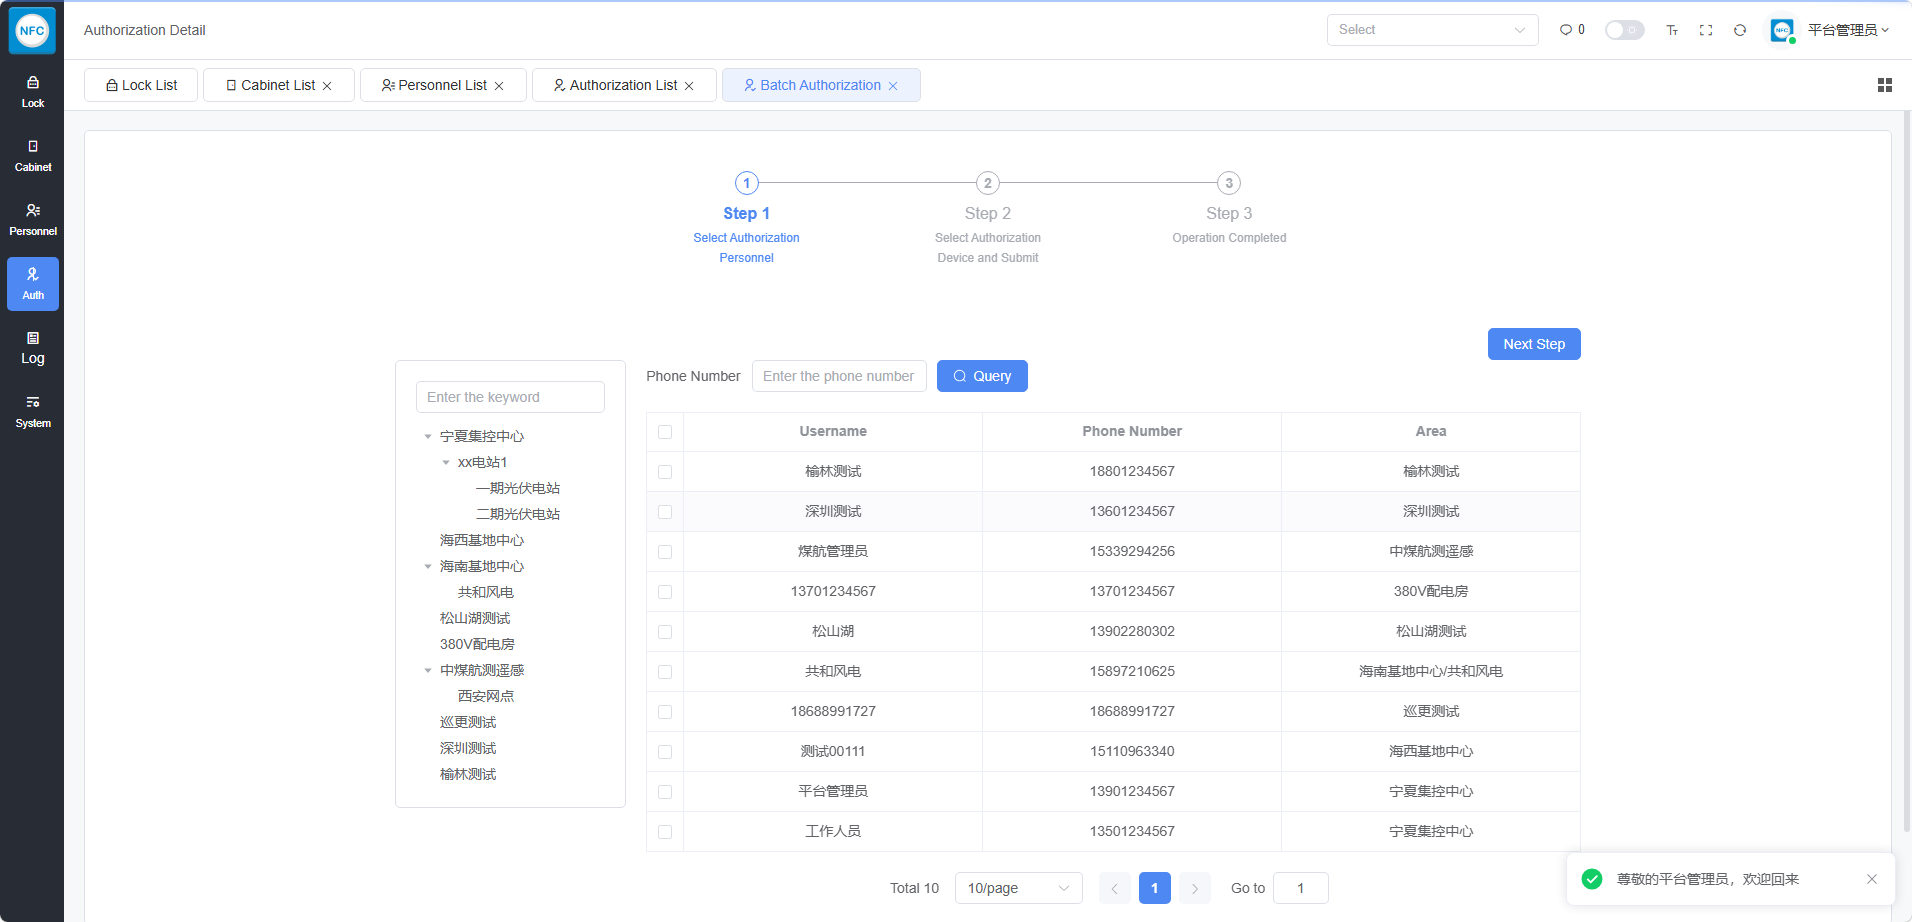
图 4-5:批量授权操作
批量授权适用于以下场景: Batch authorization is suitable for the following scenarios:
- 新员工入职,需要开通多个设备权限 New employee onboarding, need to enable multiple device permissions
- 团队项目启动,多人需要访问相同设备 Team project launch, multiple people need to access the same devices
- 临时任务,需要快速分配权限 Temporary tasks, need to quickly assign permissions
批量取消 Batch Cancellation
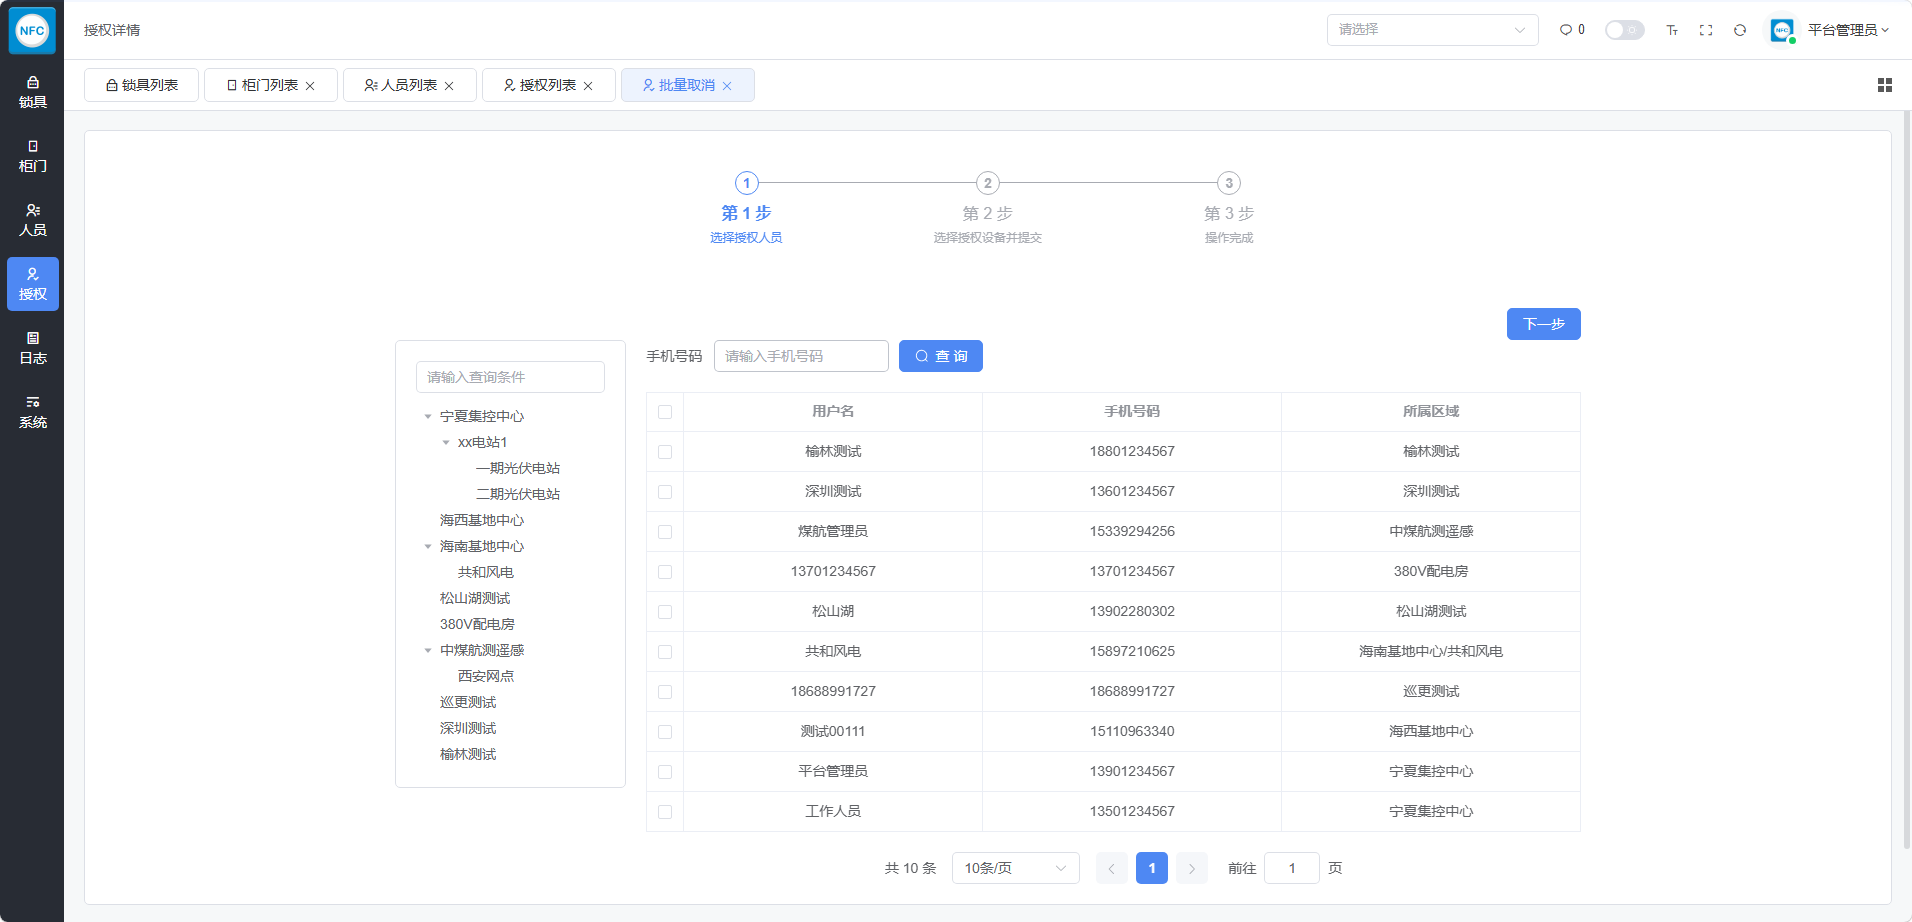
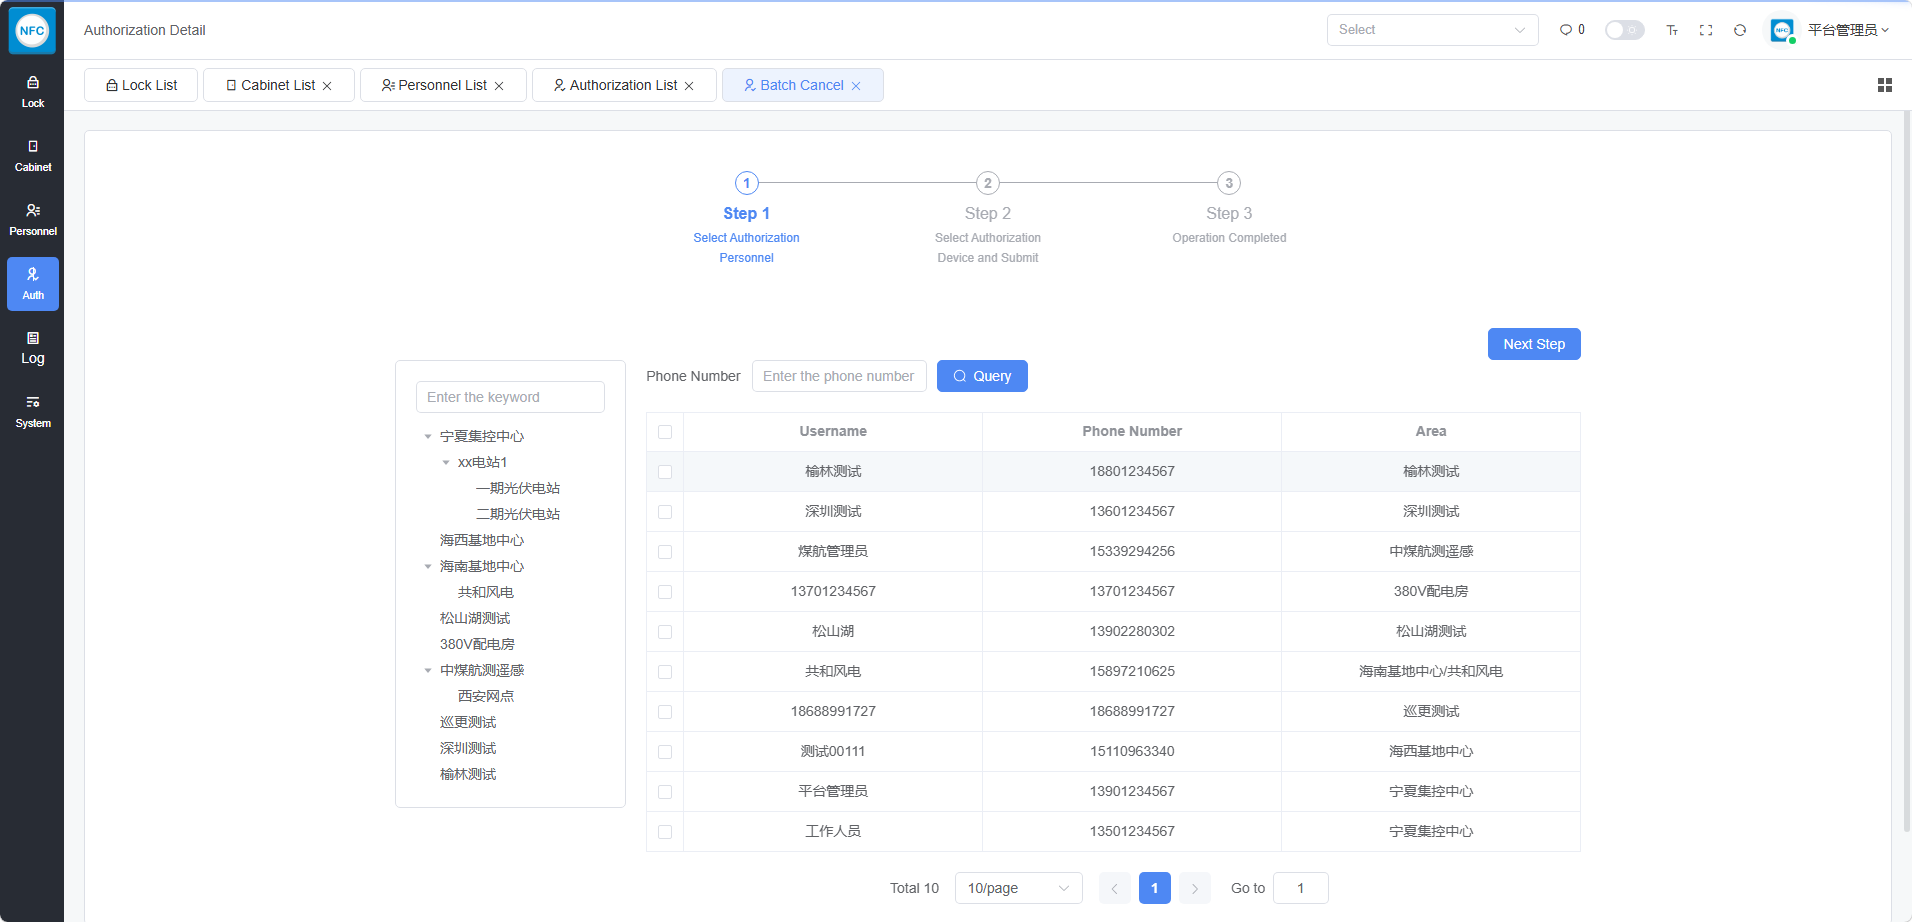
图 4-6:批量取消授权
取消授权后,用户将无法访问相关设备。如设备正在使用中,请提前通知用户。
After canceling authorization, users will not be able to access related devices. If the device is in use, please notify users in advance.
5.5 记录查询 5.5 Records Query
开锁记录 Unlock Records
查看所有设备的开锁操作记录。
View unlock operation records for all devices.
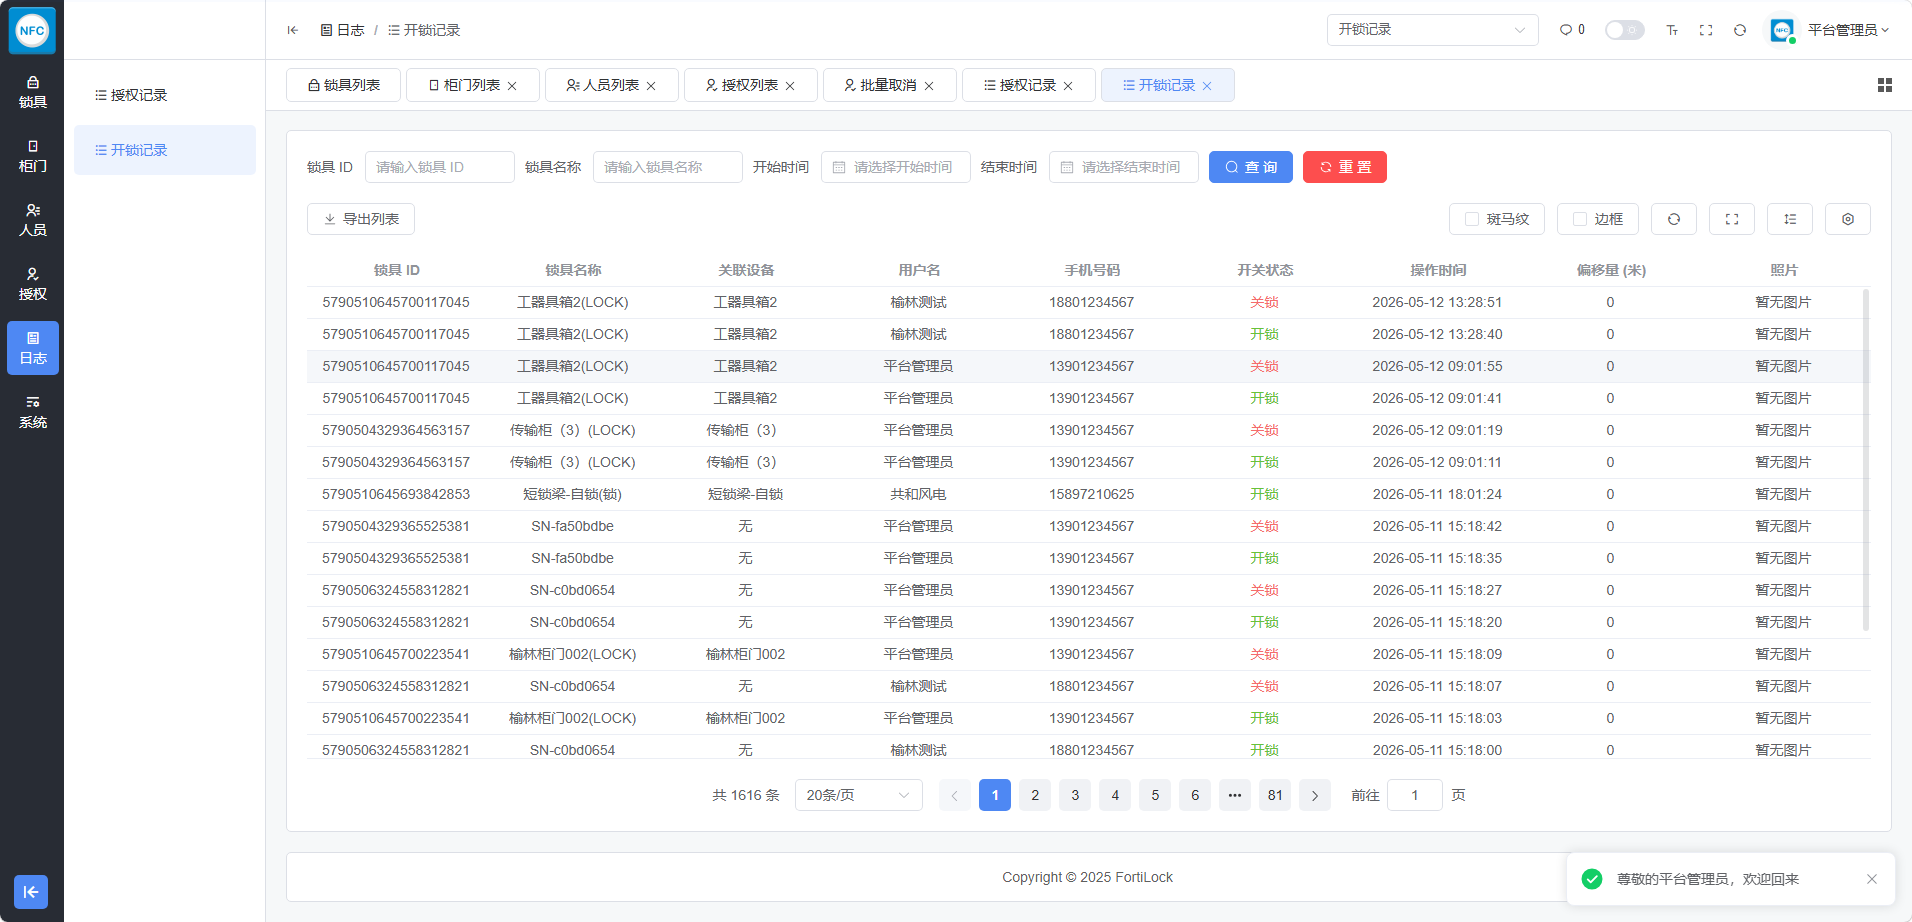
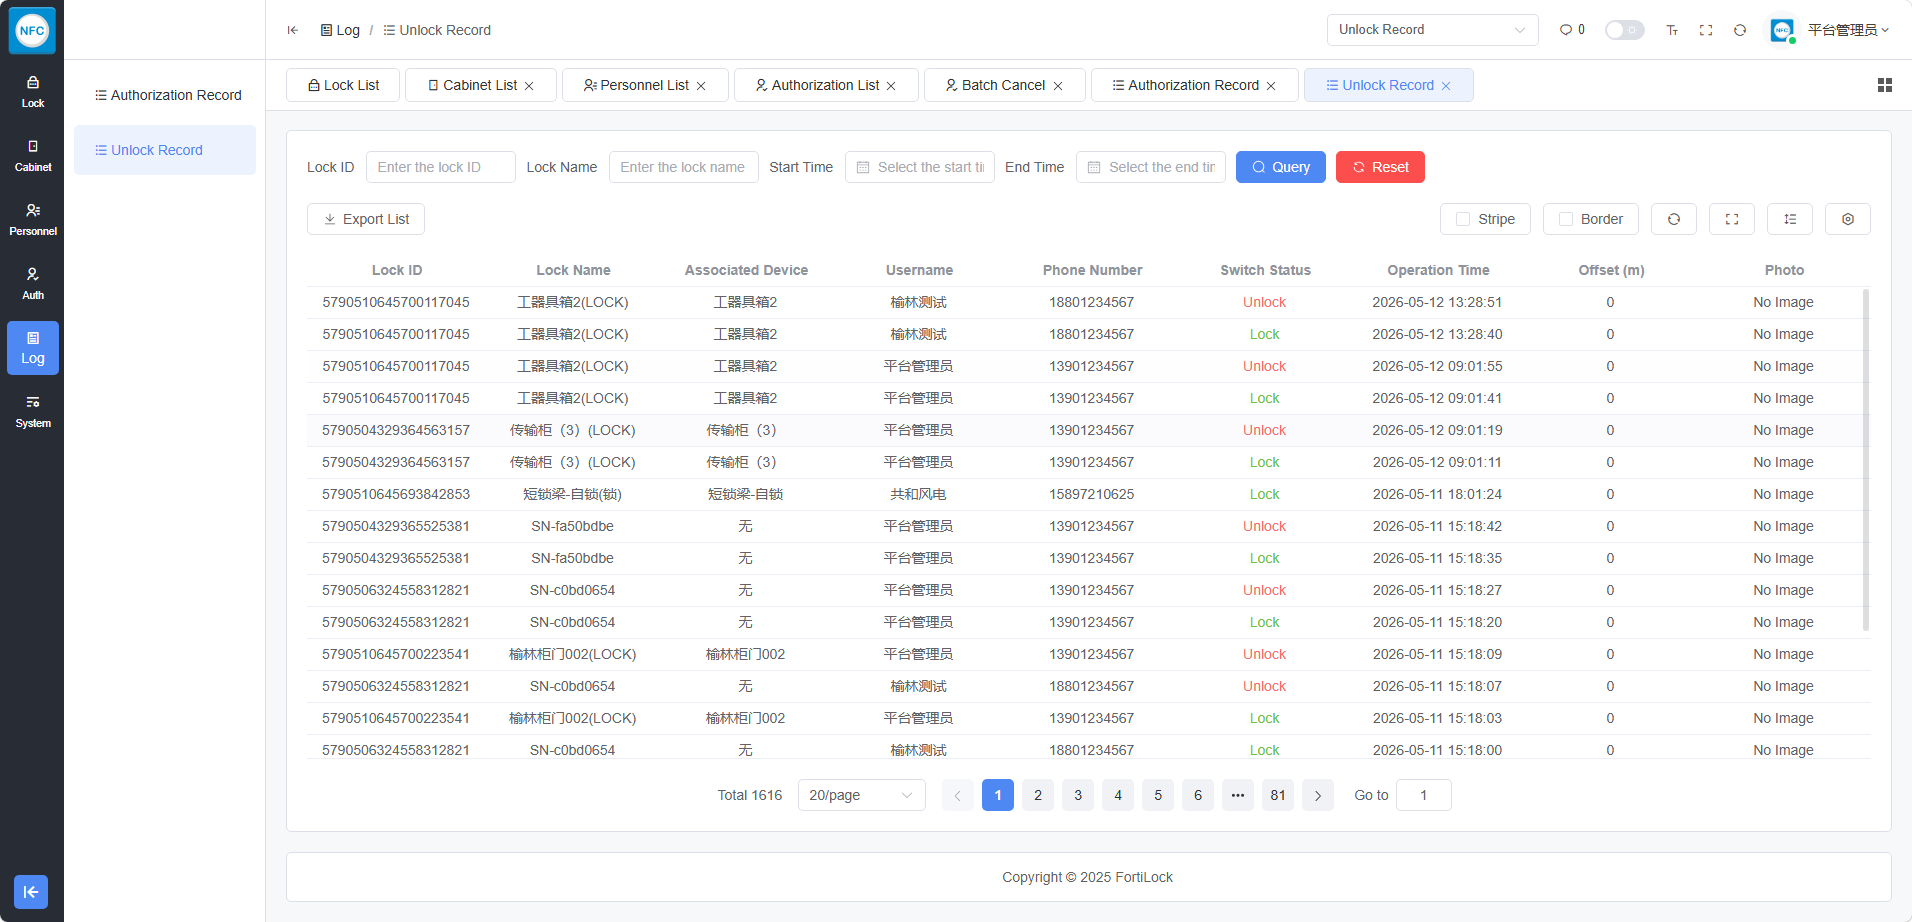
图 4-7:开锁记录查询
查询条件
- 时间范围筛选
- 指定设备
- 指定操作人员
- 开锁方式(APP/卡片/密码)
授权记录 Authorization Records
查看所有的授权操作历史。
View all authorization operation history.
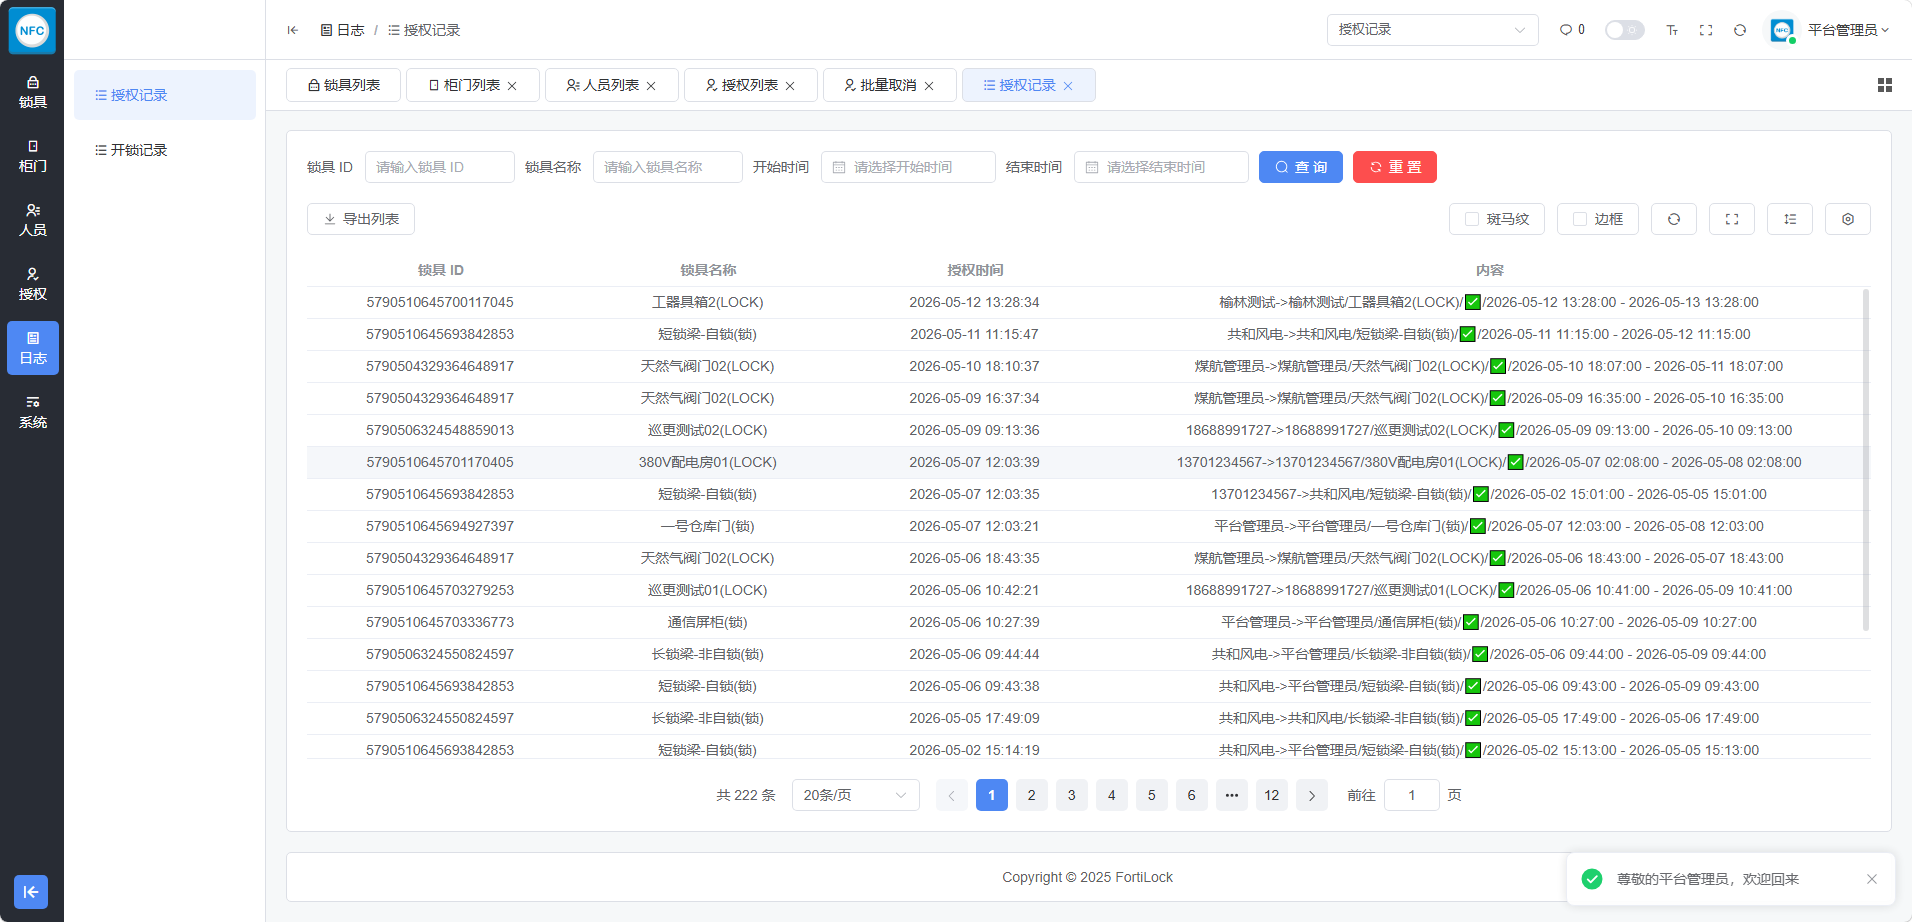
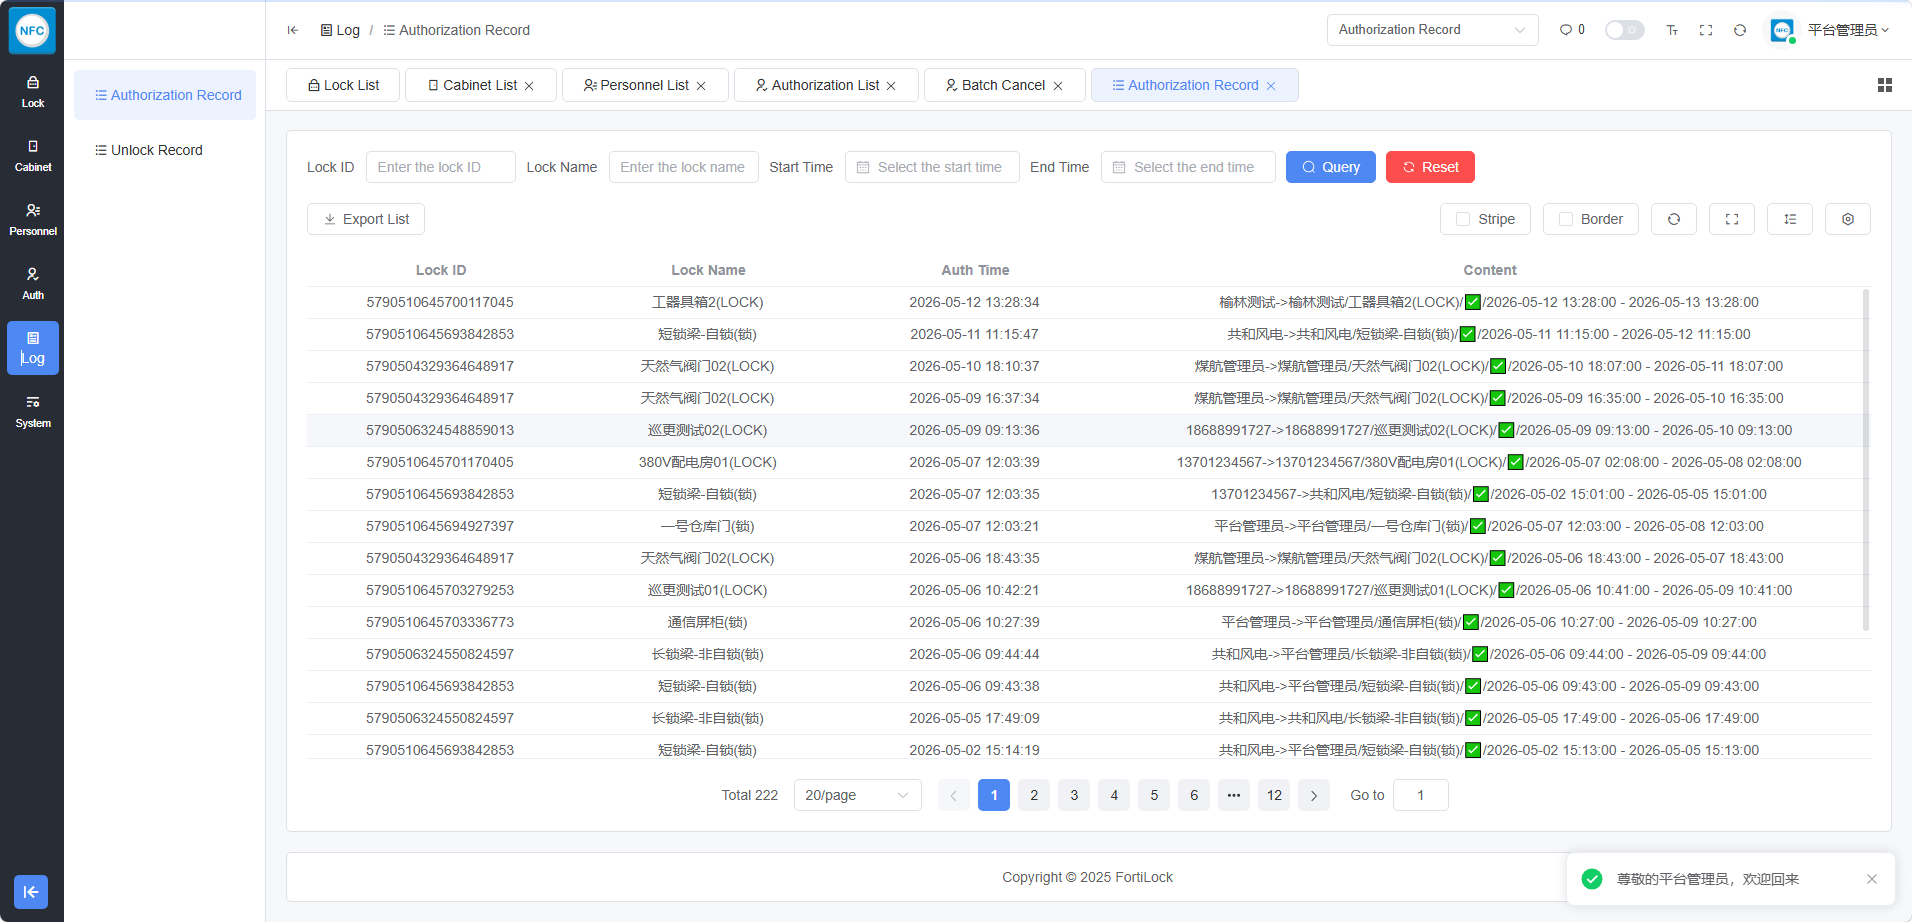
图 4-8:授权记录查询
记录类型
- 新增授权
- 取消授权
- 授权过期
- 授权修改
支持将查询结果导出为 CSV 文件,便于数据分析和归档。
Support exporting query results to CSV files for data analysis and archiving.
5.6 人员管理 5.6 User Management
管理系统用户账号和权限分配。
Manage system user accounts and permission assignments.
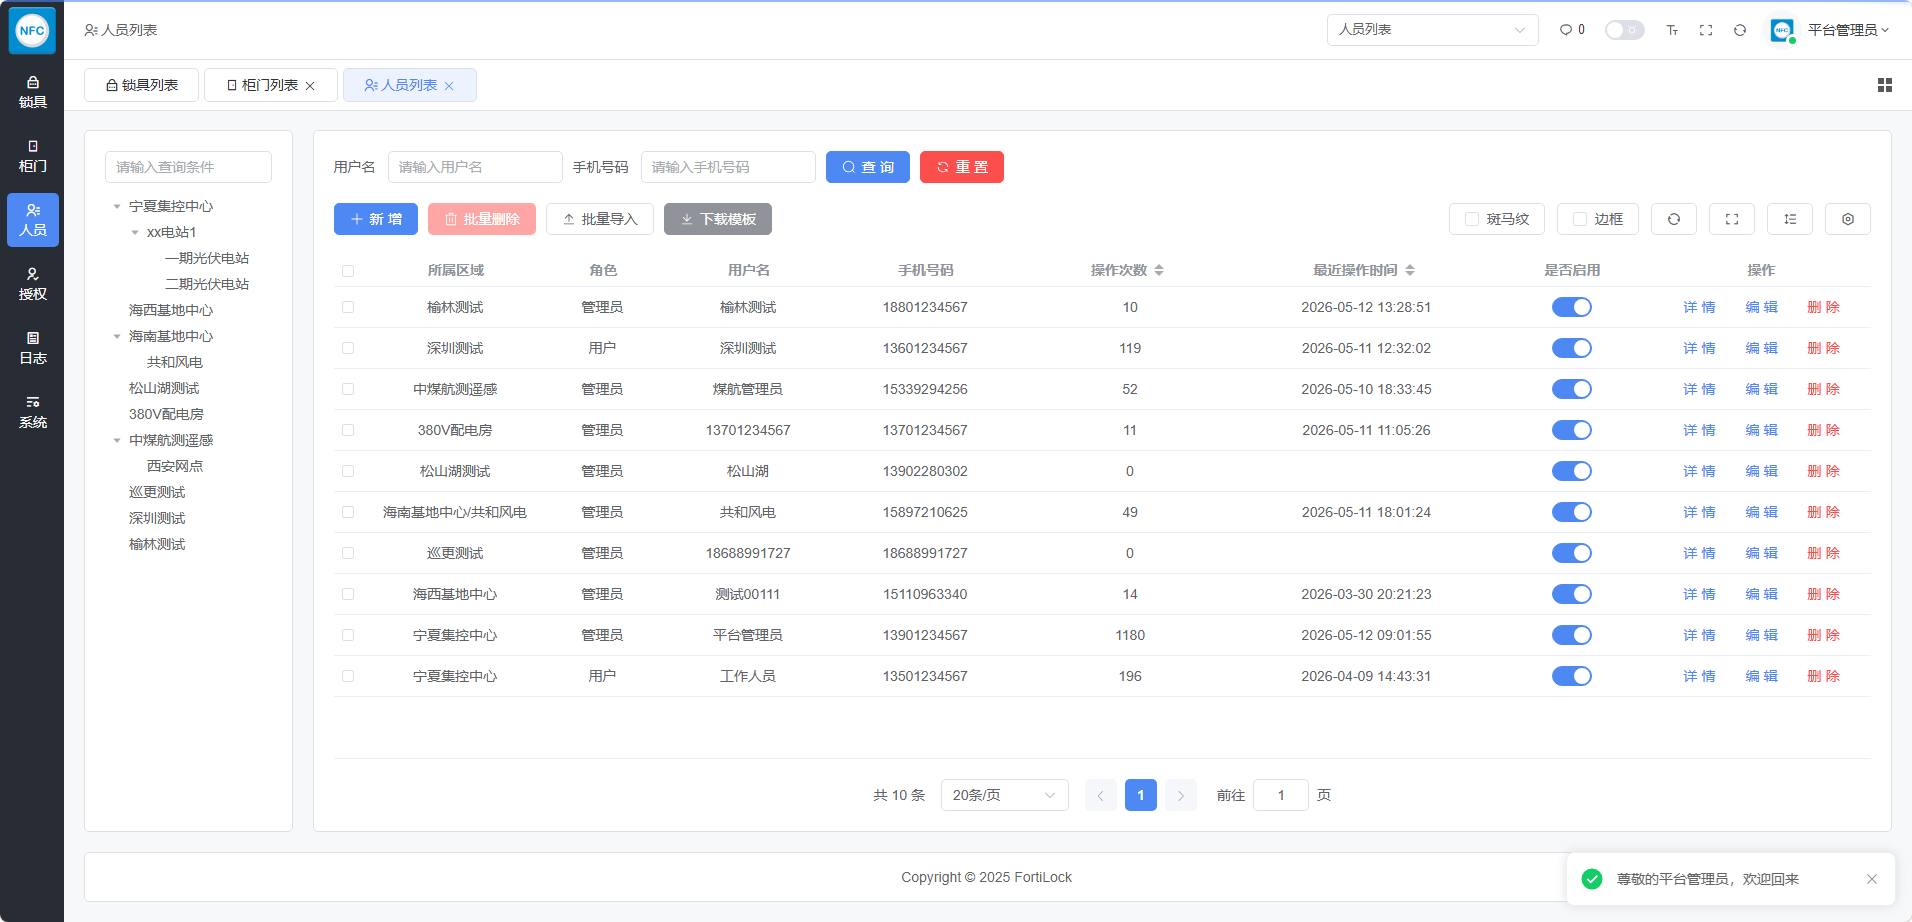
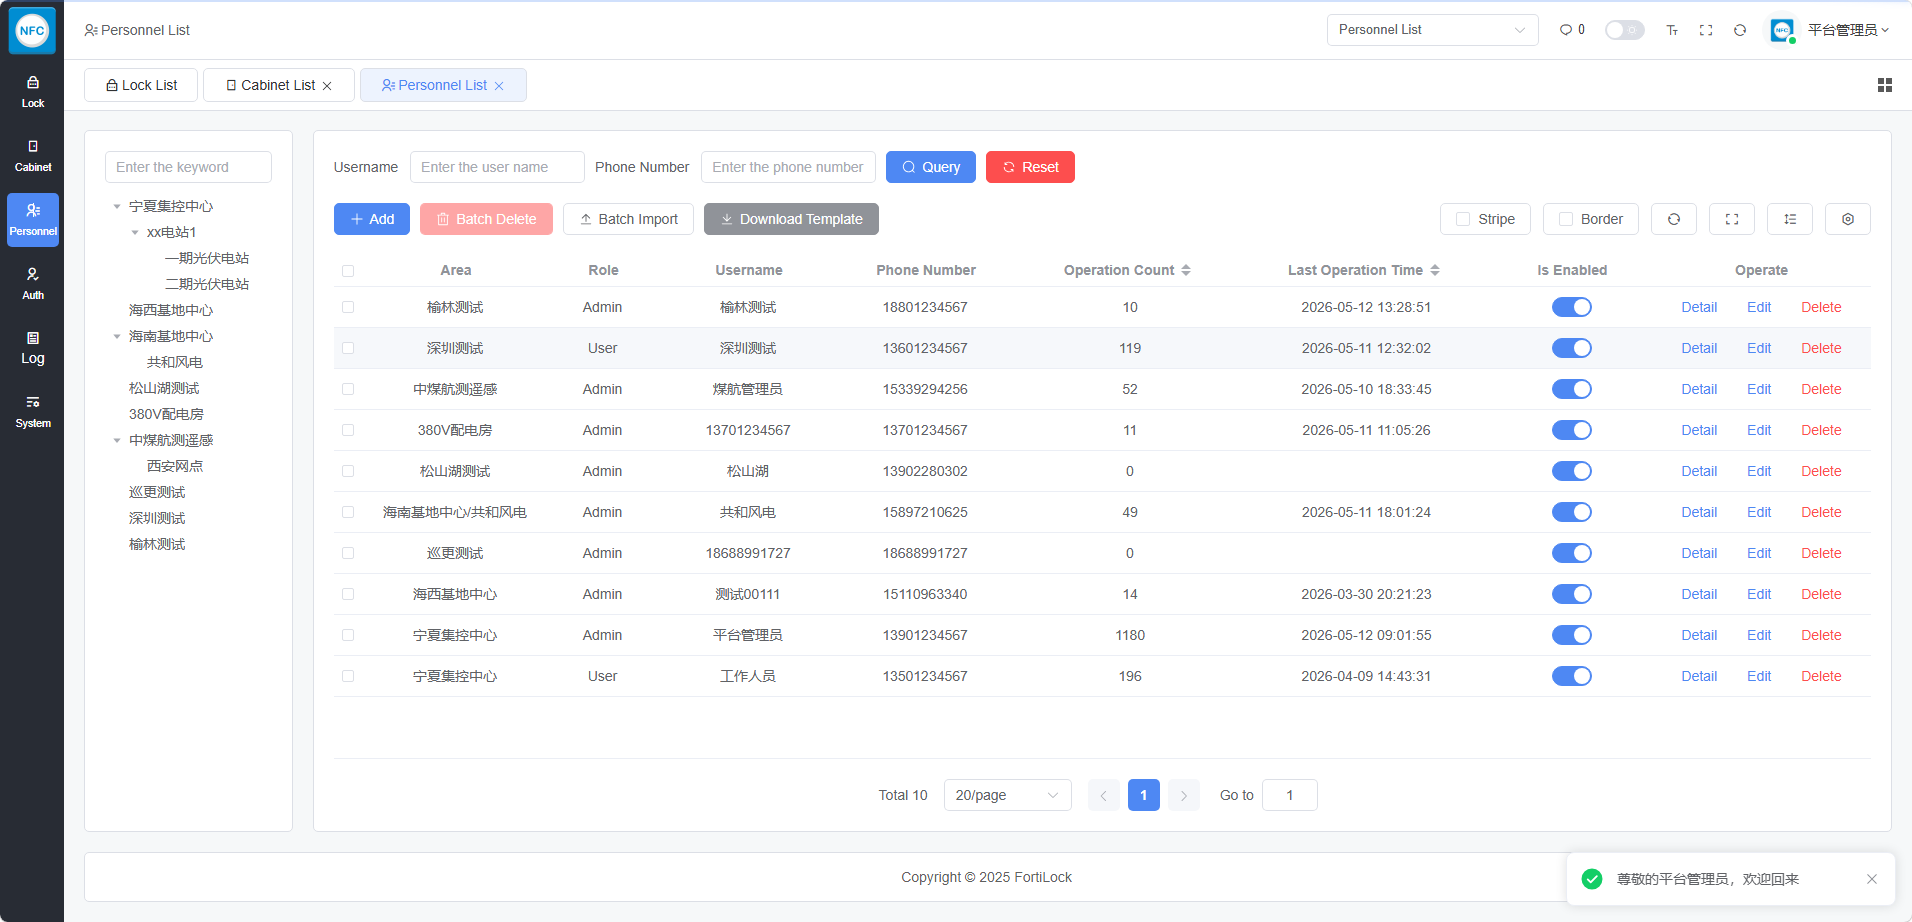
图 4-9:人员管理界面
用户操作 User Operations
- 添加用户: Add User: 创建新用户账号 Create new user account
- 编辑用户: Edit User: 修改用户信息和权限 Modify user information and permissions
- 启用/禁用: Enable/Disable: 控制用户登录权限 Control user login permissions
- 批量导入: Batch Import: Excel 批量创建用户 Excel batch create users
- 批量导出: Batch Export: 导出用户列表 Export user list
系统会自动生成初始密码(默认为手机号后六位),用户首次登录后需修改密码。
The system will automatically generate an initial password (default is the last six digits of the phone number). Users must change the password after first login.
角色权限 Role Permissions
| 角色 Role | 权限说明 Permission Description |
|---|---|
| 管理员 Administrator | 拥有所有权限 Has all permissions |
| 普通用户 Ordinary User | 仅可查看已授权设备和开锁 Can only view authorized devices and unlock |
5.7 系统设置 5.7 System Settings
区域管理 Region Management
管理设备的区域分类,支持树形结构。
Manage device region classification, supporting tree structure.
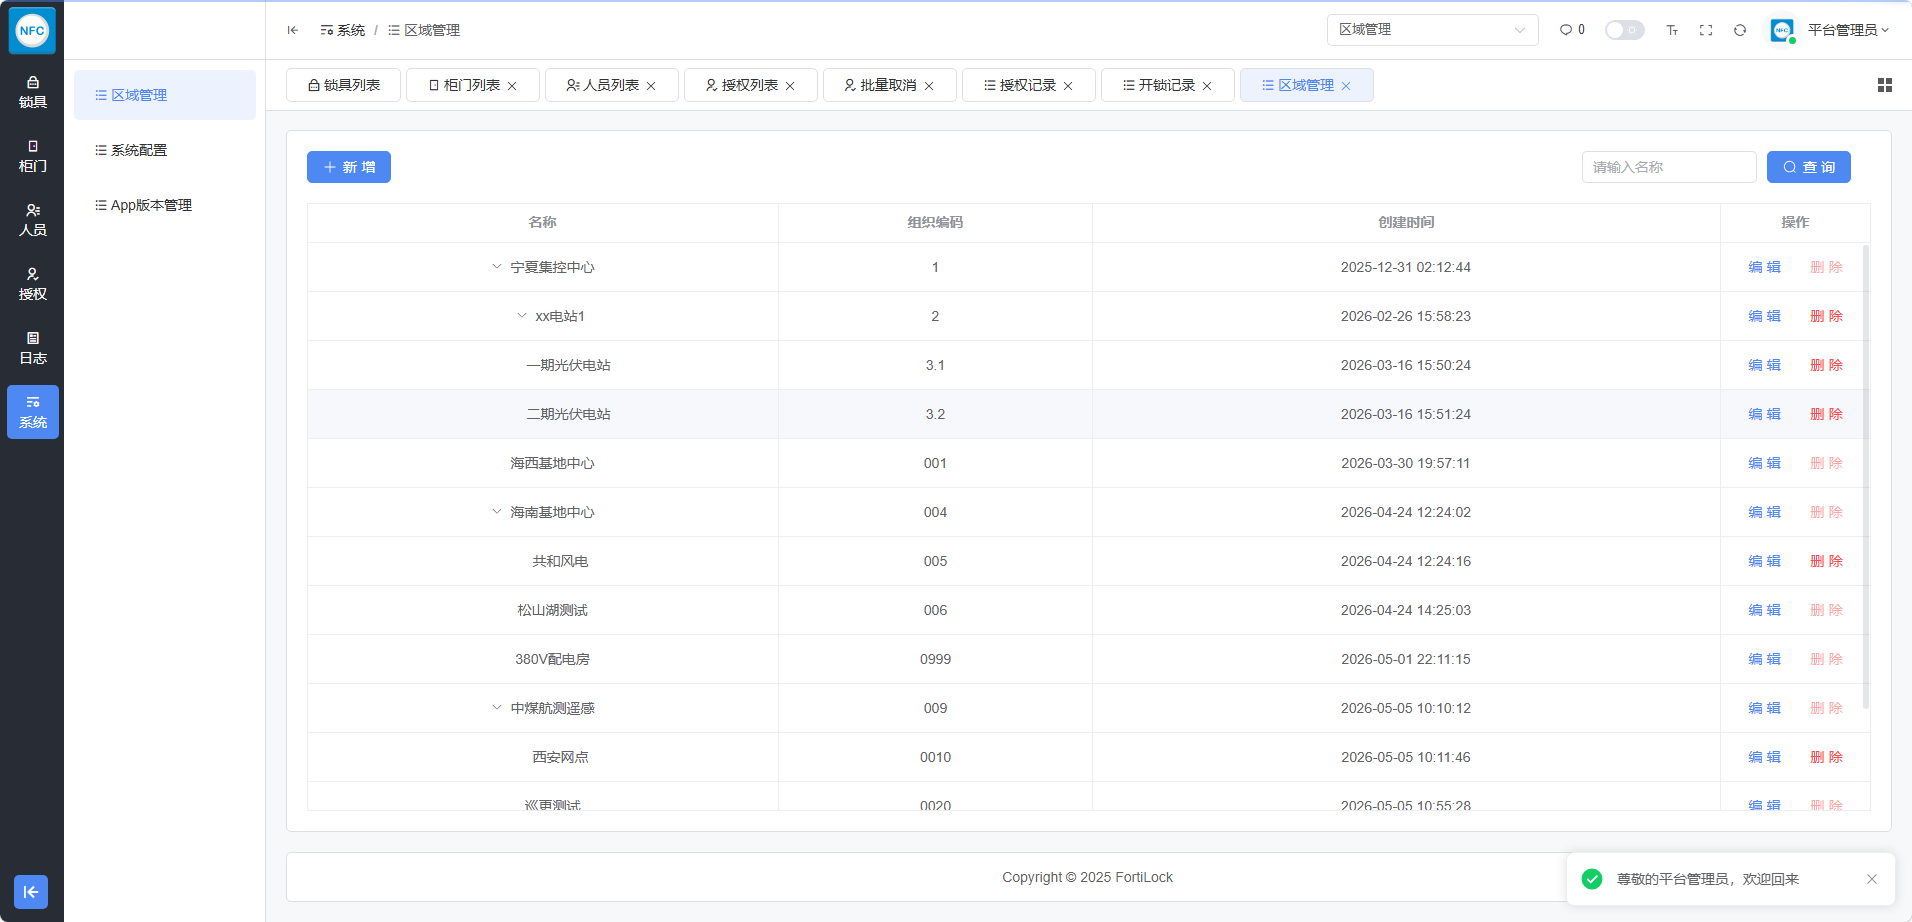
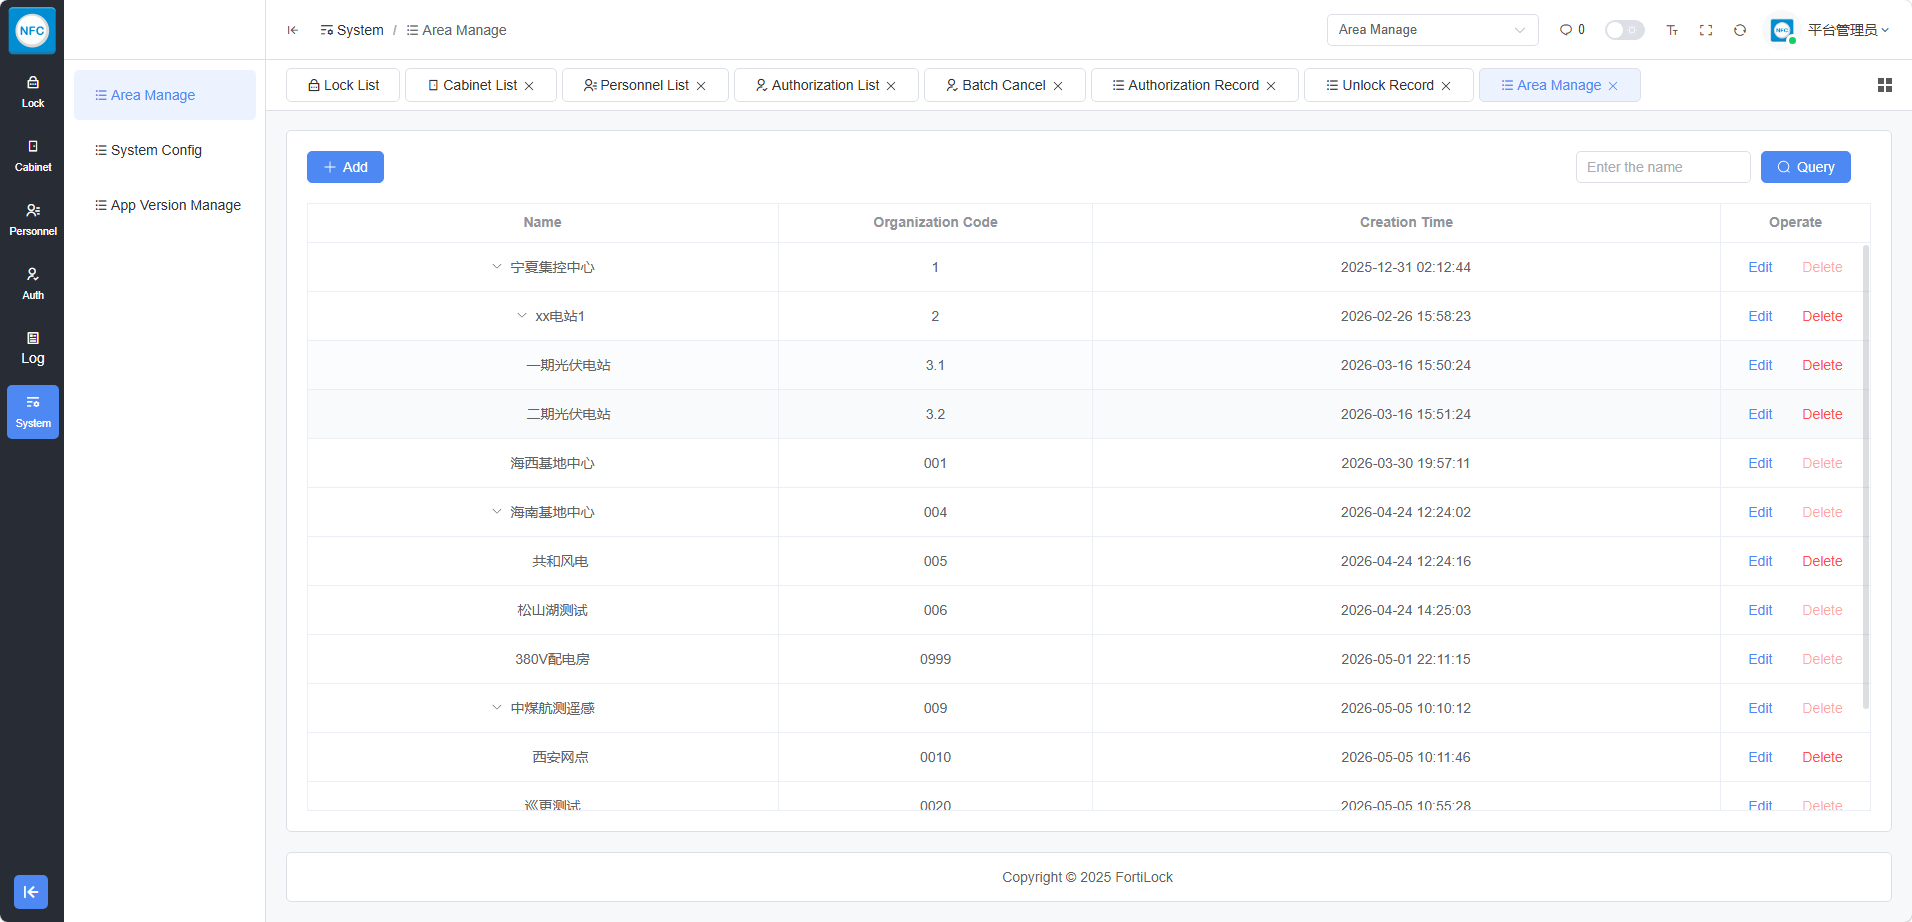
图 4-10:区域管理
APP版本管理 APP Version Management
管理移动端APP版本和更新策略。
Manage mobile APP versions and update strategies.
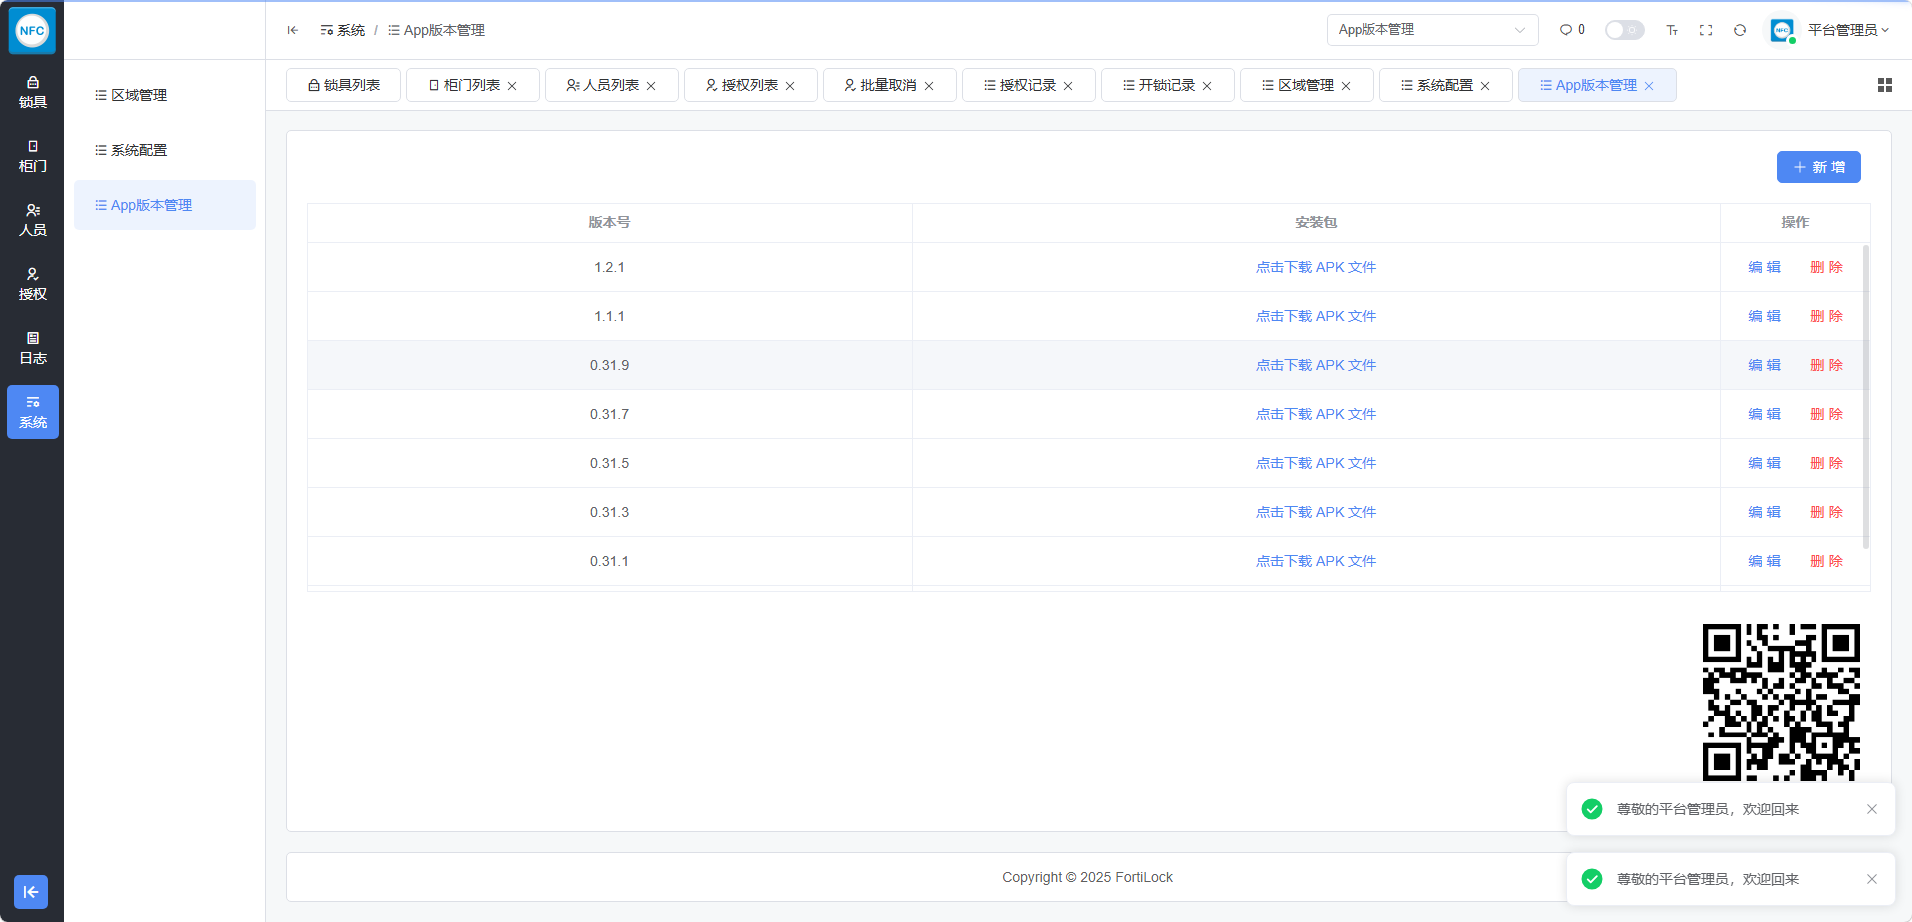
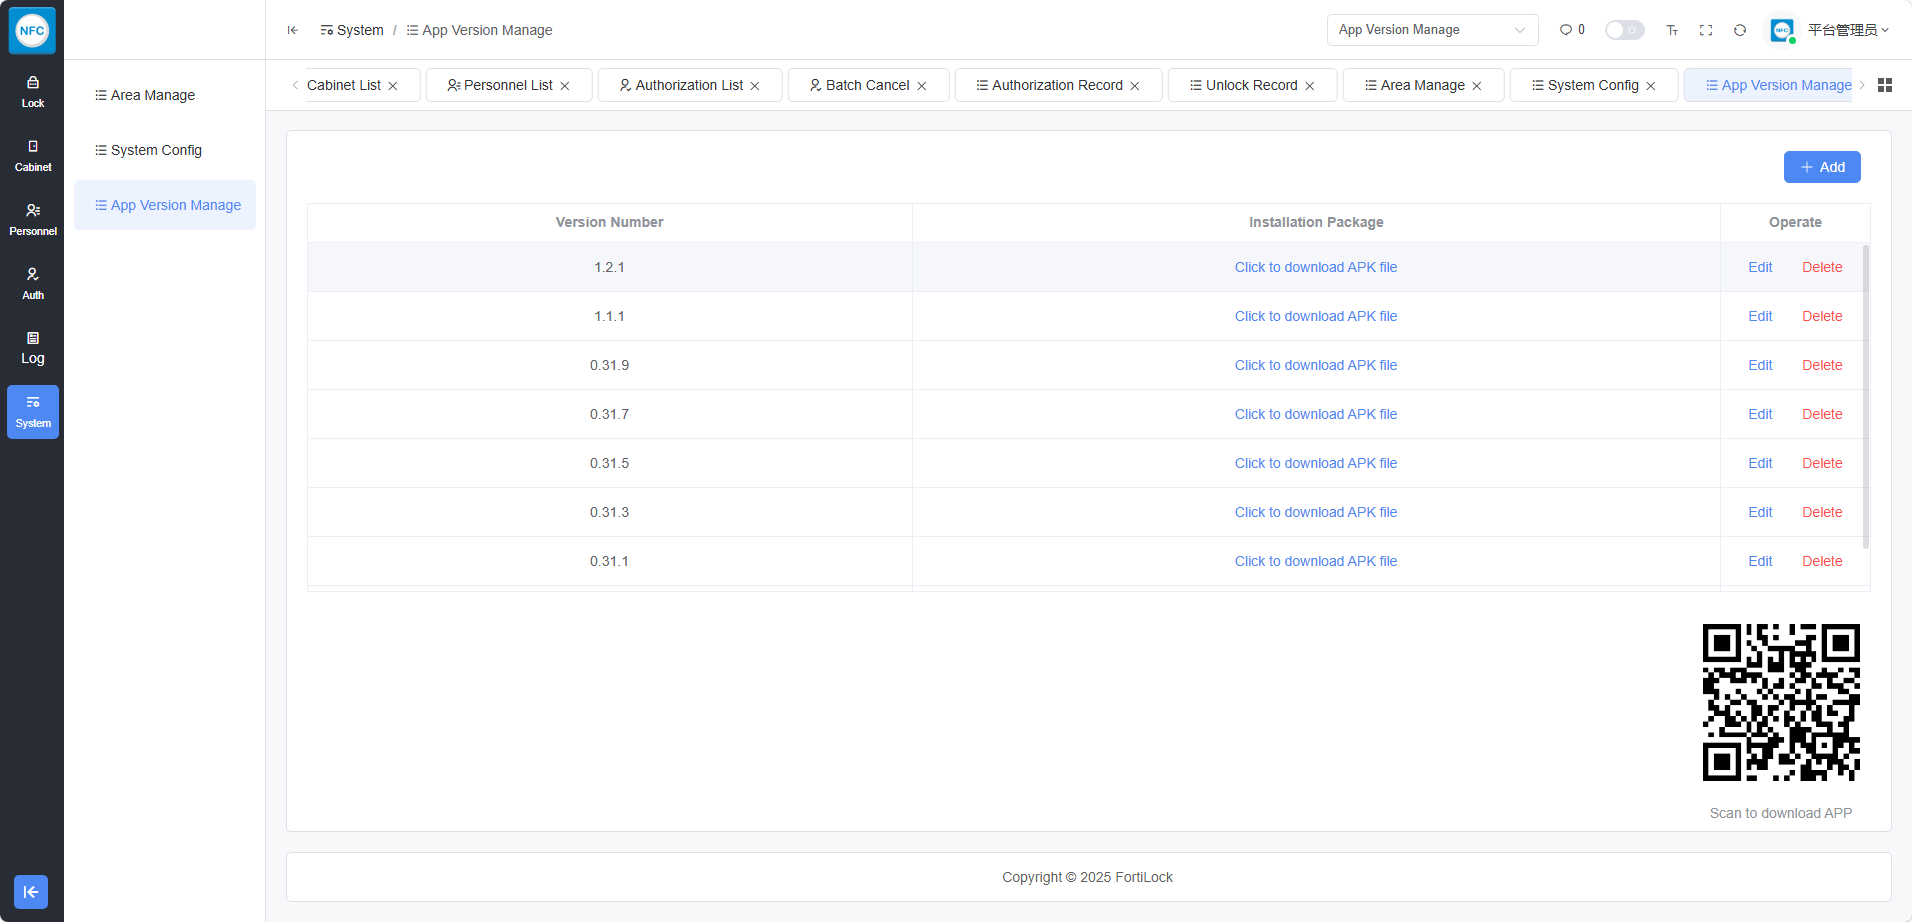
图 4-11:APP版本管理
系统配置 System Configuration
配置系统运行参数。
Configure system runtime parameters.
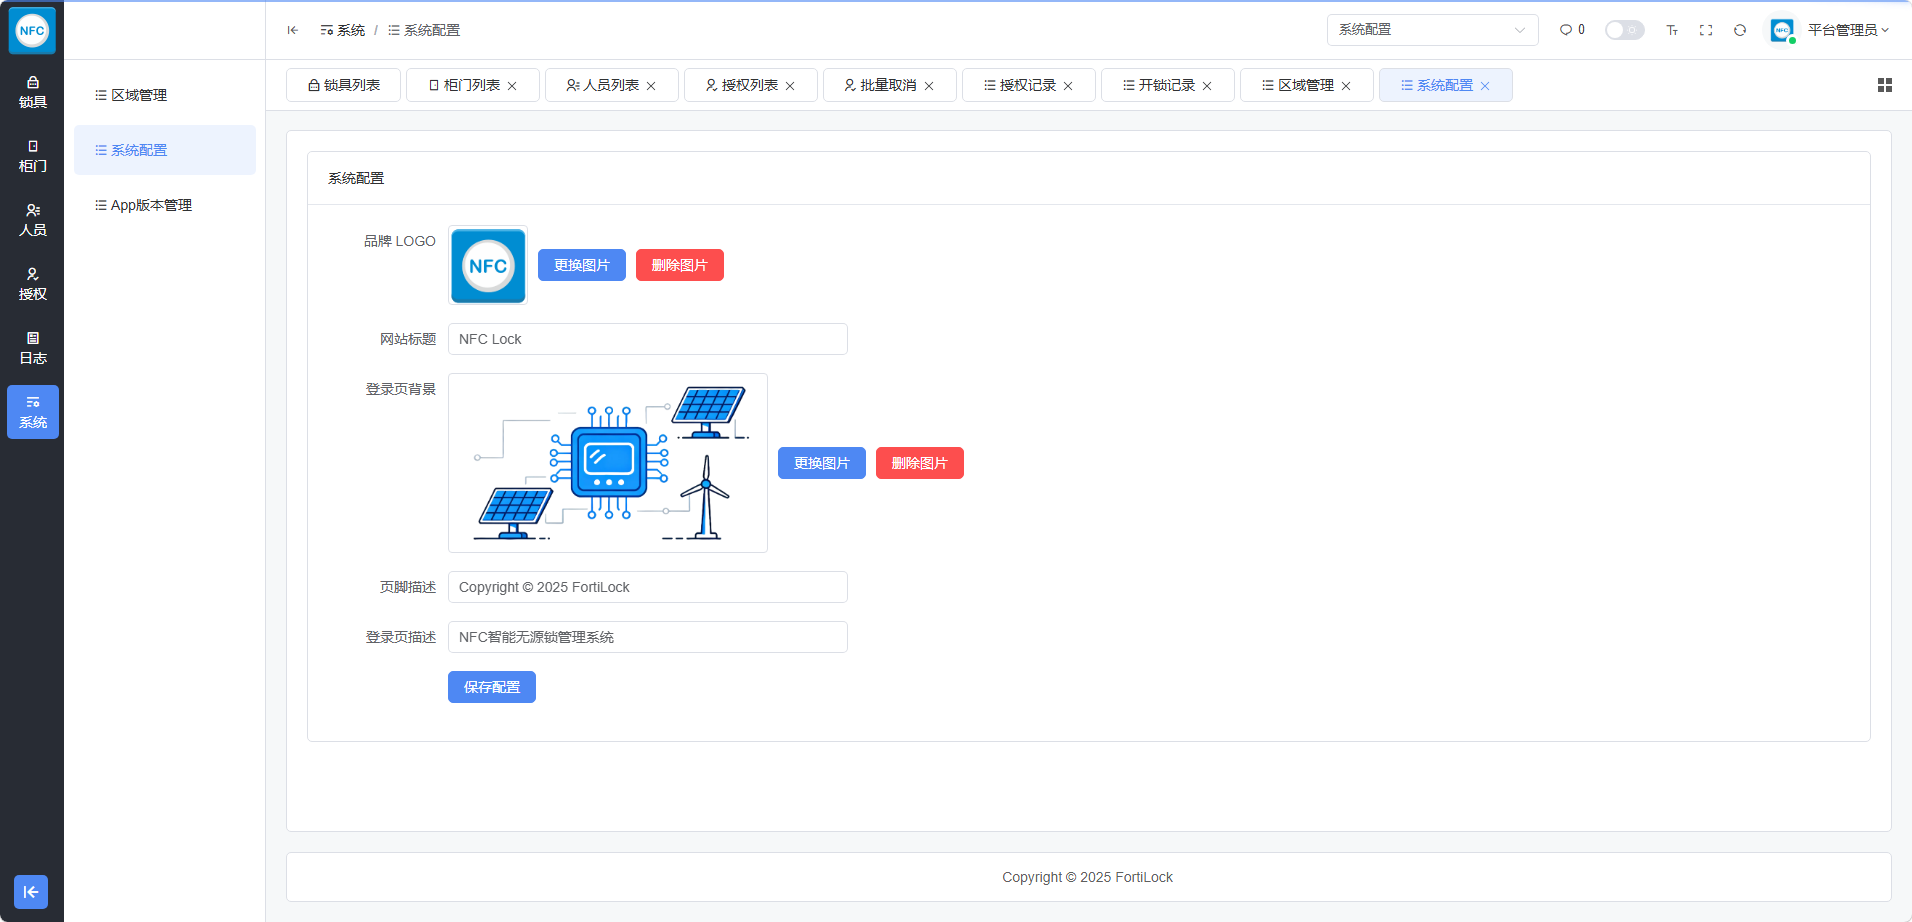
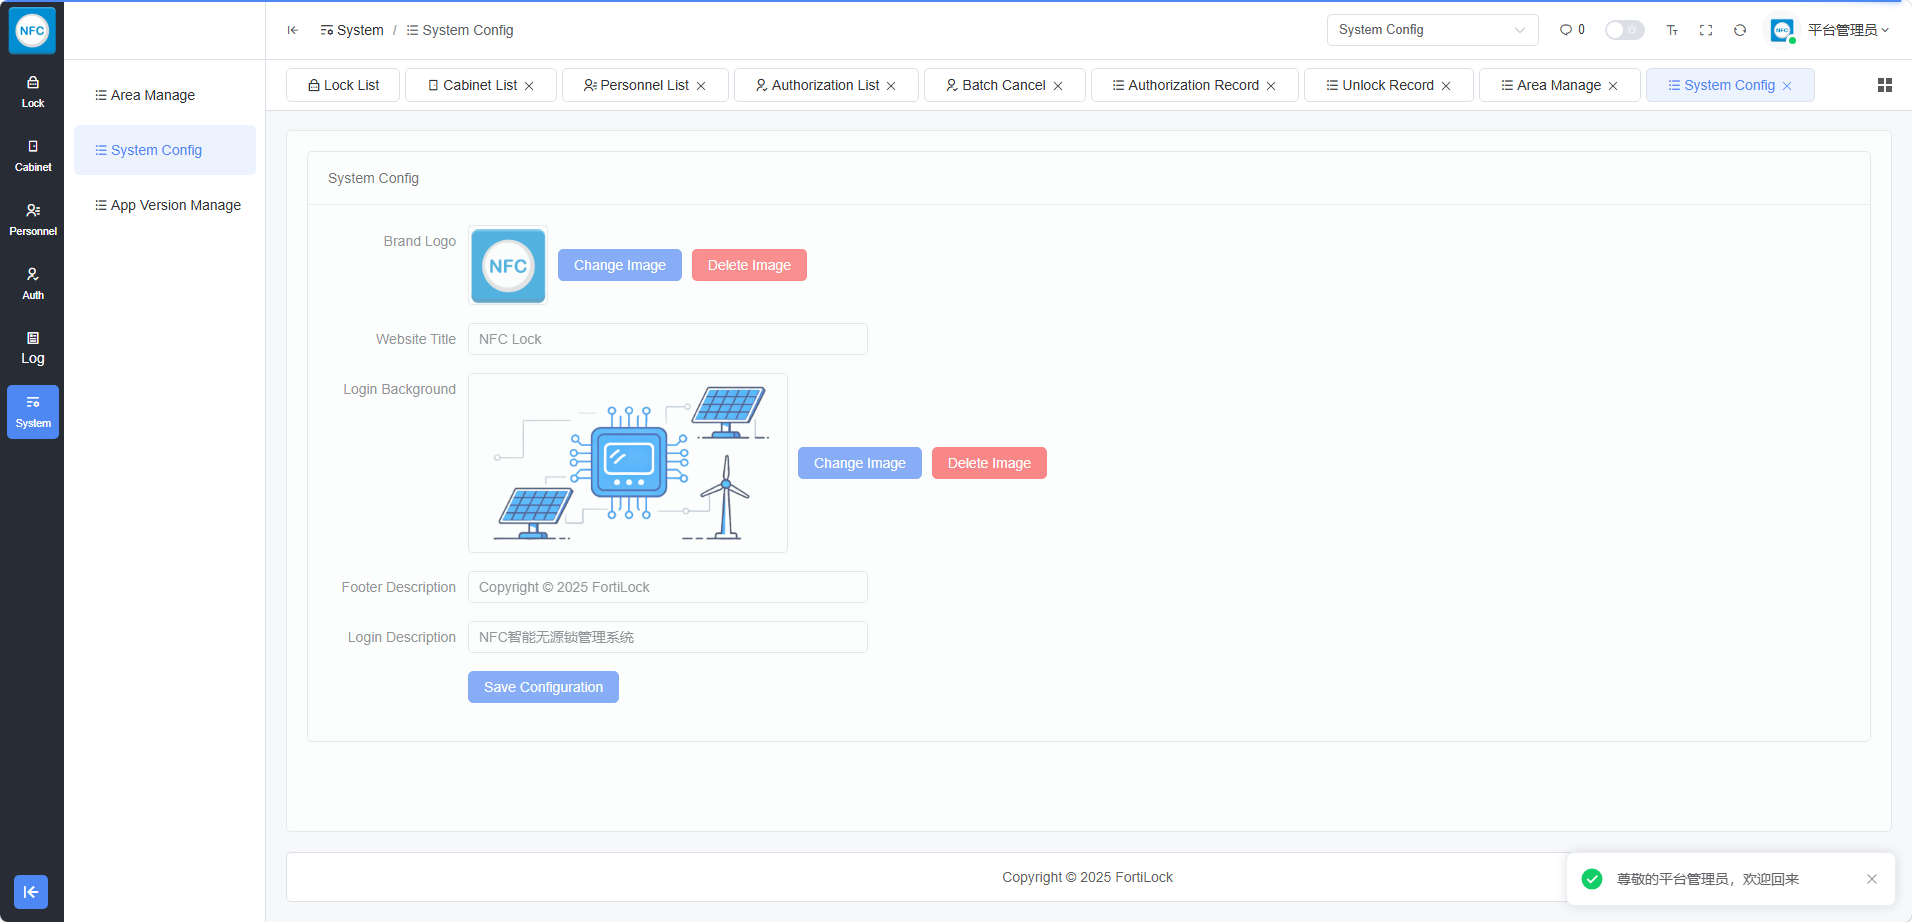
图 4-12:系统配置
移动端操作手册 Mobile App User Guide
本手册说明现场人员使用 釜电 移动端 App 完成登录、装锁、调试期试开以及正式授权后的日常开锁流程。
This guide covers the Fudian mobile app for field personnel: sign-in, lock installation, commissioning-time trial access, and daily unlock after authorization.
本手册侧重手机端操作路径。人员、角色、授权策略、审批流等仍以《后台操作手册》4.4 授权管理、4.6 人员管理 为准;在 App 中提交「申请授权」后,通常需管理员在后台审批或配置后方可生效。
This guide focuses on the mobile UI. User accounts, roles, authorization policies, and approvals are still maintained in the admin console (see Admin Console Guide sections 4.4 and 4.6). Authorization requests submitted from the app generally require administrator approval before they take effect.
步骤 1:登录 Step 1: Sign in
打开 App,使用管理员或现场账号登录(账号一般由后台「人员管理」开通)。请确认网络可访问已配置的 釜电 服务地址。
Open the app and sign in with an administrator or field account (accounts are usually created under User Management in the admin console). Ensure the device can reach the configured Fudian server address.
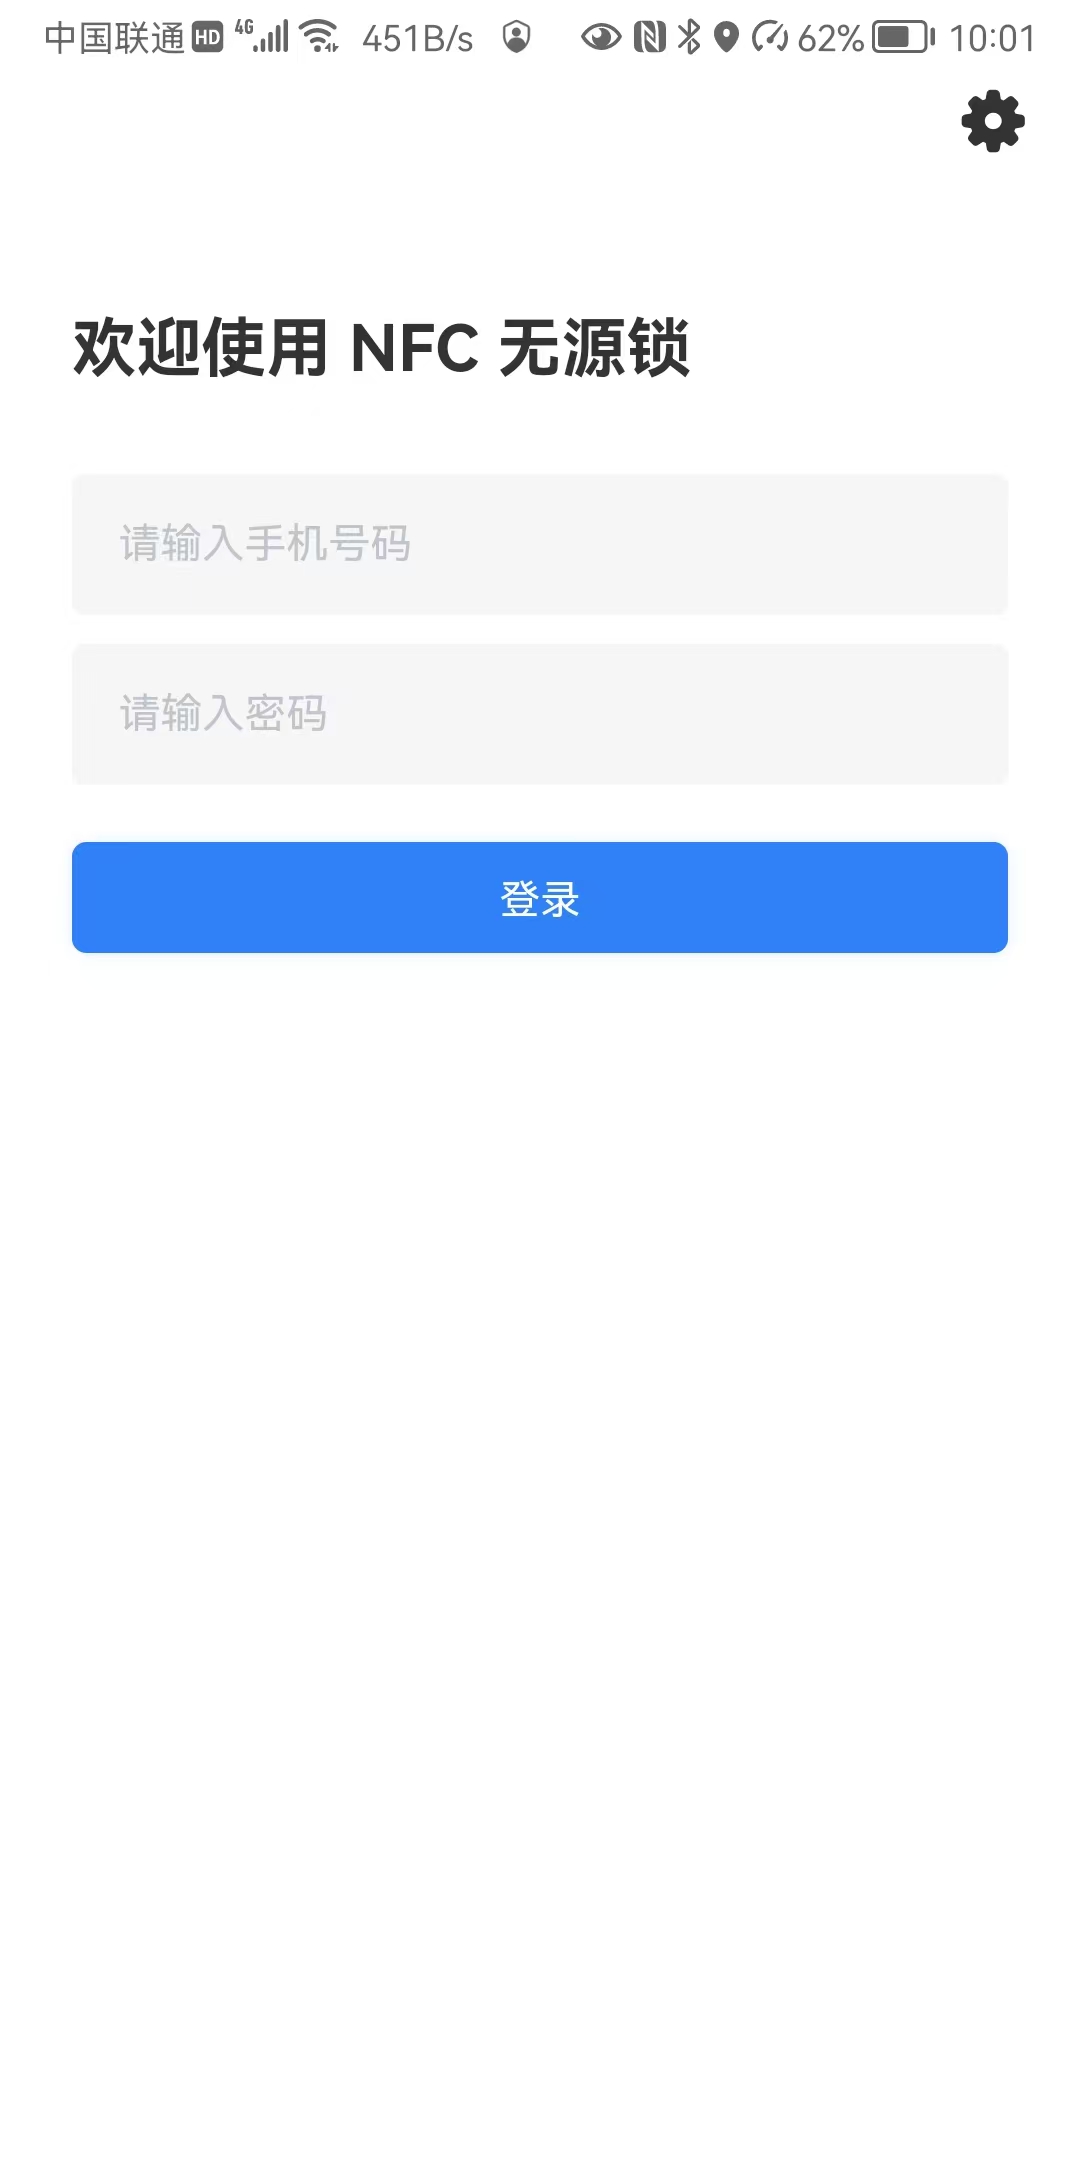
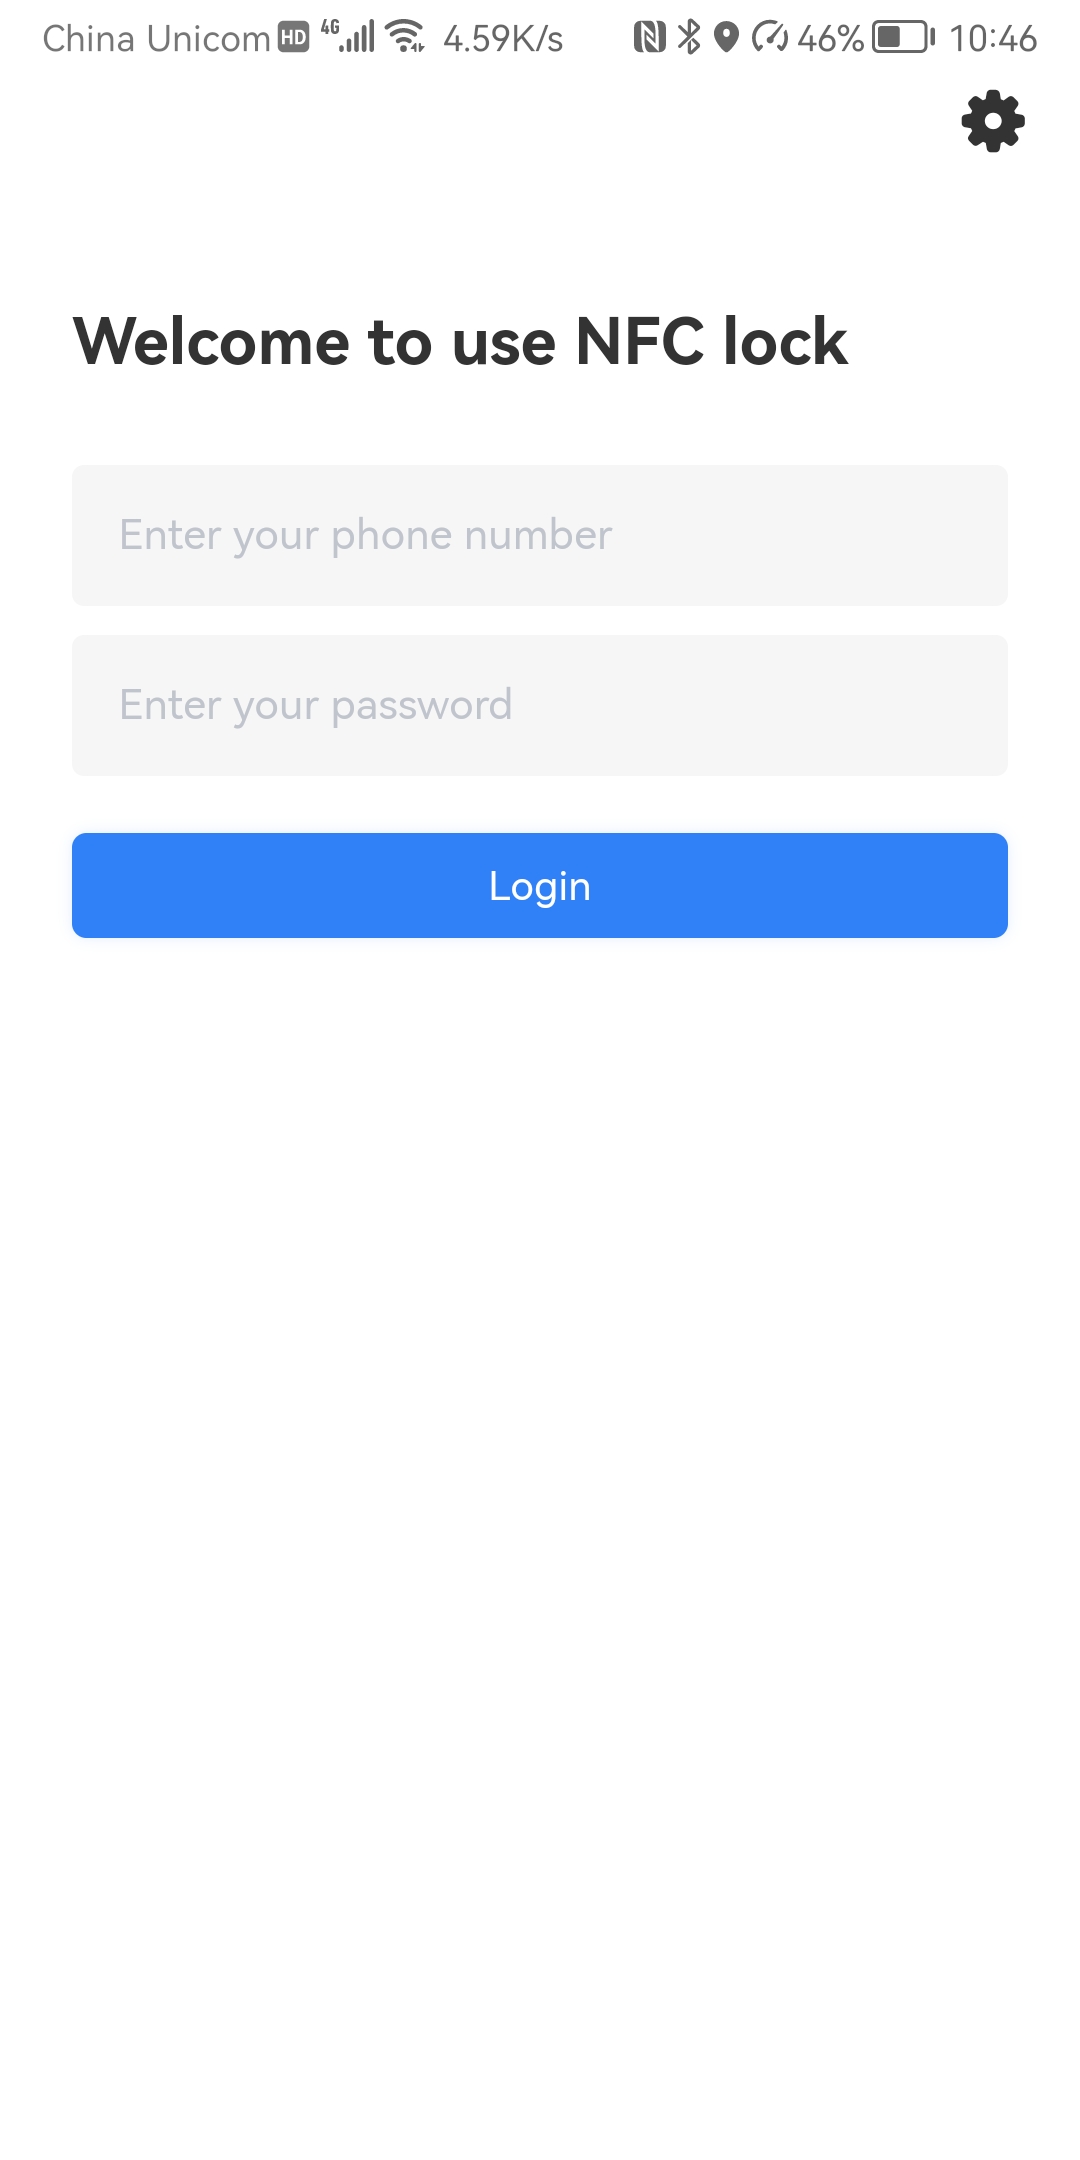
图 5-1:移动端登录
步骤 2:配置服务地址 Step 2: Configure server URL
将 App 指向当前环境的后台服务地址(与 manifest/config/config.yaml 中的 domain 或运维下发的访问域名一致)。内网部署时请使用可达的内网 IP 或域名,避免混用 HTTP/HTTPS 与端口错误。
Point the app to the backend URL for your environment (consistent with domain in manifest/config/config.yaml or the URL provided by operations). For intranet deployments, use a reachable internal IP or hostname and avoid mixing HTTP/HTTPS or wrong ports.
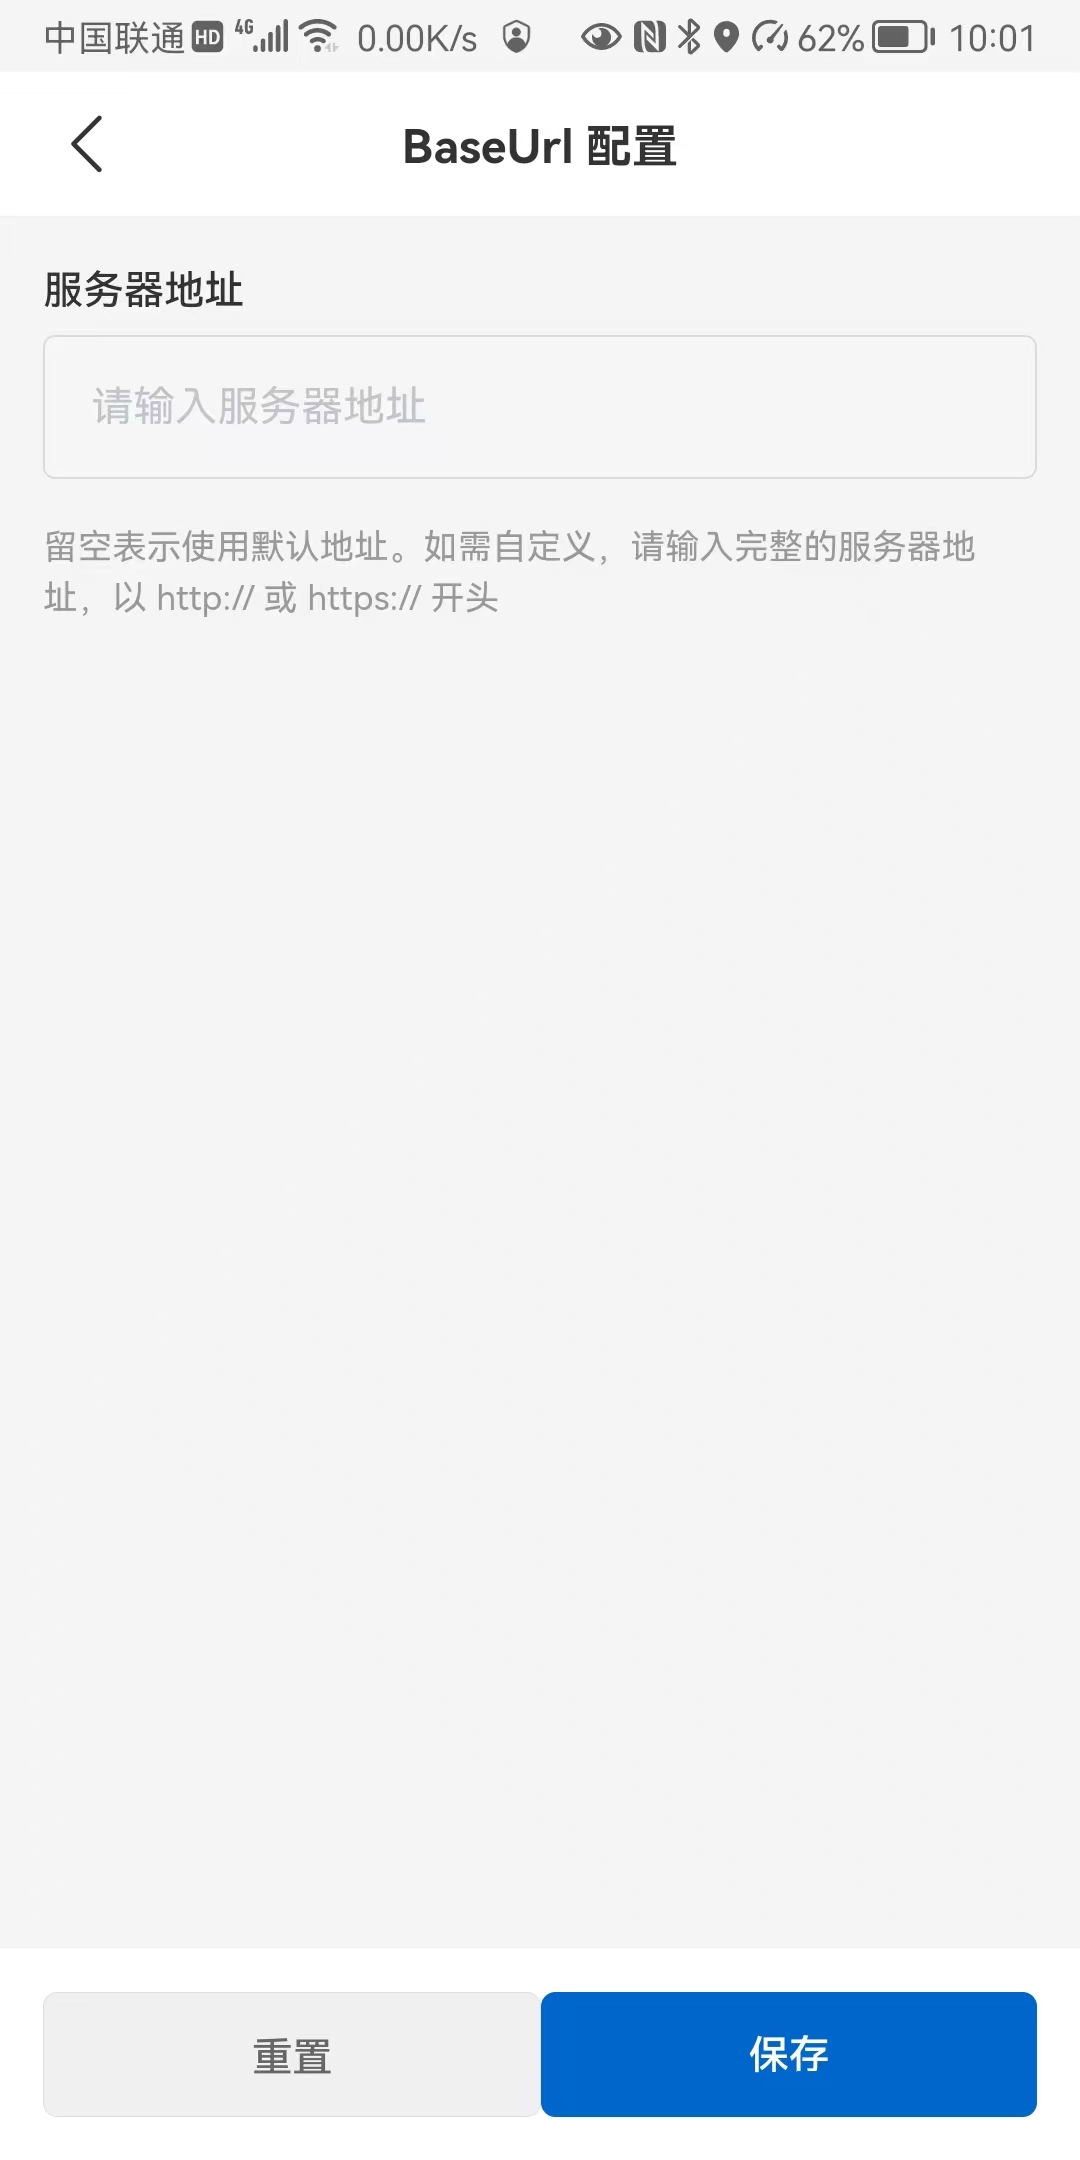
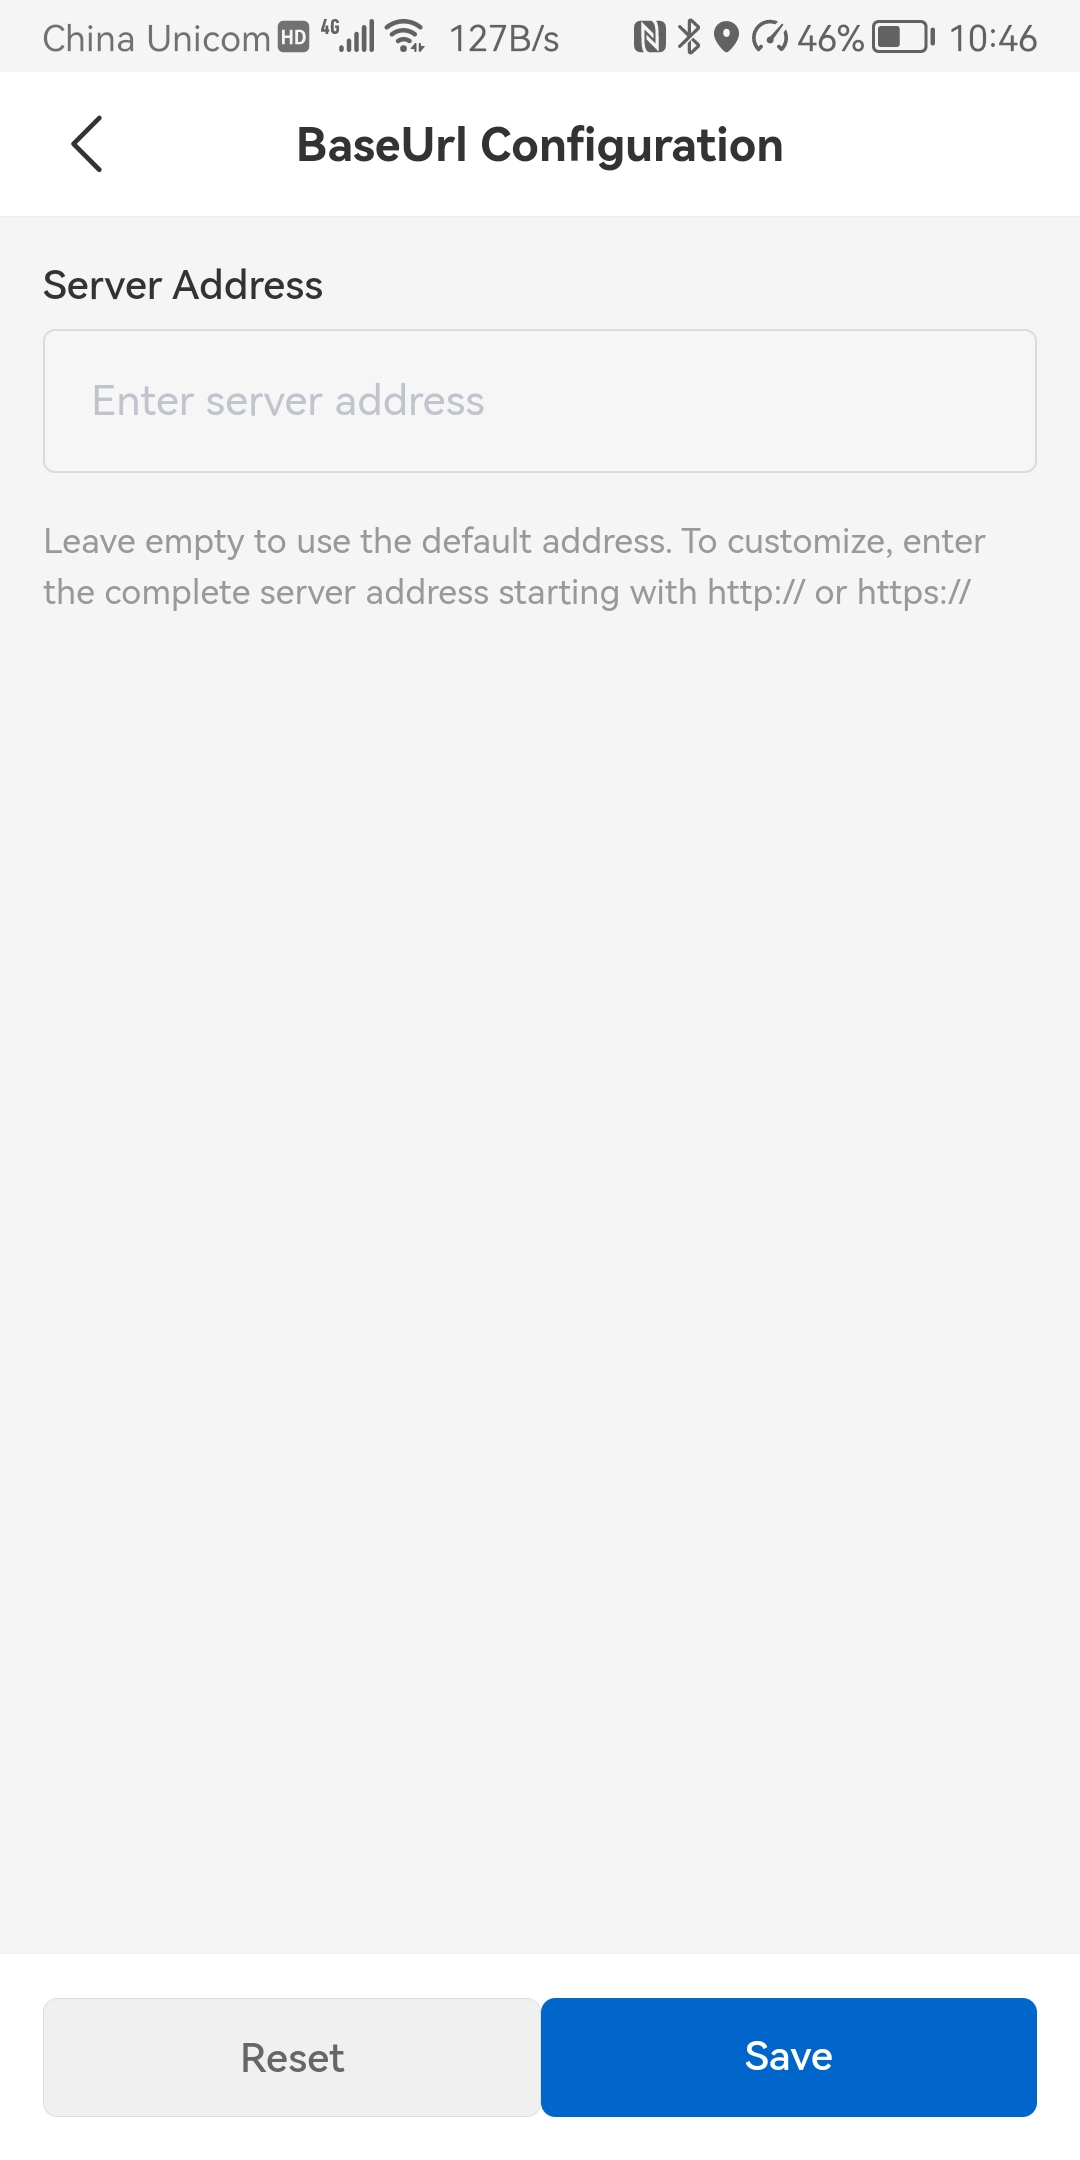
图 5-2:配置服务地址
步骤 3:设备装锁(入口) Step 3: Lock installation entry
在 App 中进入设备装锁相关功能模块,准备将实体锁具与当前账号、柜体/设备档案建立绑定关系。若后台尚未创建设备档案,请先在《后台操作手册》4.2 锁具管理 中维护设备后再执行装锁。
Open the lock installation flow in the app to bind the physical lock to the current account and device/cabinet records. If the device record does not exist yet, create it first in section 4.2 Device Management.
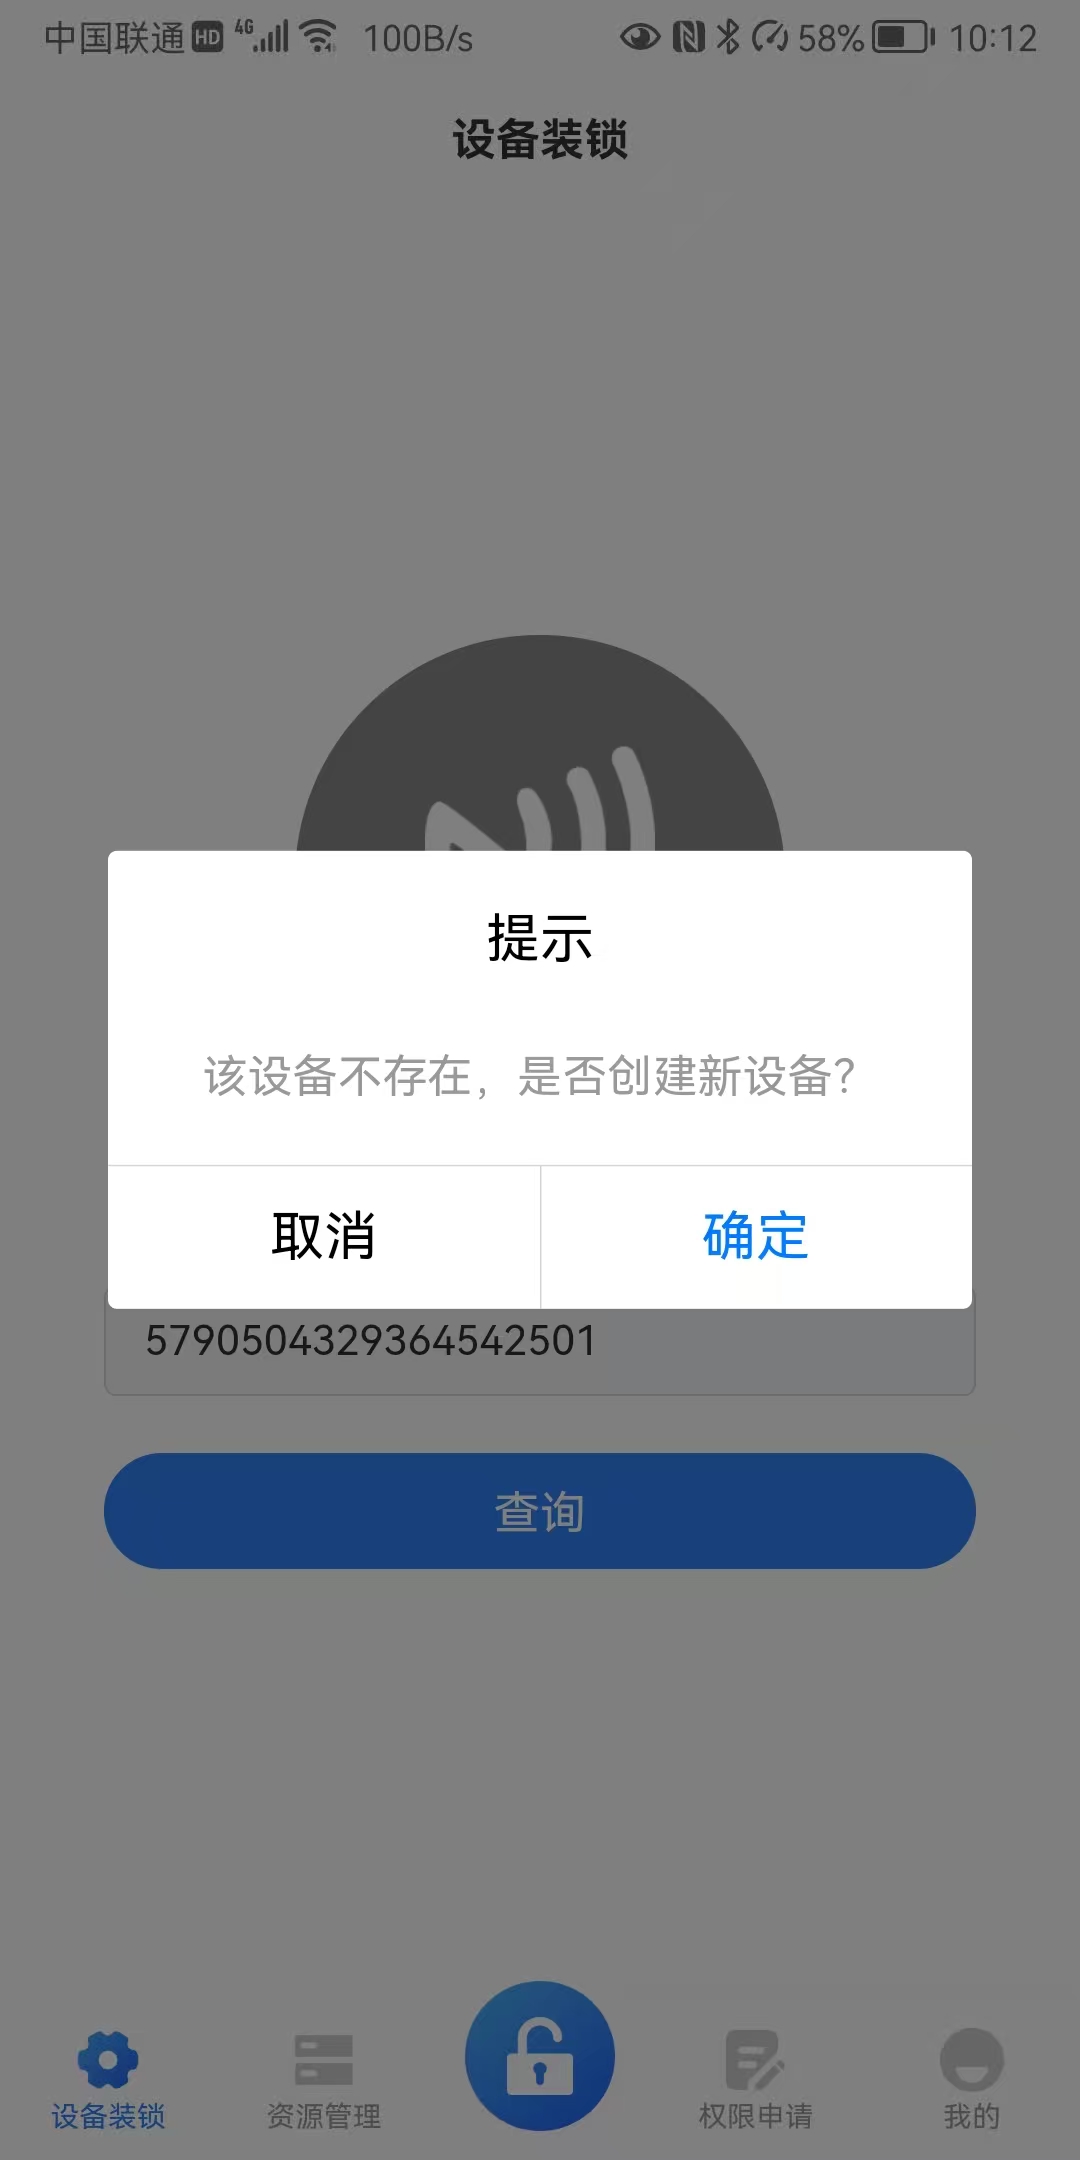
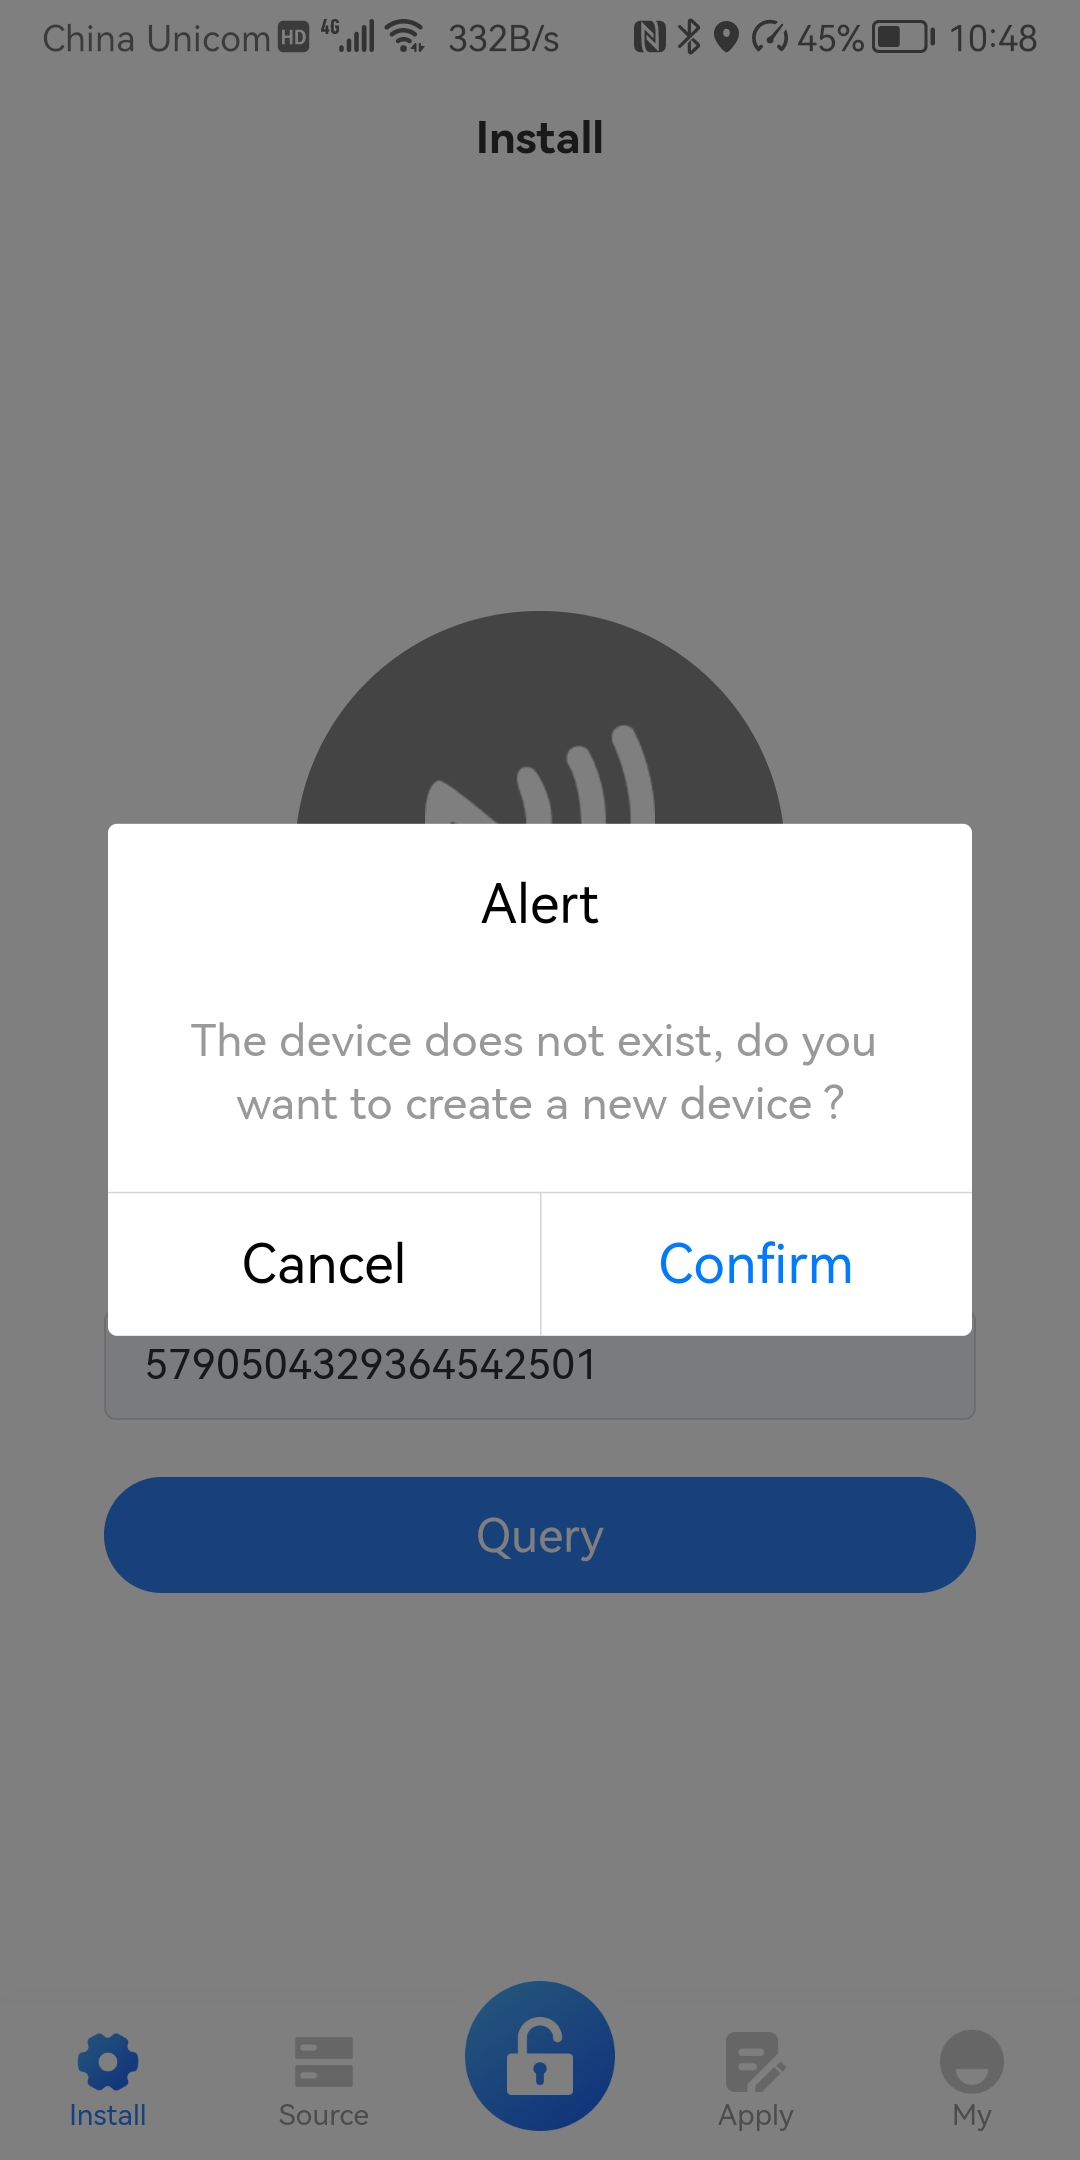
图 5-3:设备装锁入口
步骤 4:安装设备 Step 4: Install device
按界面提示选择或确认待绑定的设备信息,核对实体 ID、柜体/区域等是否与现场一致,避免错绑。
Follow the on-screen steps to select or confirm the device to bind. Verify entity ID, cabinet, and region match the site to avoid wrong bindings.
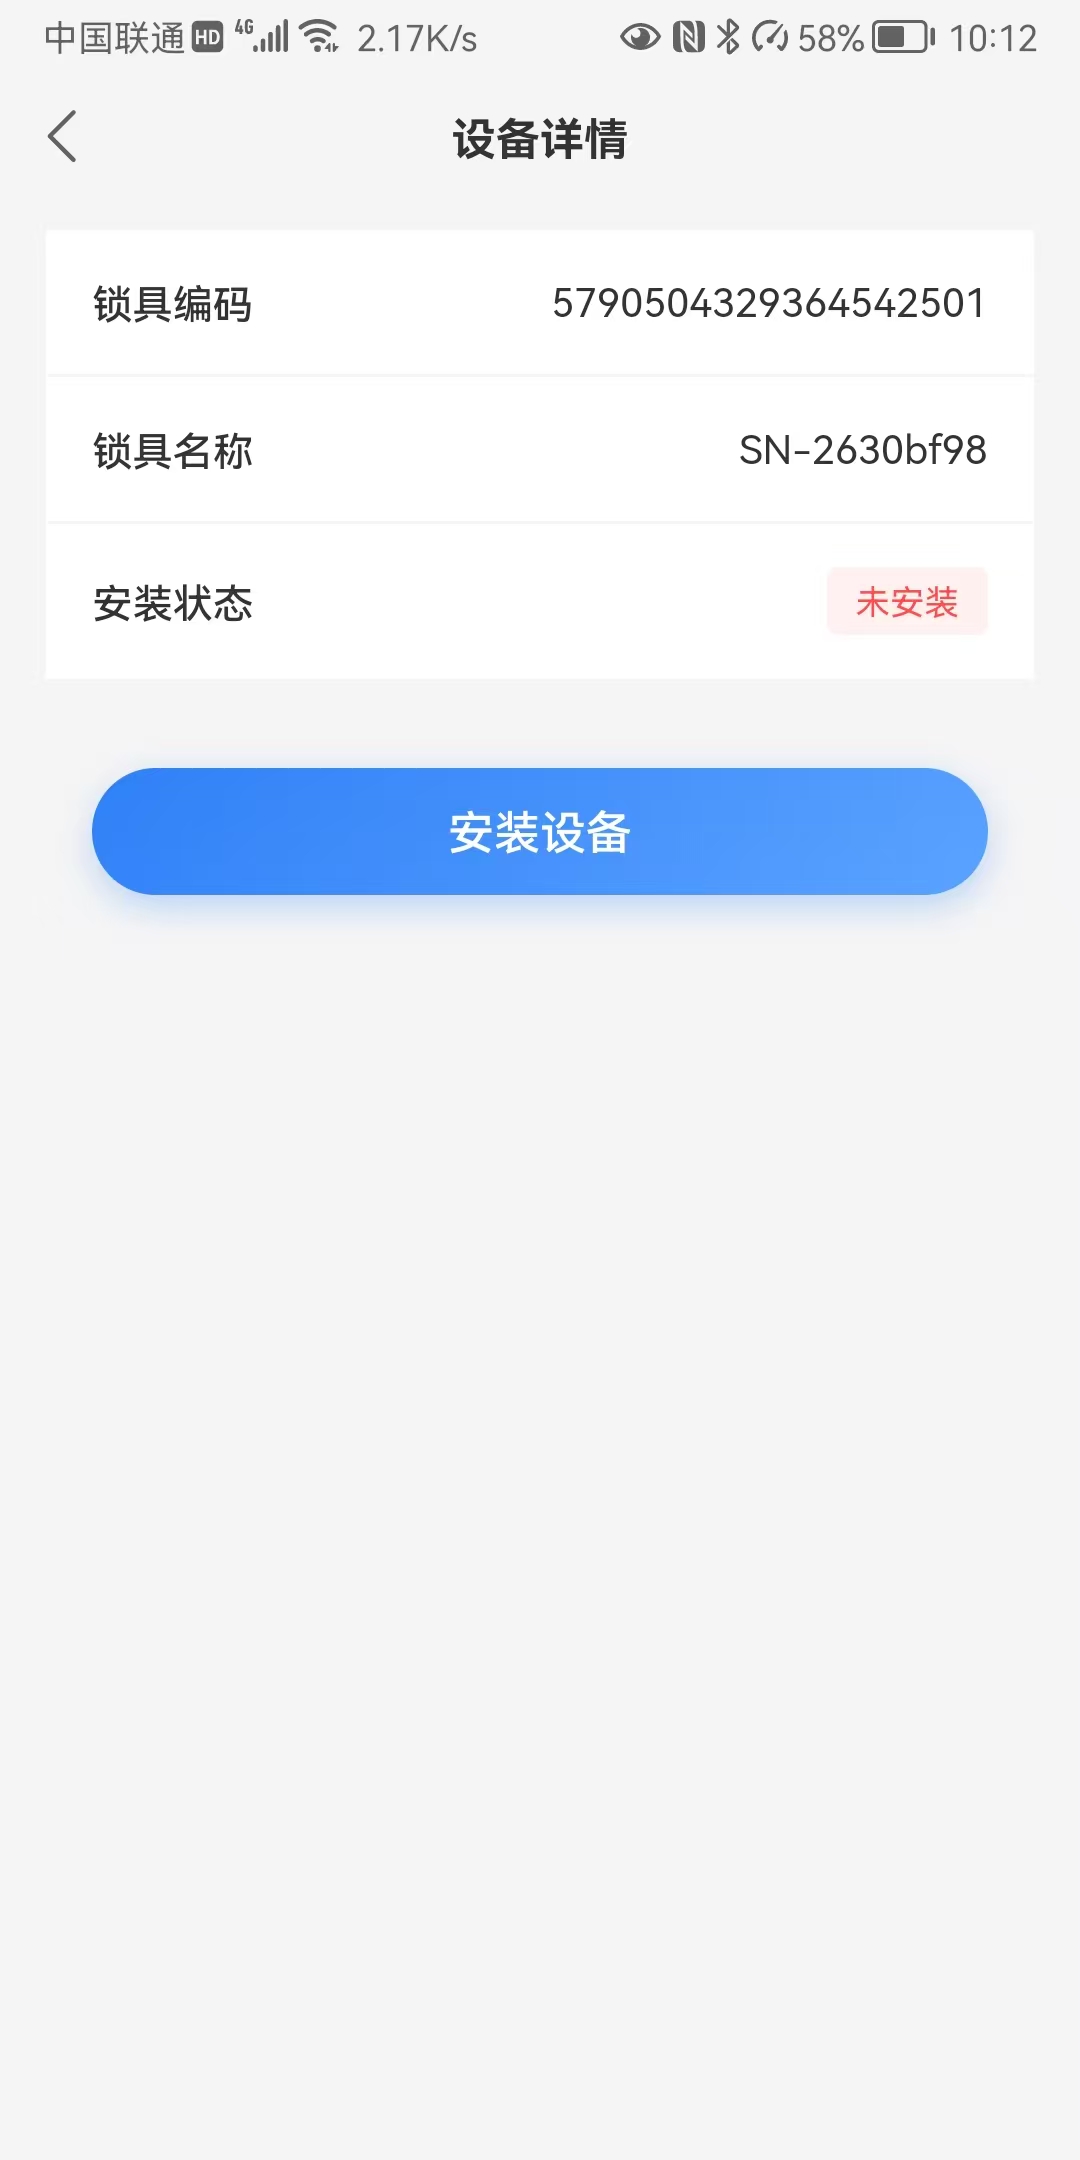
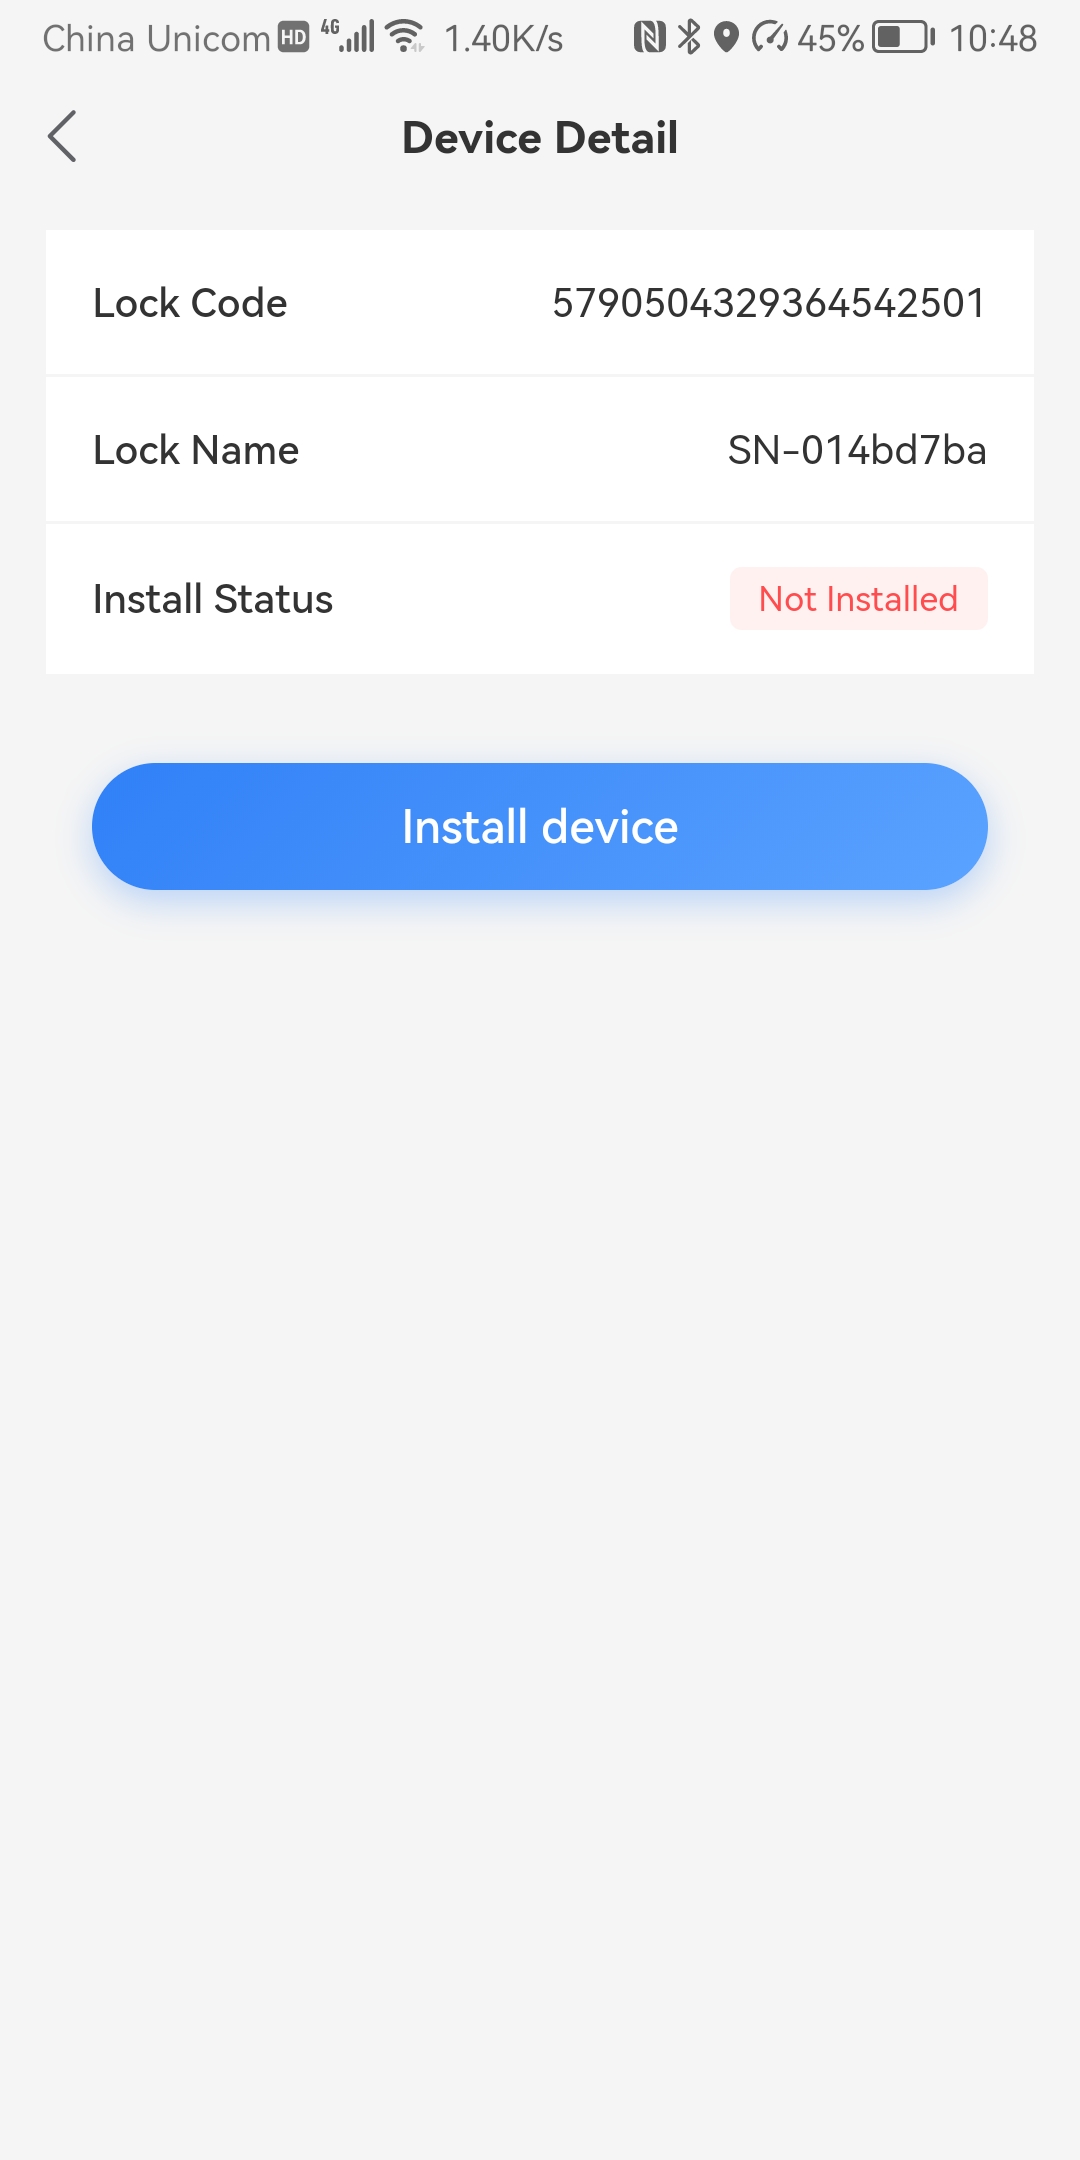
图 5-4:安装设备
步骤 5:NFC 贴近与装锁执行 Step 5: NFC tap and install
将锁具 NFC 感应区贴近手机背面上部(常见 NFC 天线位置),保持稳定直至 App 提示通信完成。若多次失败,请检查手机 NFC 是否开启、金属遮挡、手机壳厚度或尝试缓慢平移贴合。
Hold the lock's NFC area against the upper back of the phone (typical NFC antenna area) until the app reports success. If pairing fails repeatedly, enable NFC on the phone, remove metal interference or thick cases, and try slow sliding contact.
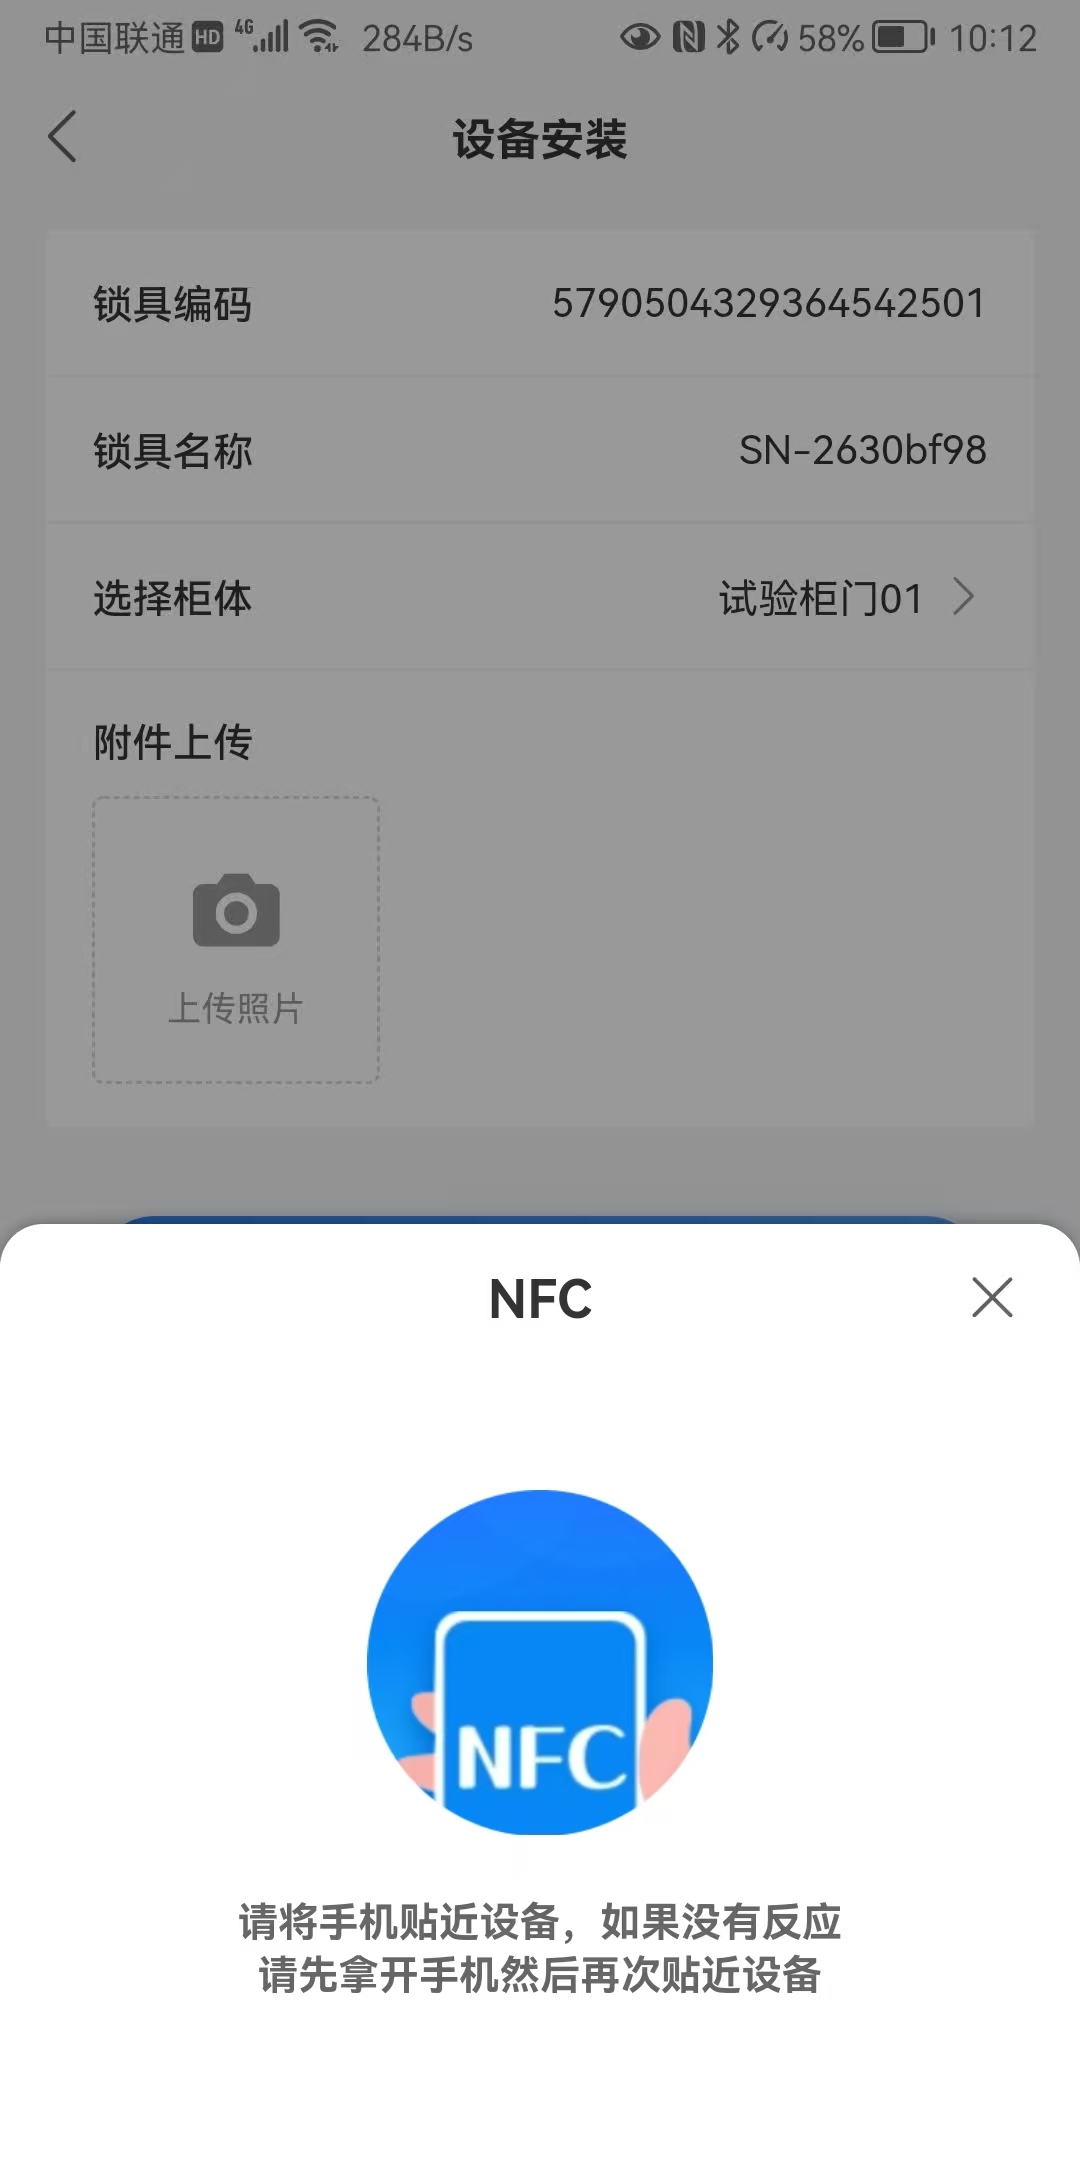
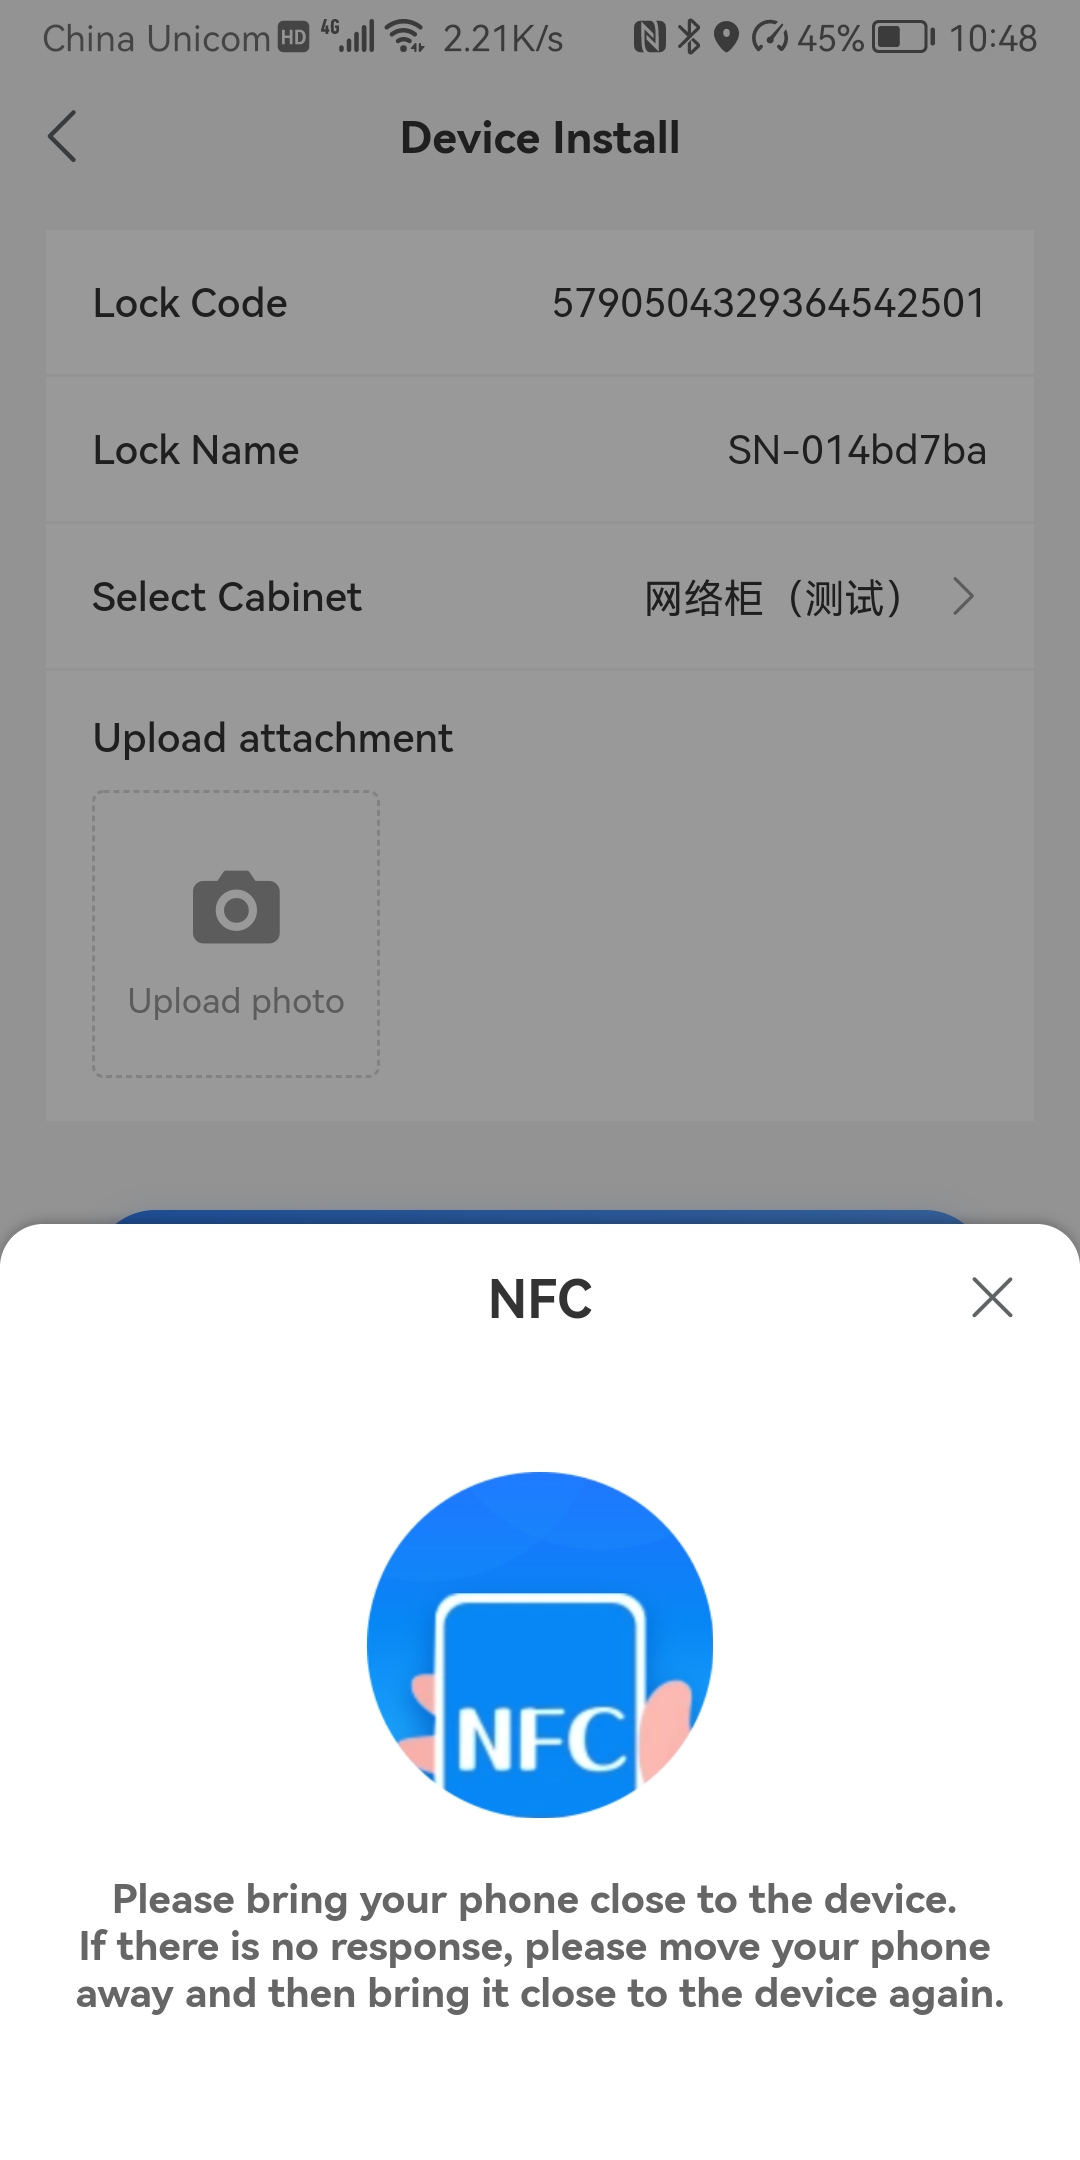
图 5-5:NFC 贴近装锁
步骤 6:装锁成功 Step 6: Installation succeeded
App 显示装锁成功后,表示锁具与平台侧档案、密钥或业务状态已完成本轮下发与确认(具体以产品实现为准)。请保留成功界面或记录时间,便于与后台设备状态、日志交叉核对。
When the app shows installation success, the lock has completed this round of binding and provisioning with the platform (exact semantics depend on the product build). Keep the success screen or a timestamp for cross-checking with admin device status and logs.
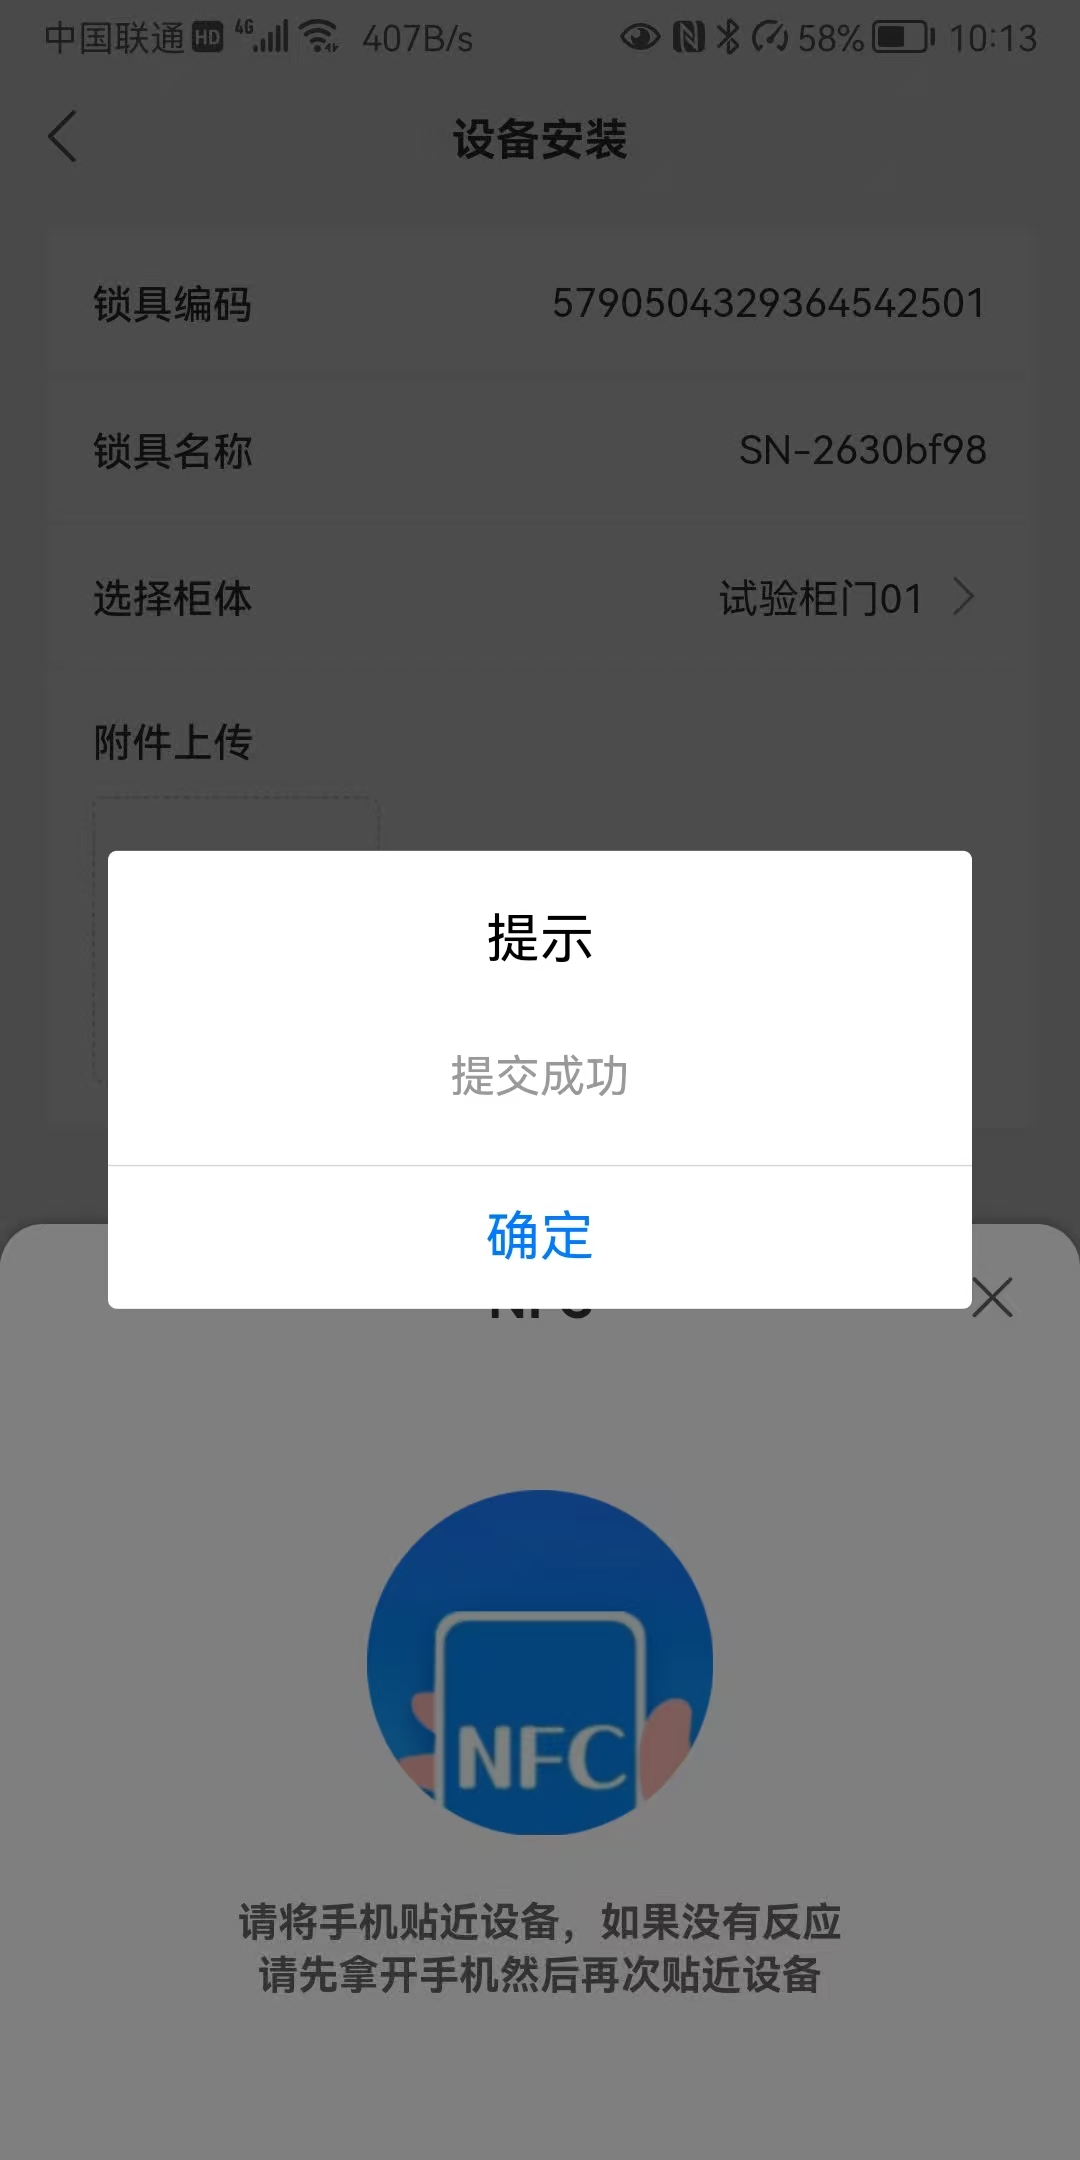
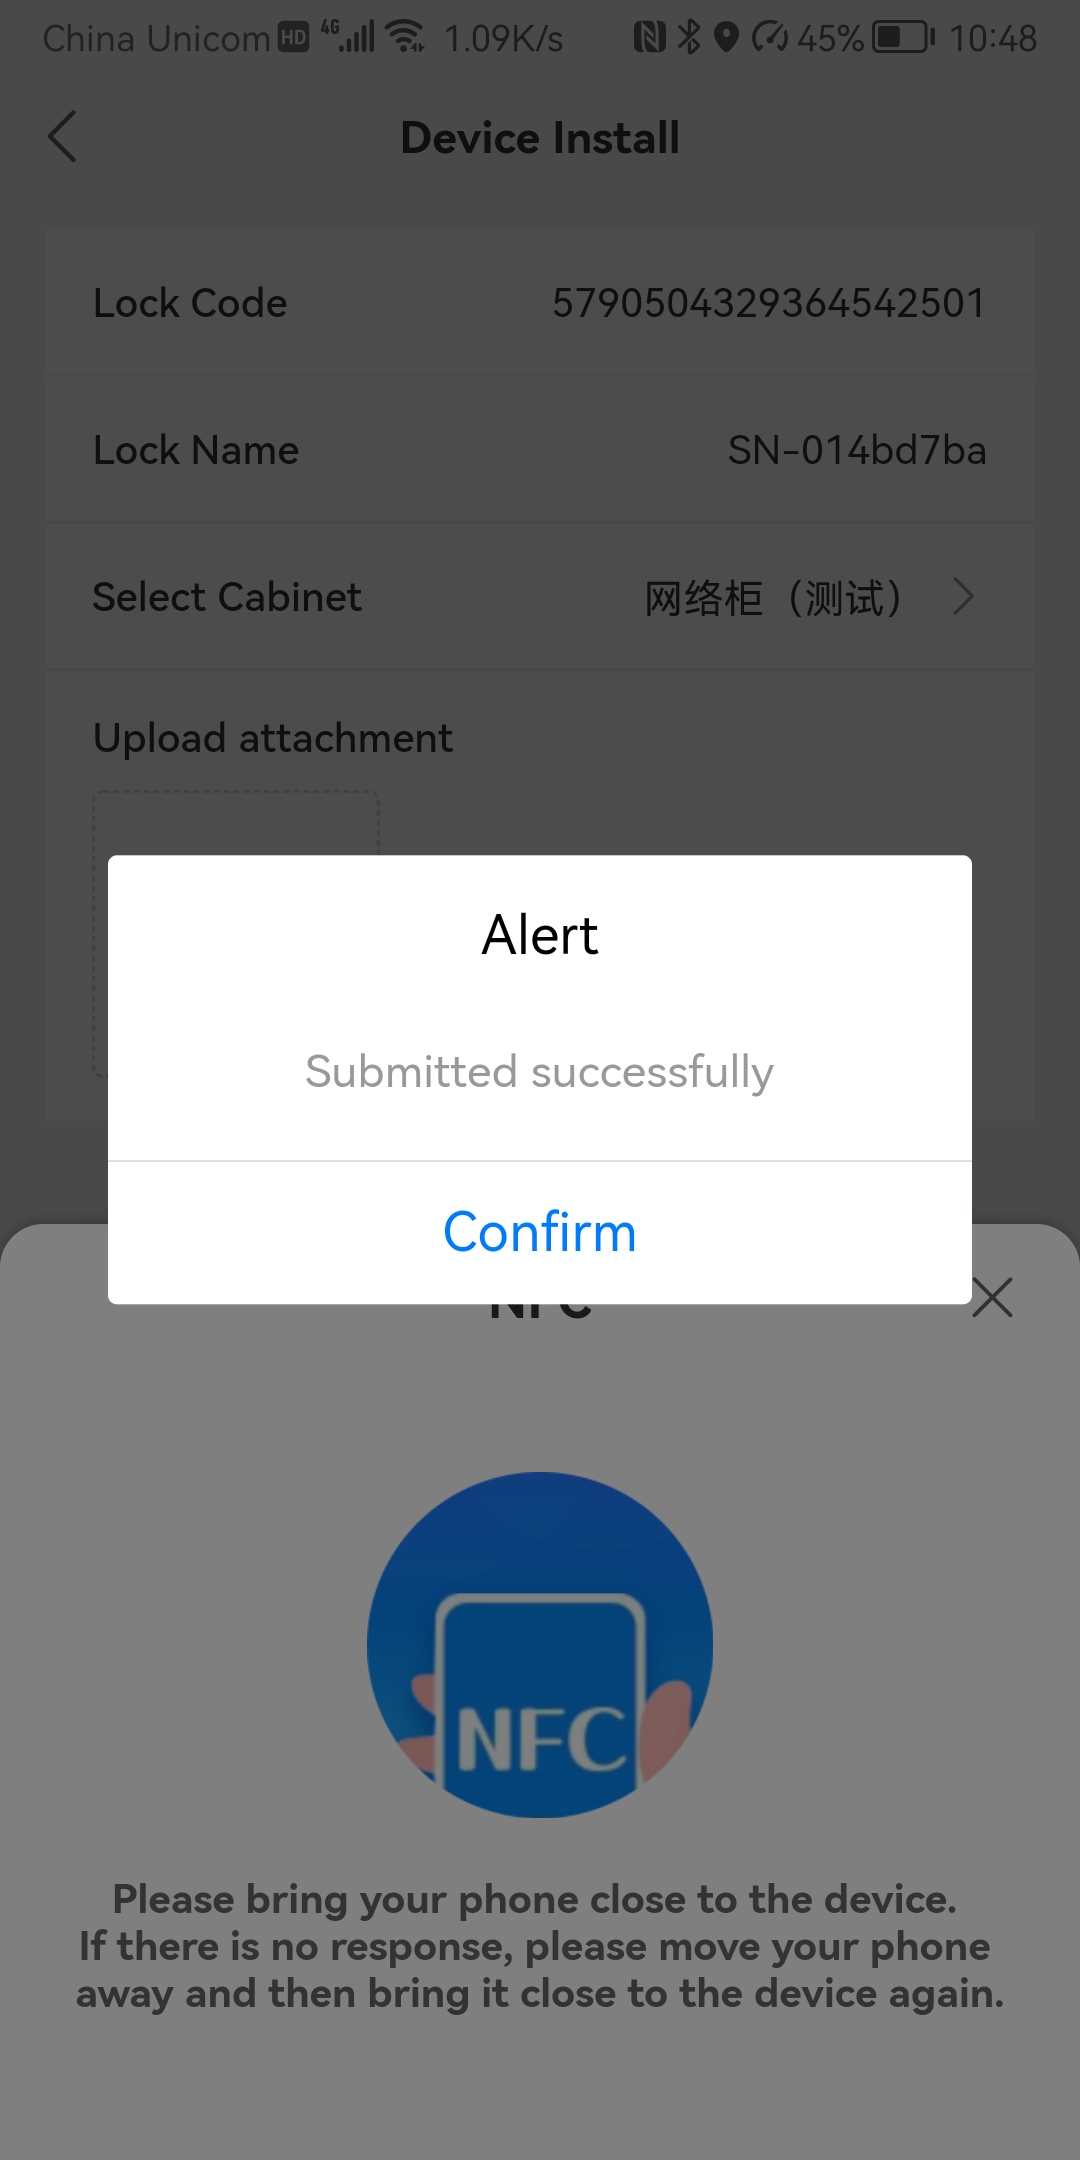
图 5-6:装锁成功
装锁成功后的 30 分钟内,系统处于调试宽限期(commissioning grace period):在此时间窗口内,任意用户均可对该锁执行开锁、关锁操作,而无需事先在后台完成个人授权。该机制用于现场联调——例如验证 NFC 通信稳定性、锁体机械行程、门磁/反馈信号、与柜体绑定的正确性等——避免因审批链路未就绪而阻塞验收。
For 30 minutes after successful installation, the system enters a commissioning grace period: during this window, any user may lock and unlock the device without a prior per-user authorization in the admin console. This is intended for on-site commissioning—NFC stability, mechanical travel, auxiliary signals, cabinet binding checks—without being blocked by approval workflows that are not ready yet.
30 分钟届满后,宽限期自动结束,平台恢复常规最小权限 / 需授权访问策略:此后用户必须按下文步骤 8~12 完成「申请授权 → 填写/提交申请 → 列表跟踪 → 审批通过」,或由管理员在《后台操作手册》4.4 授权管理 中直接授予设备权限,方可正常开锁、关锁。请在宽限期内完成必要调试;若现场有多支施工队,应注意该窗口内任意账号均可操作带来的安全风险,调试结束后尽快转入正式授权流程。
When the 30 minutes expire, the grace period ends and the platform returns to normal least-privilege / authorization-required behavior. Users must then follow steps 8–12 (request → fill/submit → list tracking → approval) or receive permissions directly from an administrator in Admin Console Guide section 4.4. Complete commissioning within the window; if multiple teams share the site, be aware that any account can operate the lock during this period and move to formal authorization promptly afterward.
步骤 7:开锁(宽限期内试开) Step 7: Unlock (trial within grace period)
在宽限期内,可直接按 App 引导执行开锁以验证业务闭环。若已超过 30 分钟且未授权,此处通常会收到权限不足或需申请授权的提示。
During the grace period, unlock according to the app to validate the full loop. After 30 minutes without authorization, you will typically see insufficient permission or a prompt to request access.
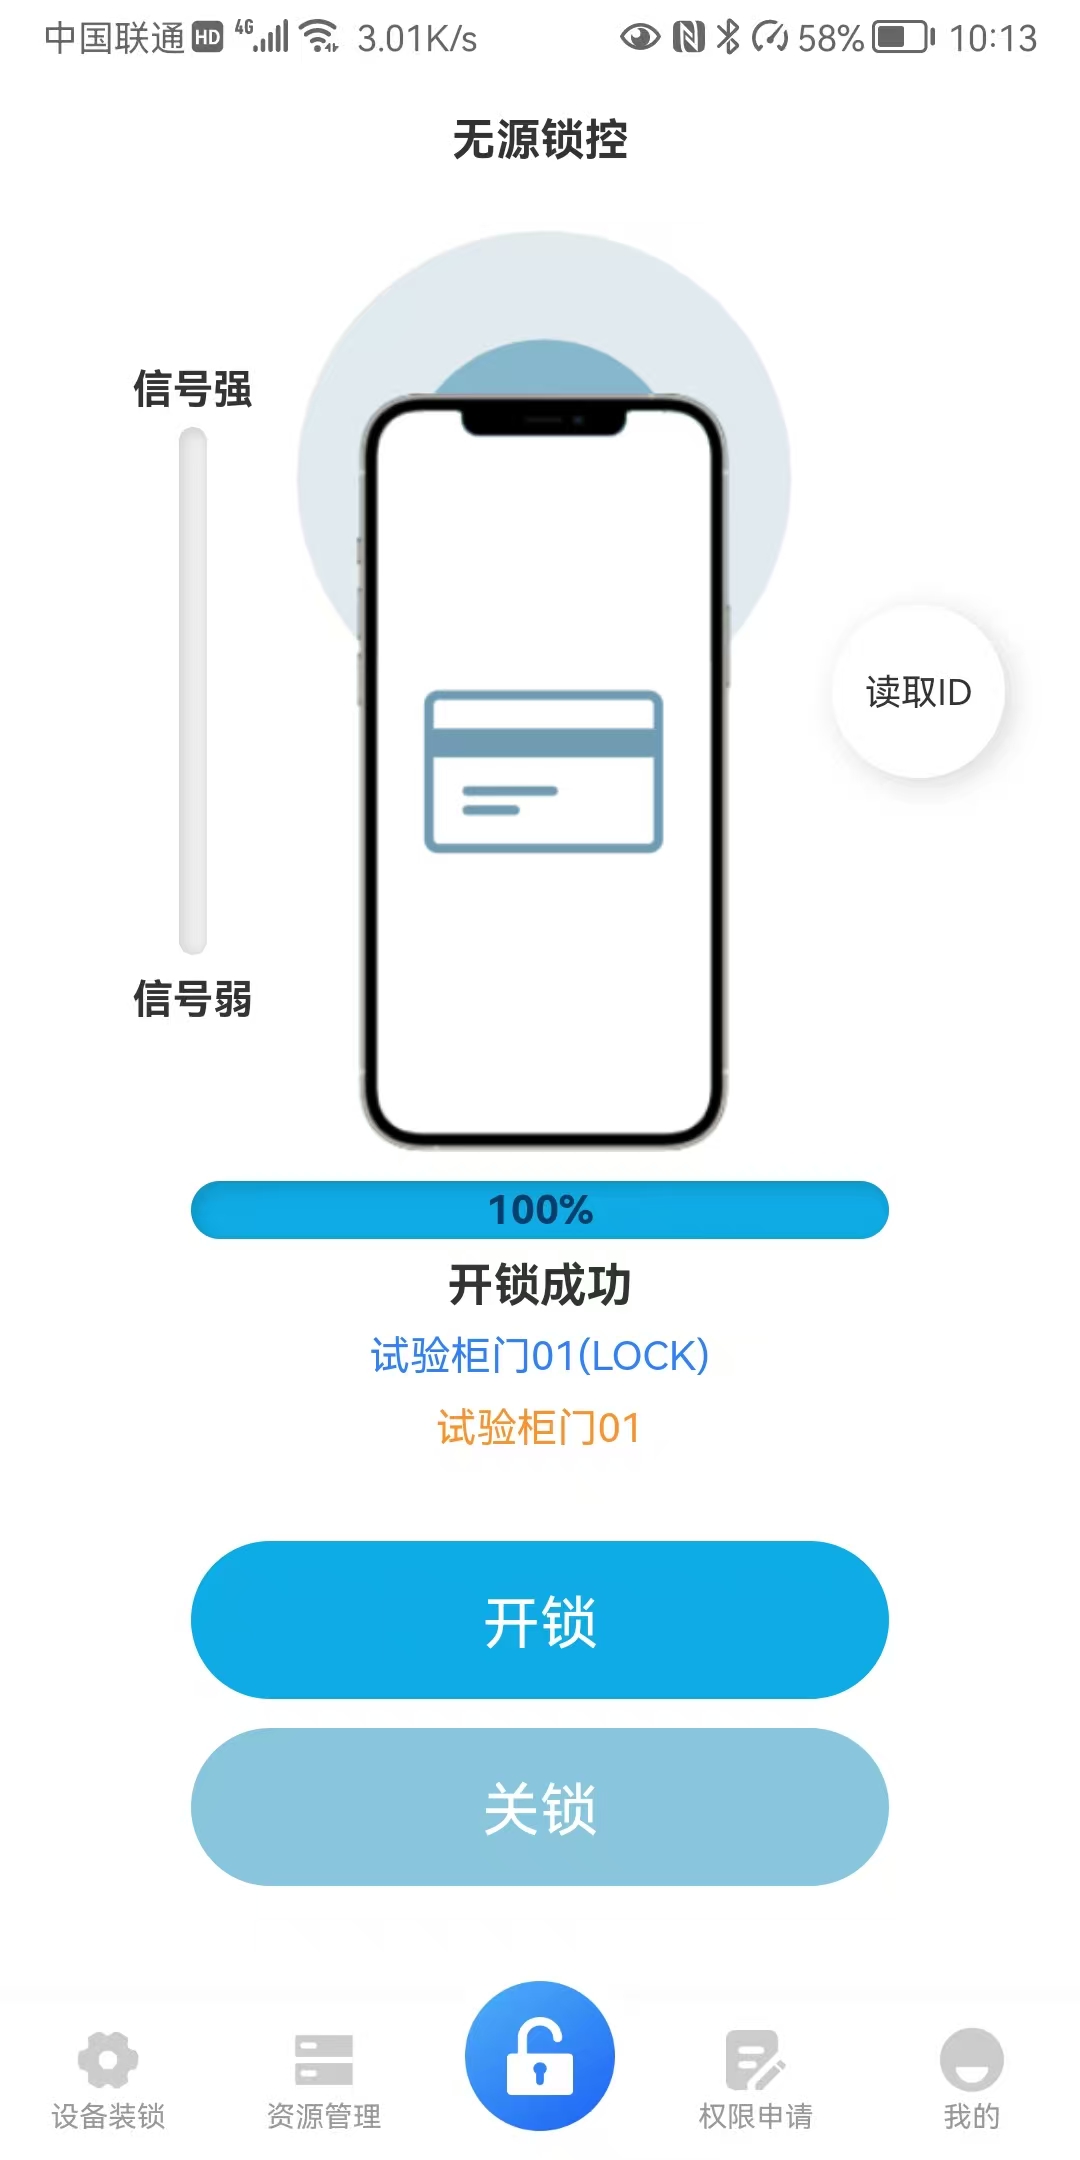
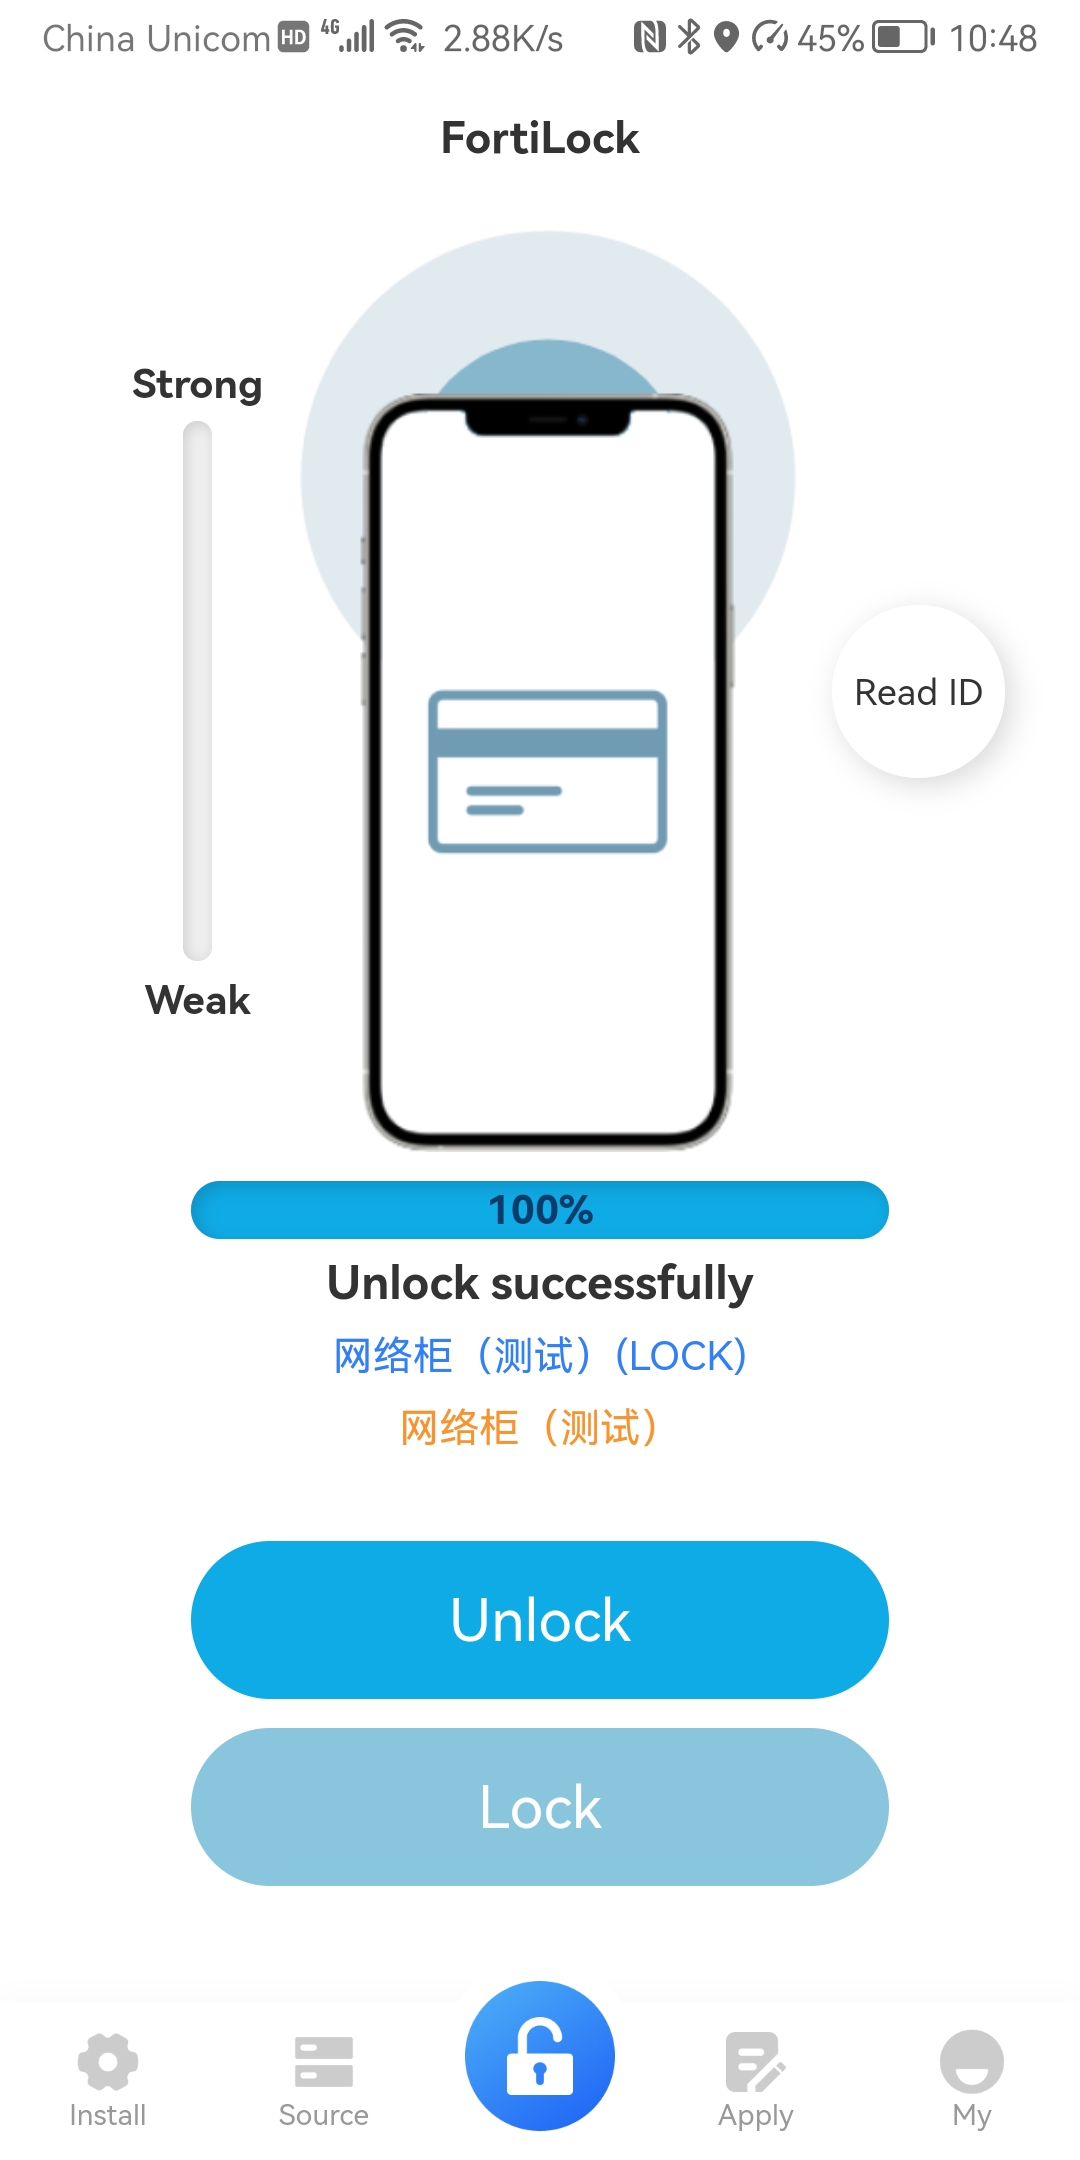
图 5-7:开锁(调试期)
步骤 8:申请授权 Step 8: Request authorization
宽限期结束后,需通过「申请授权」向管理员发起访问请求。请根据企业制度填写事由、预计使用时段等信息,以便审批人判断。
After the grace period, use Request authorization to ask an administrator for access. Fill in reason and expected time window according to your organization's policy.
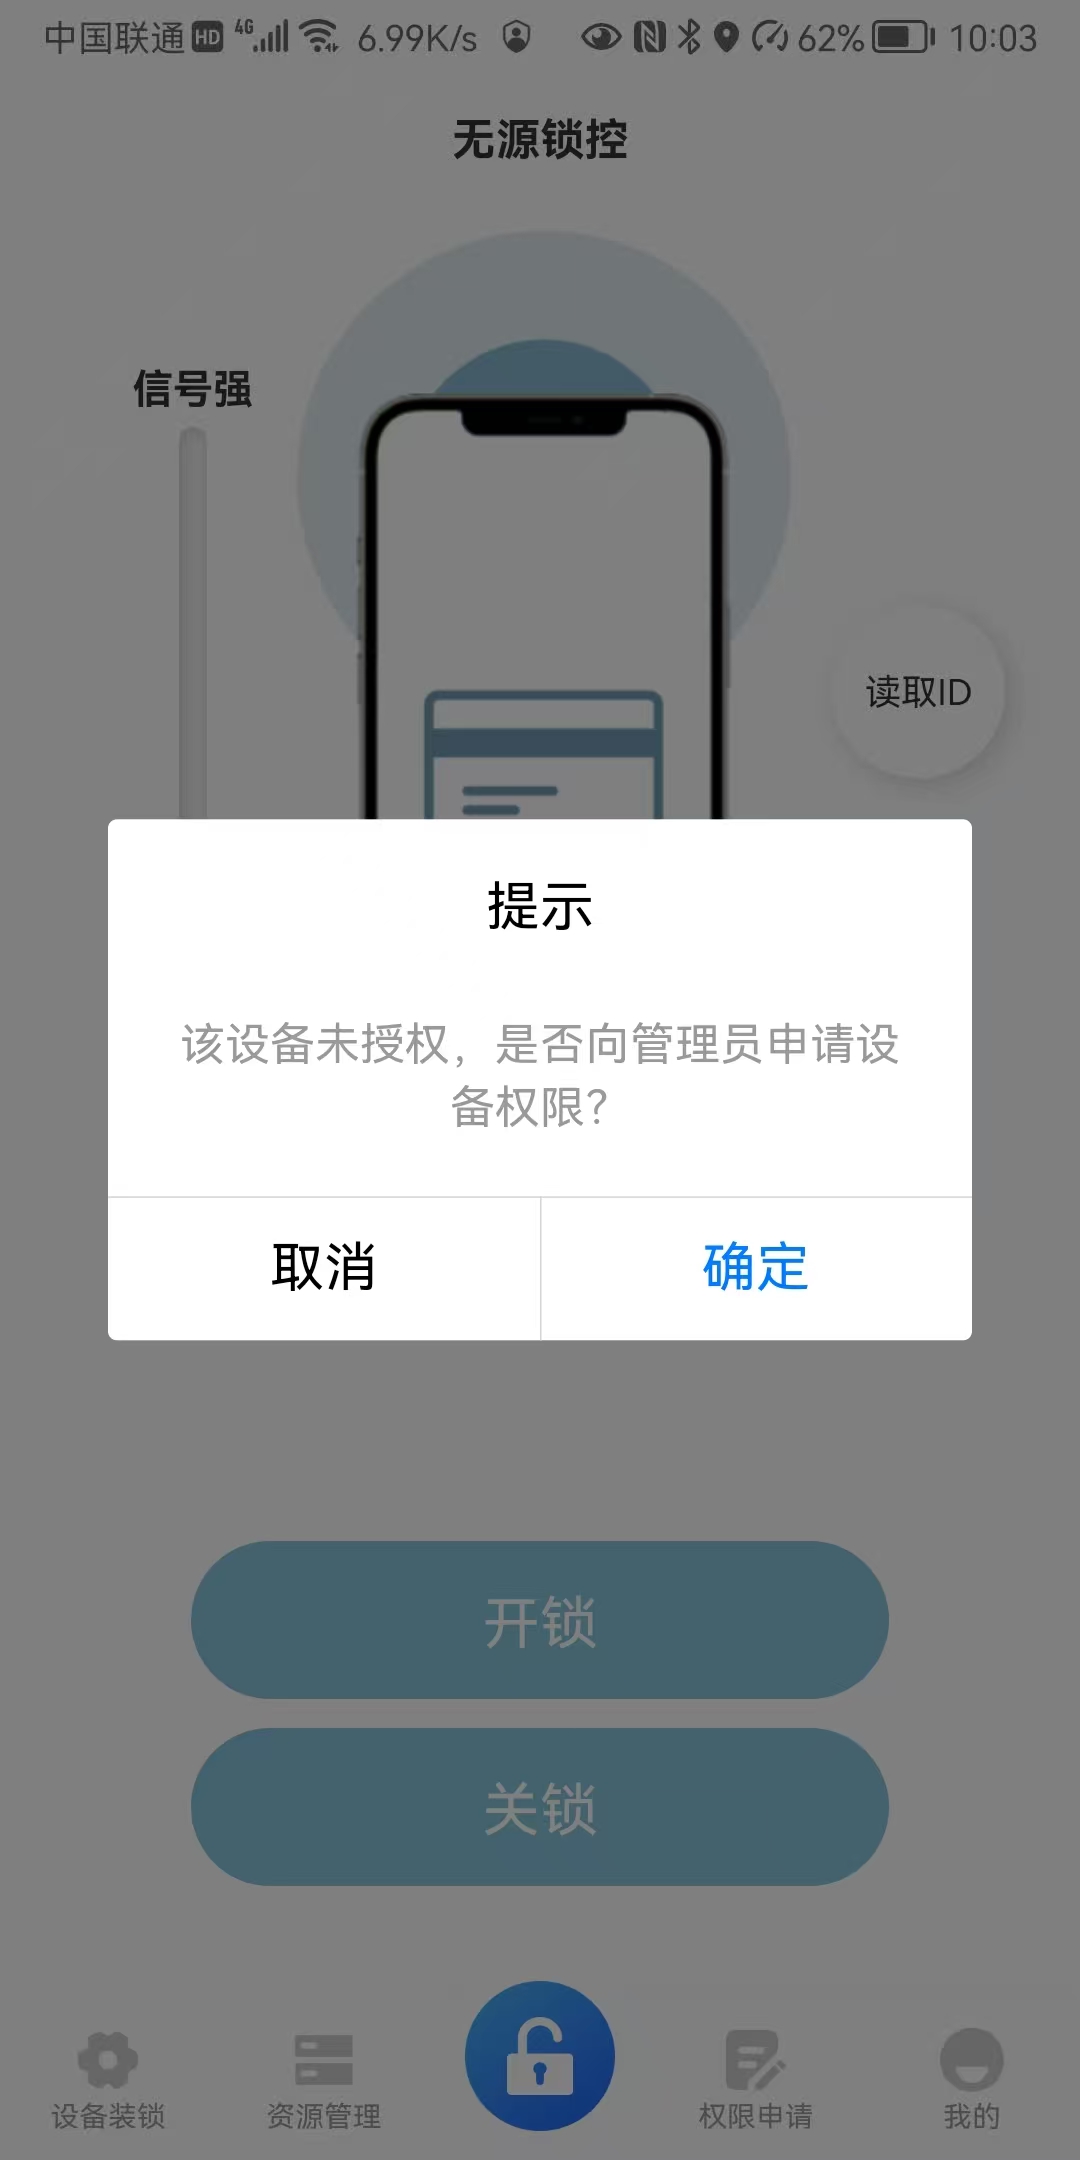
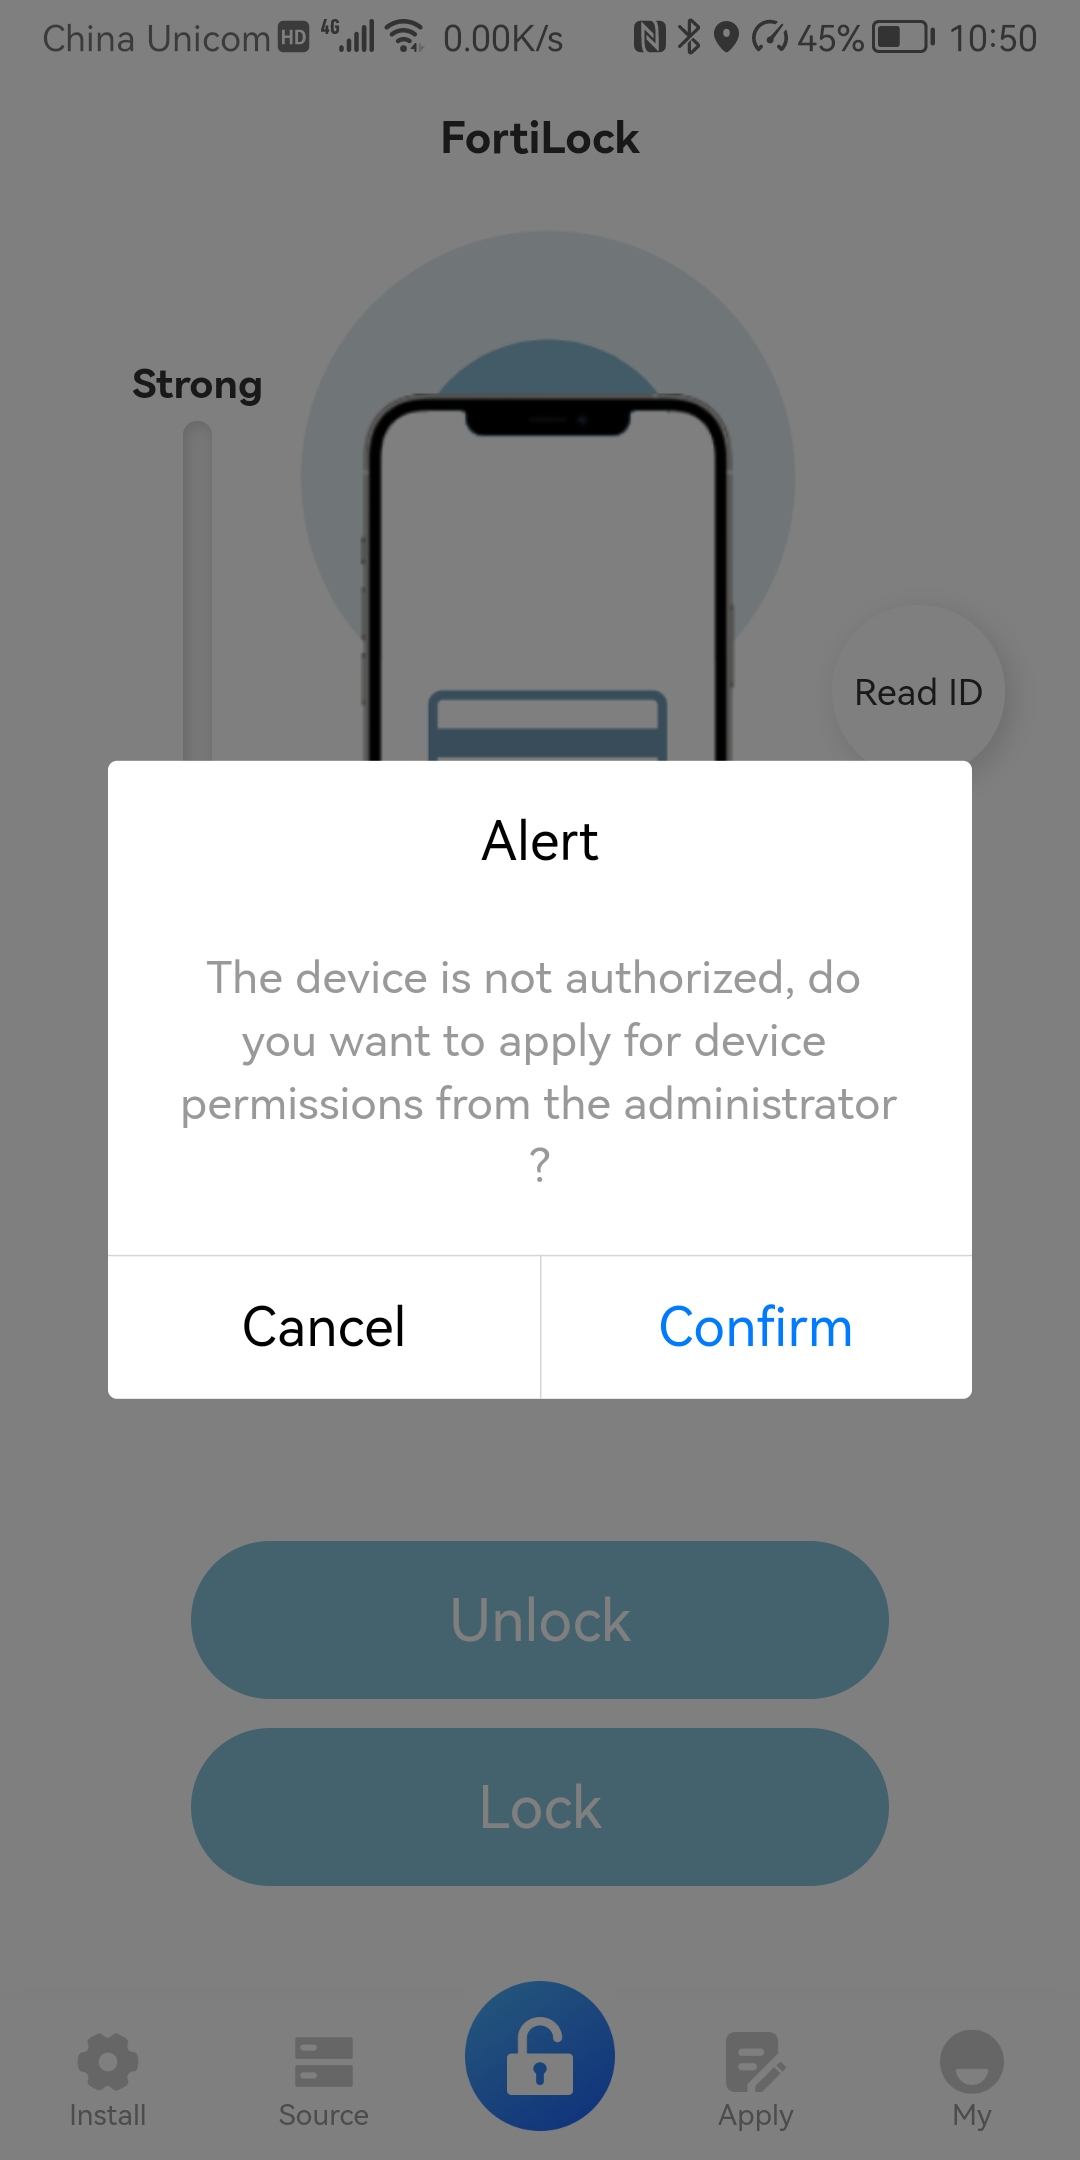
图 5-8:申请授权
步骤 9:填写授权申请信息 Step 9: Fill in request details
逐项填写表单字段(设备、时间范围、用途说明等)。带星号或红色标记的字段一般为必填;与后台字典或组织架构联动的选项应与管理员确认可选范围。
Complete each field (device, time range, purpose, etc.). Fields marked required must be filled; options tied to admin dictionaries or org structure should be confirmed with an administrator.
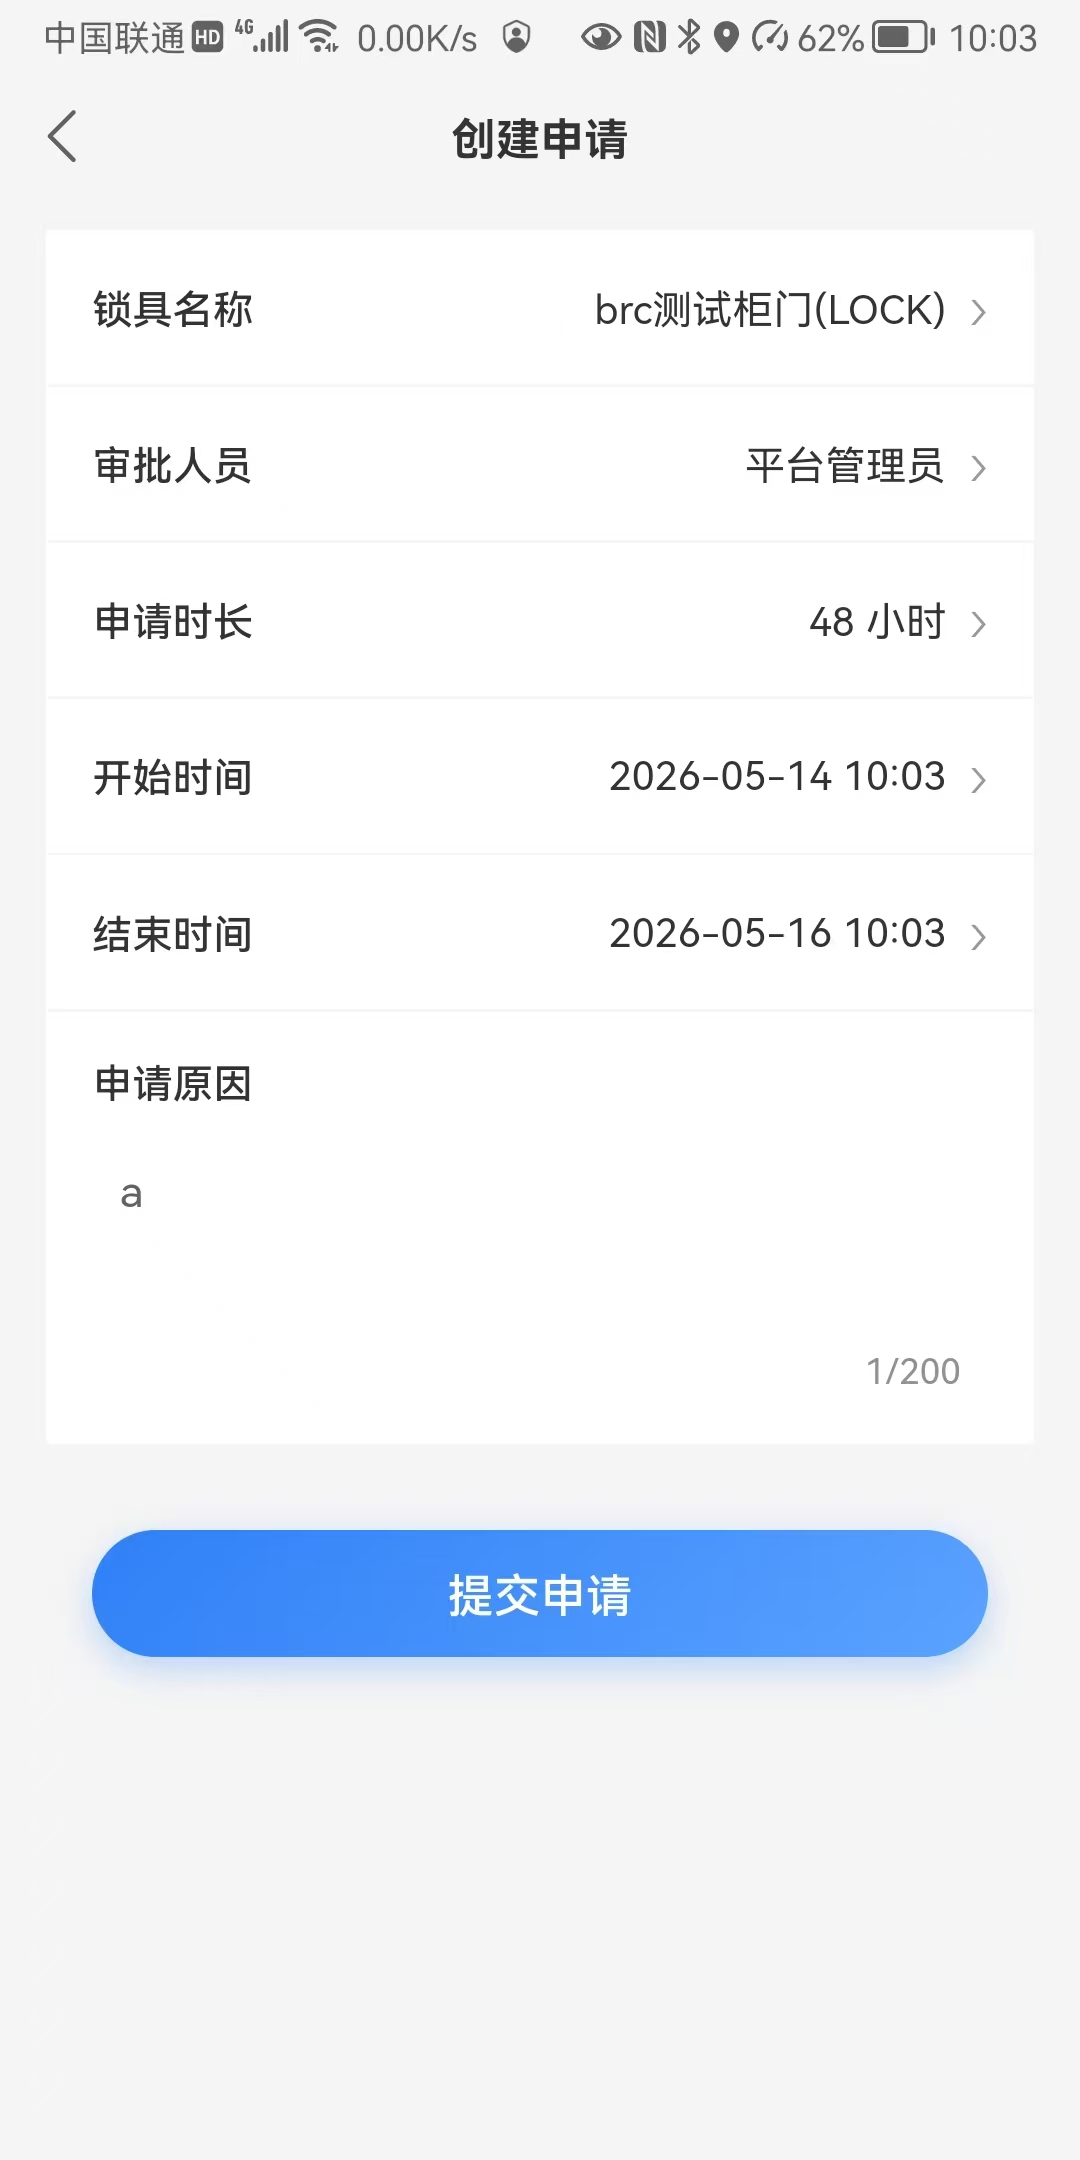
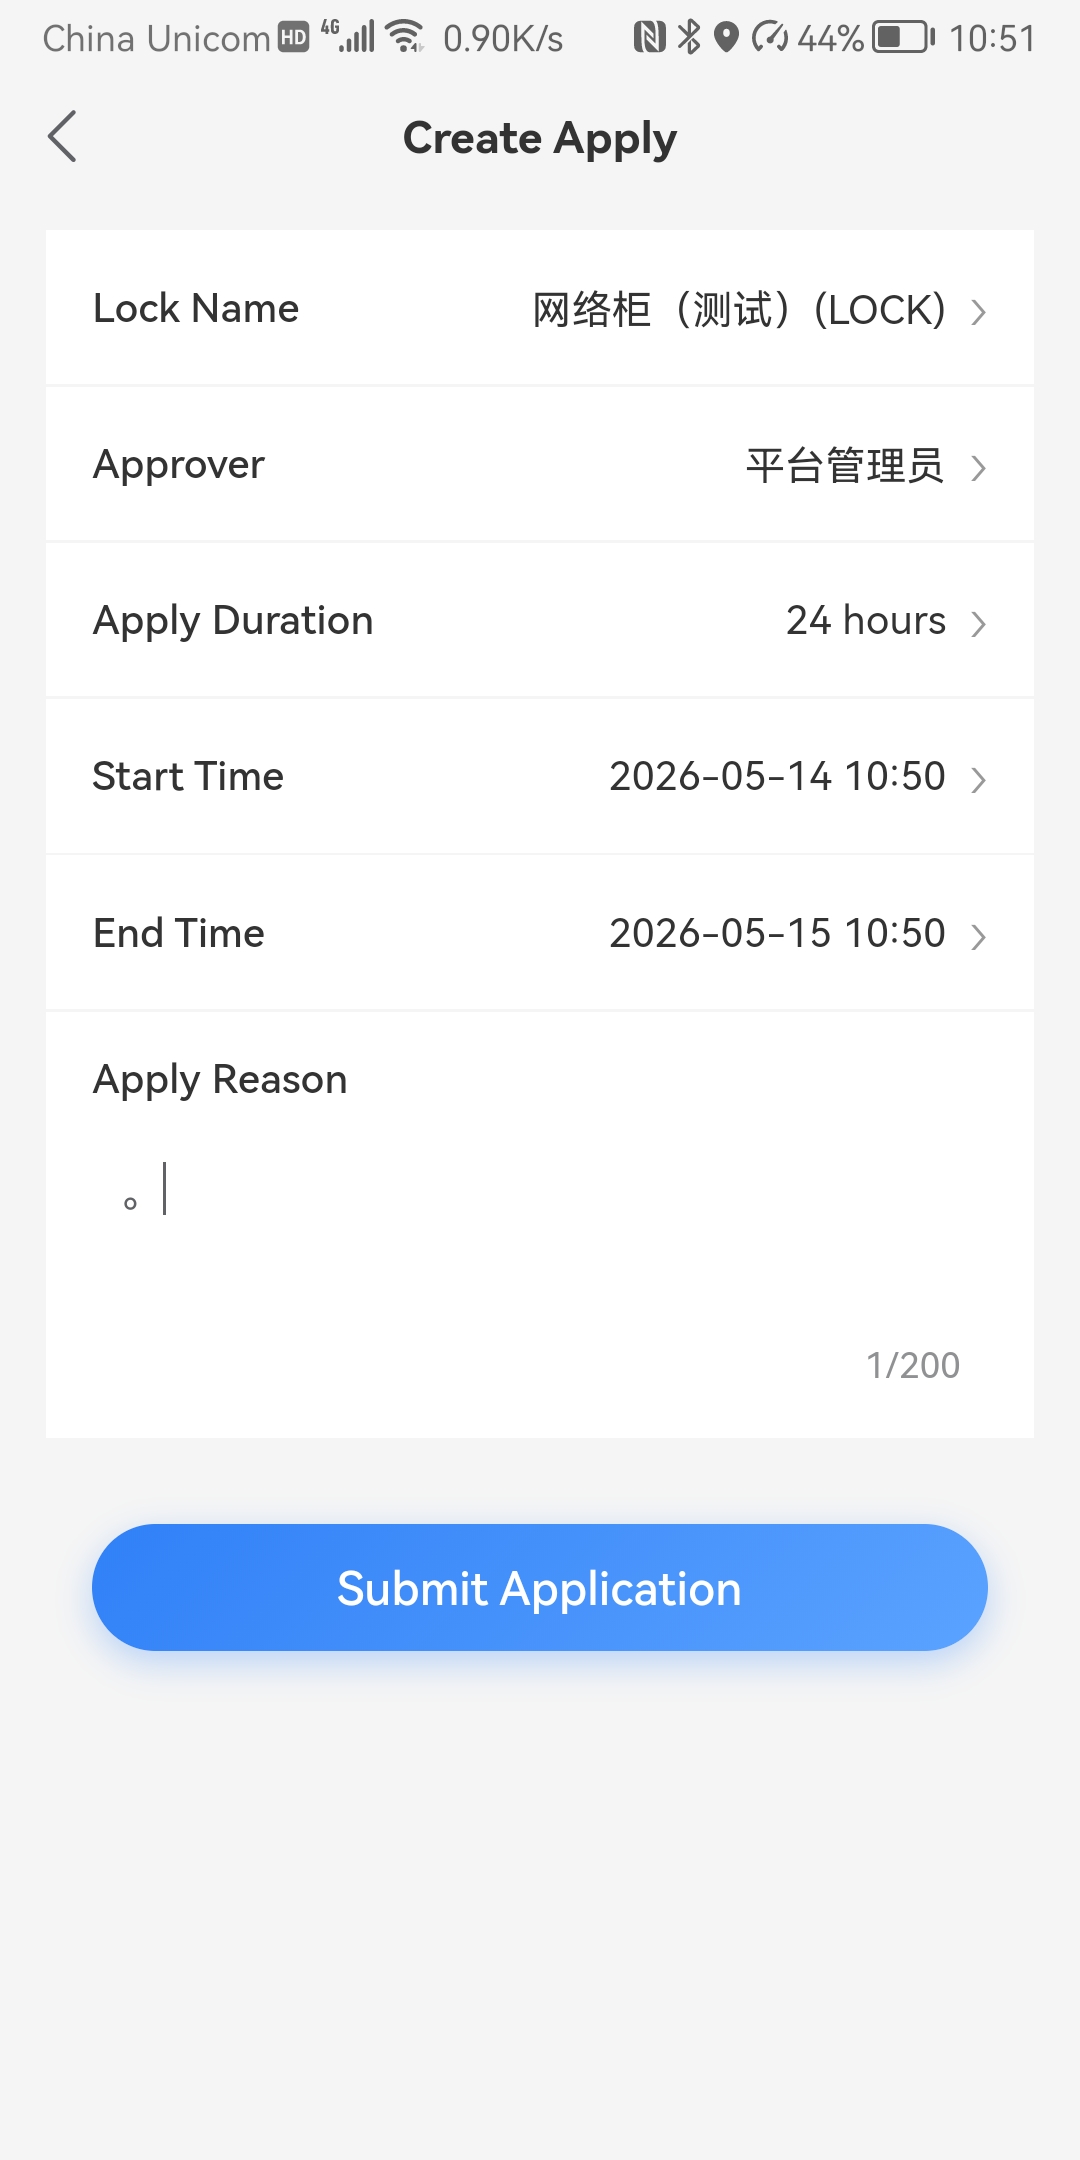
图 5-9:授权申请信息填写
步骤 10:提交授权申请 Step 10: Submit request
核对预览信息无误后提交。提交成功后申请单进入审批队列;若需修改或撤回,请按贵司流程联系审批人或管理员。
Review the summary and submit. The request enters the approval queue; to change or withdraw it, follow your internal process with the approver or admin.
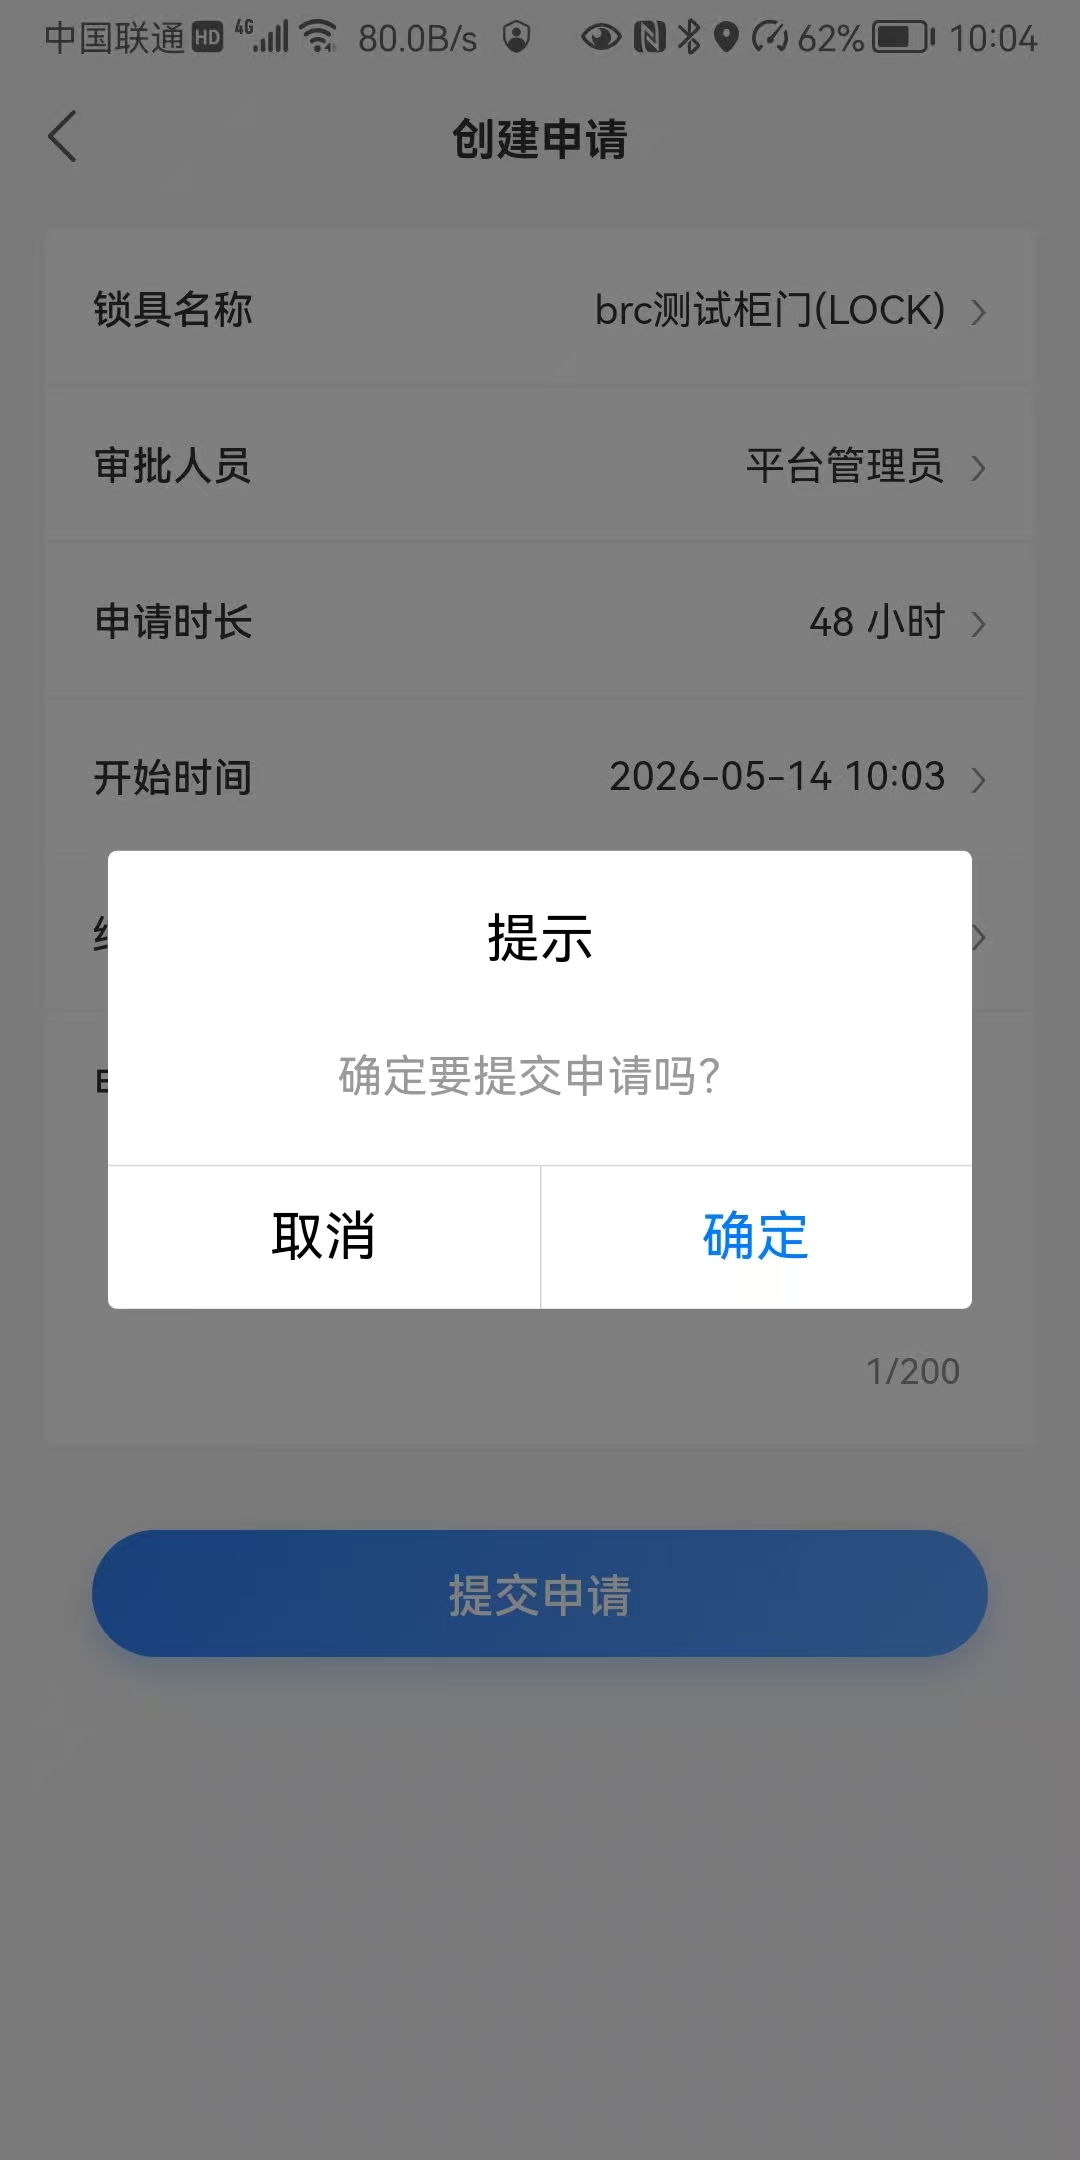
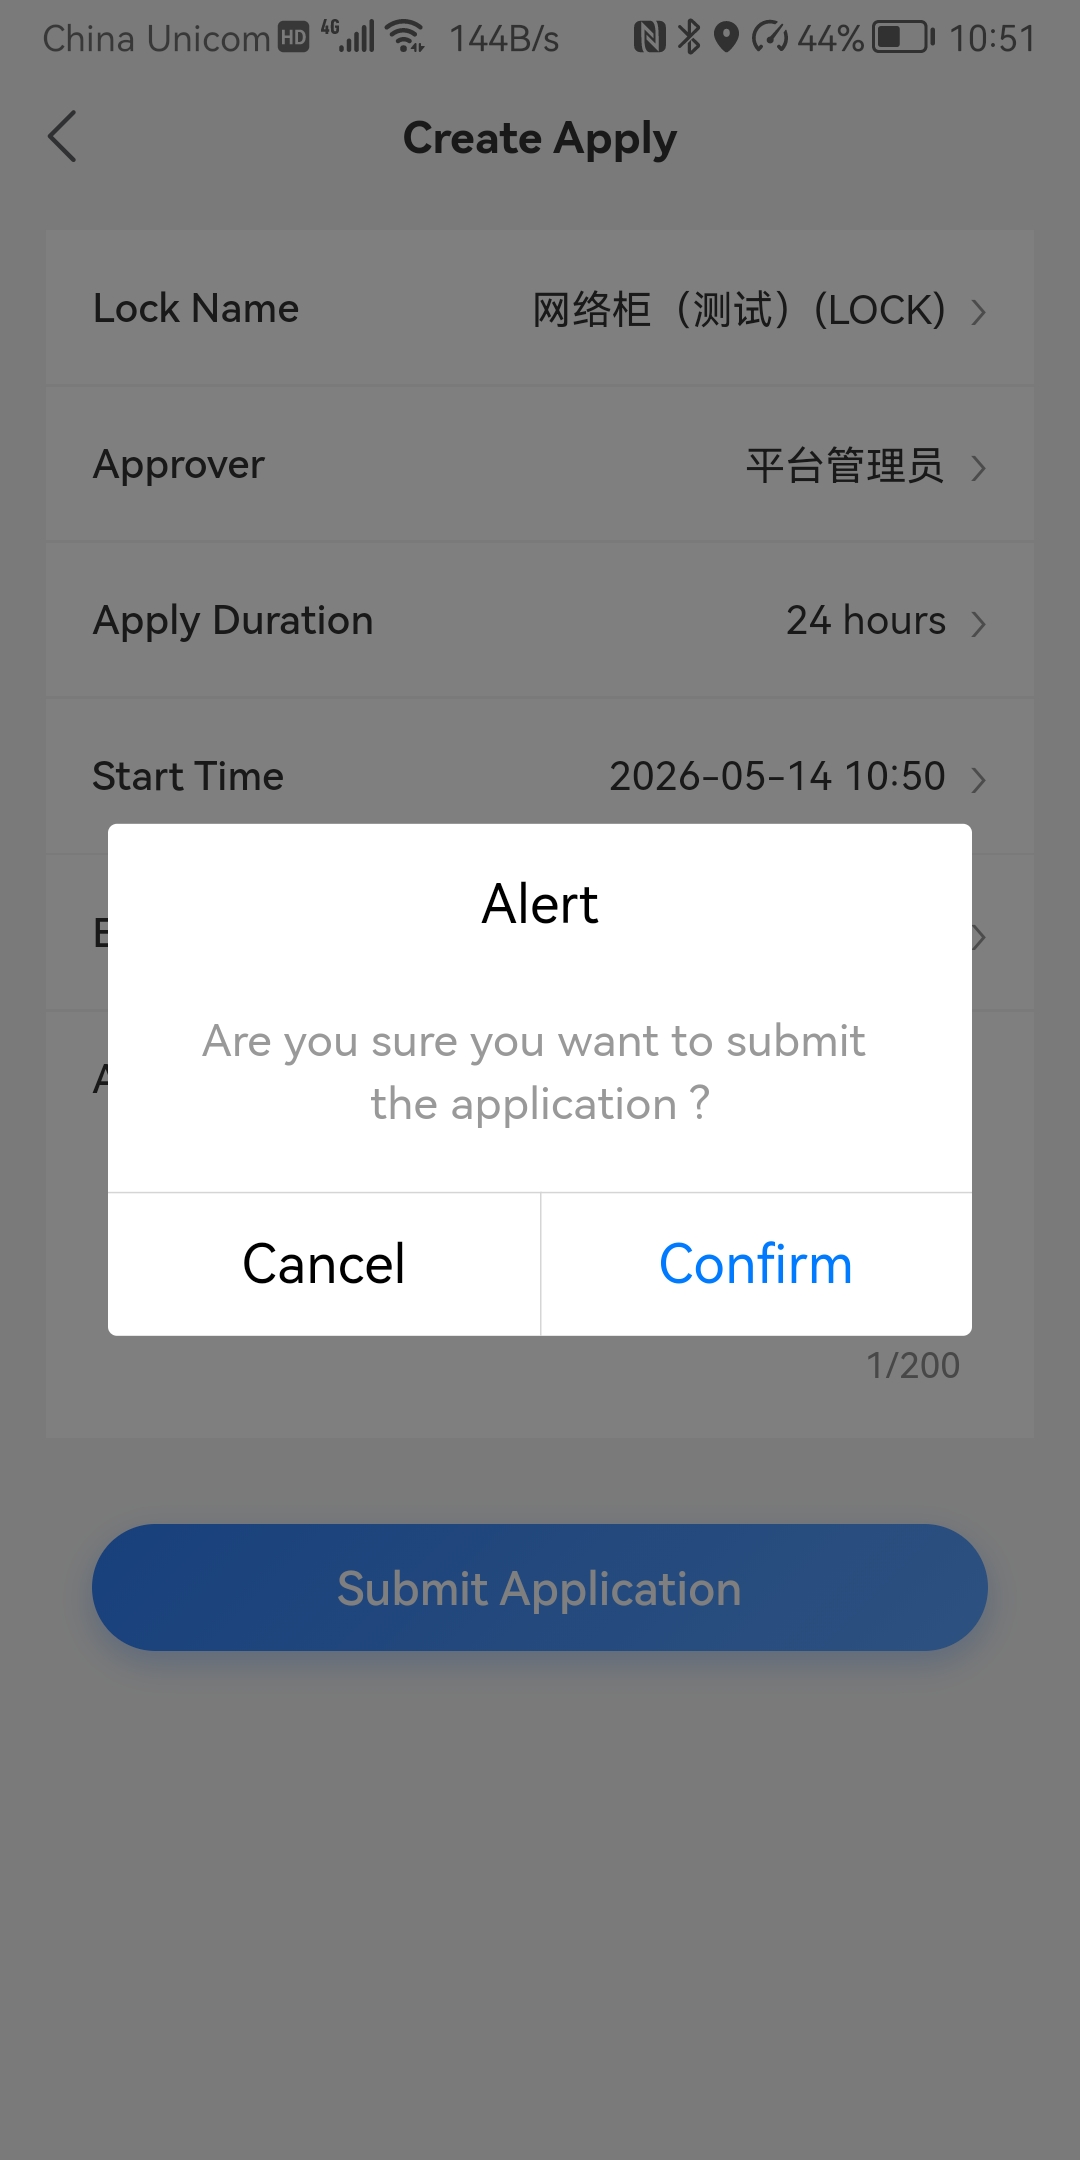
图 5-10:提交授权申请
步骤 11:授权列表 Step 11: Authorization list
在授权列表中可查看待审批、已通过、已驳回等状态。状态长期不变时,请确认审批人是否已收到通知、企业微信/邮件是否正常,或联系平台管理员排查工作流配置。
The authorization list shows pending, approved, and rejected items. If status stalls, verify approver notifications and messaging channels, or ask a platform admin to check the workflow configuration.
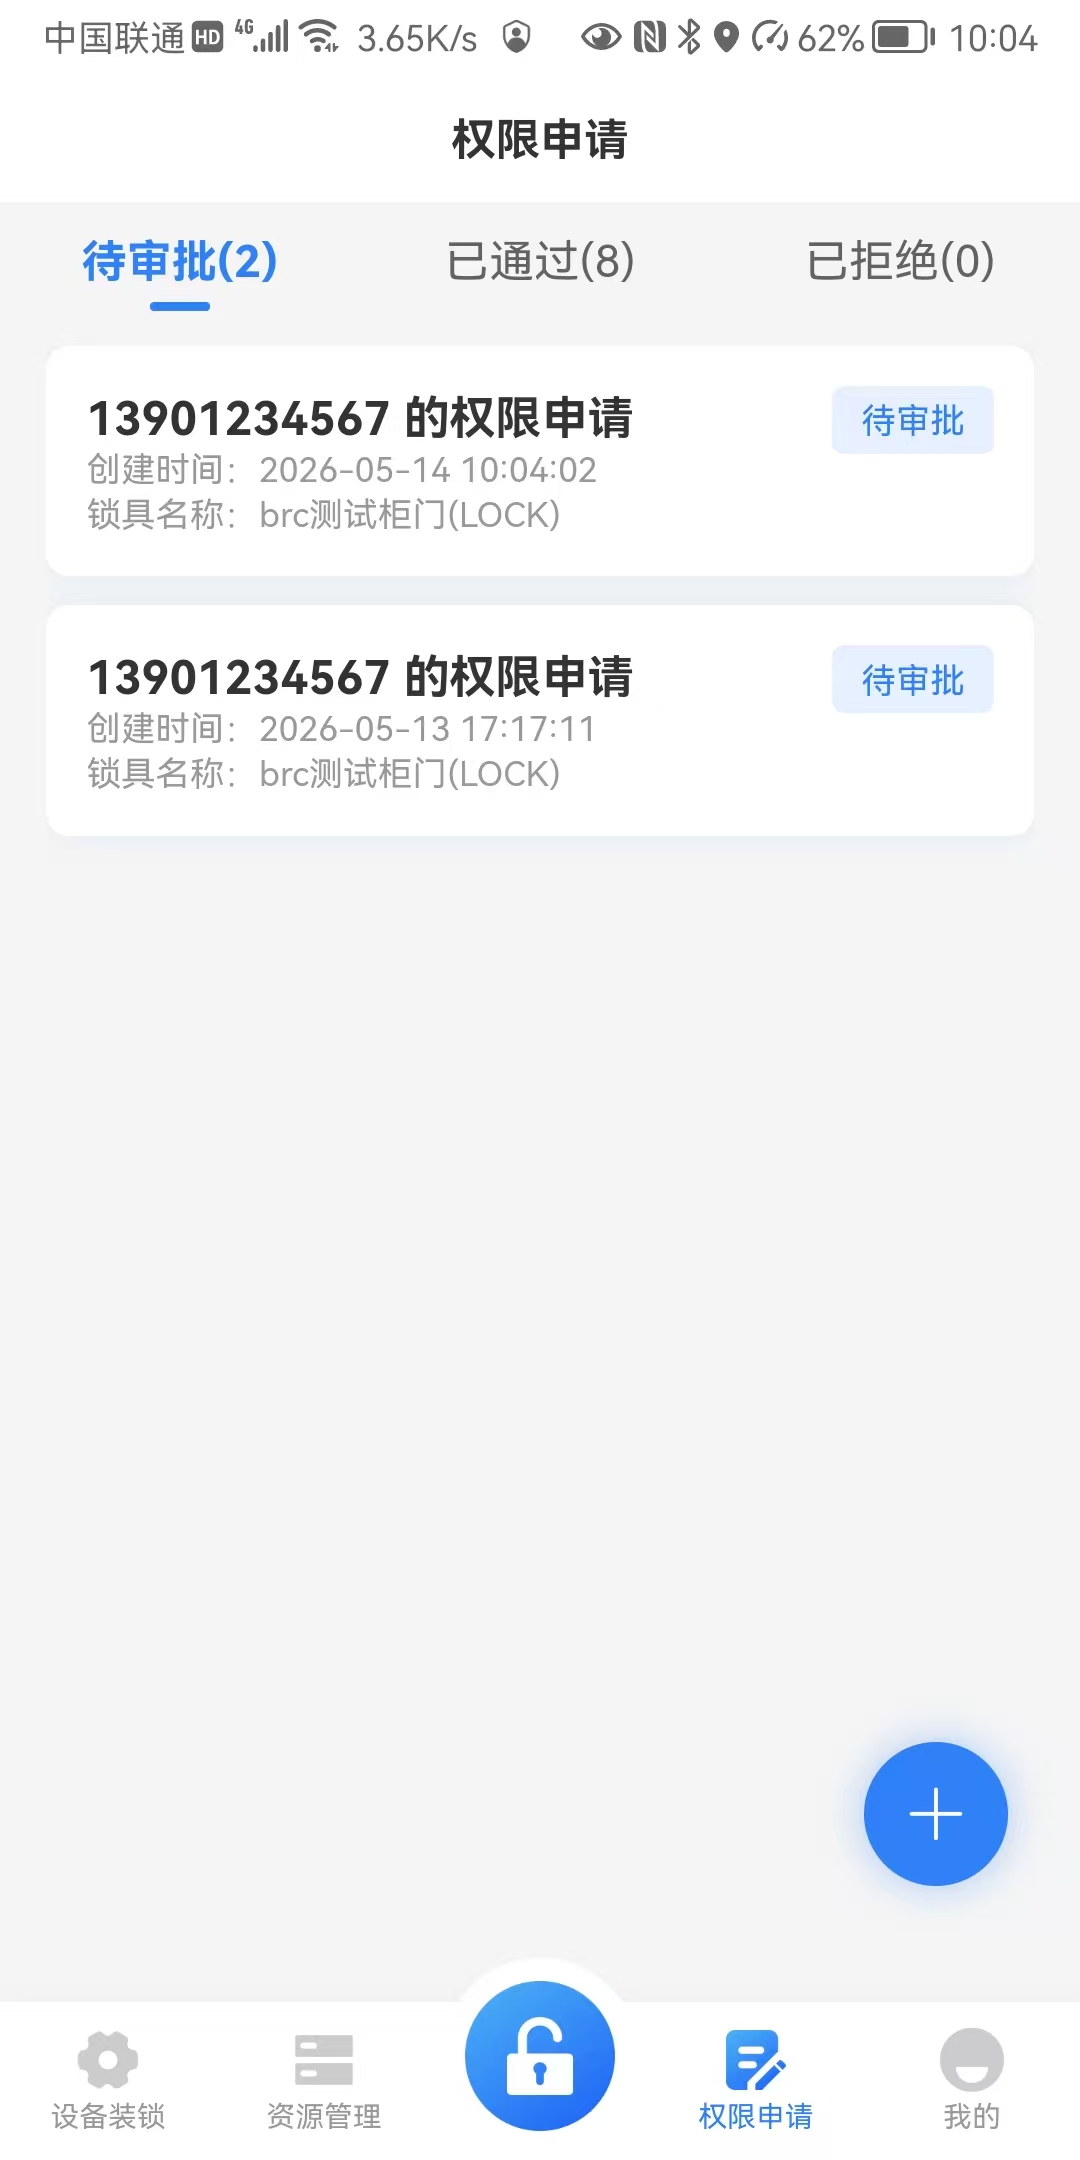
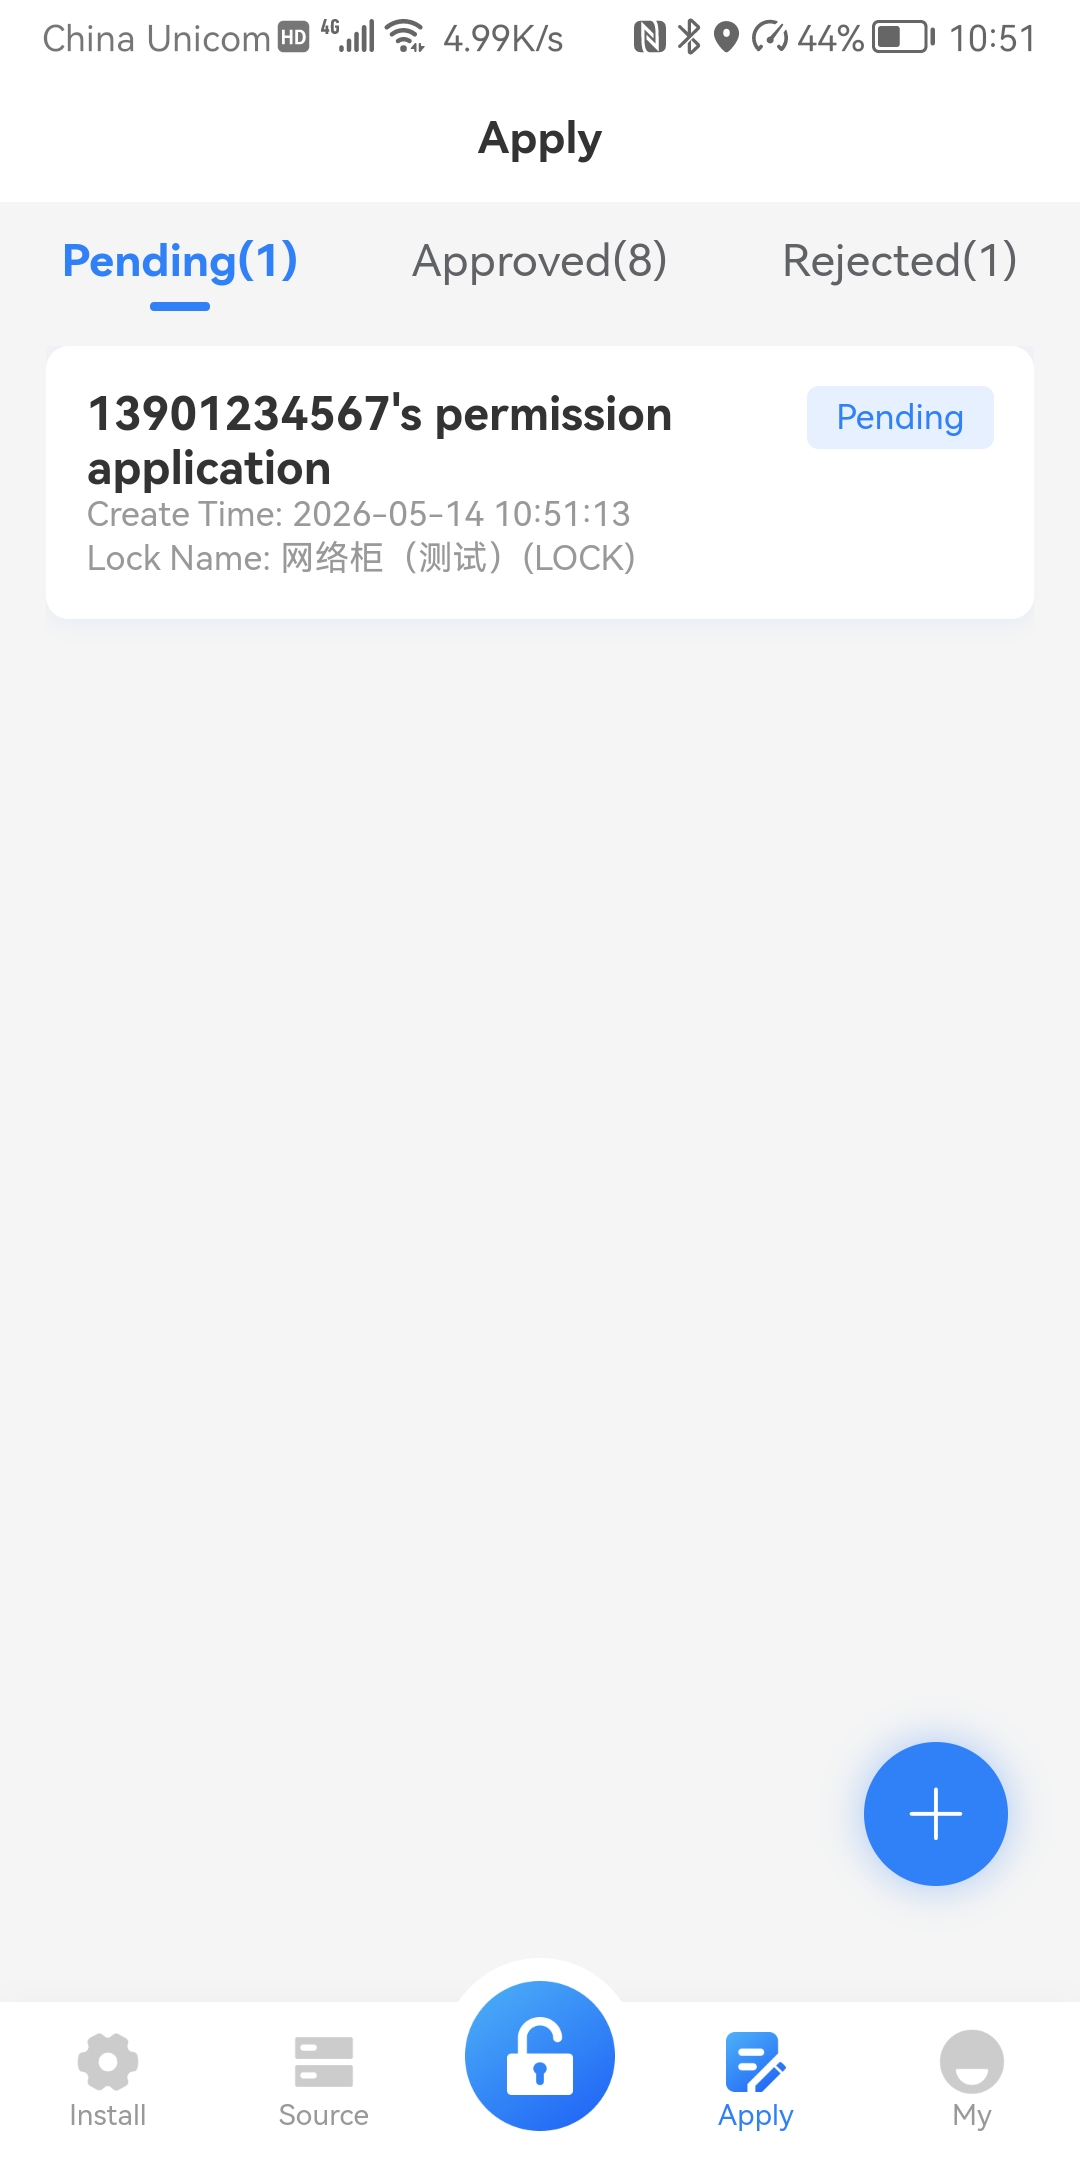
图 5-11:授权列表
步骤 12:审批通过 Step 12: Approval granted
审批通过后,平台将授权结果同步至可开锁策略(具体生效时间可能受缓存或设备在线状态影响,一般为秒级至分钟级)。若仍无法开锁,请下拉刷新、重新靠近 NFC 或确认设备在后台显示为在线。
After approval, the platform syncs the grant to the unlock policy (effective latency may depend on cache and device connectivity, often seconds to minutes). If unlock still fails, refresh the app, retry NFC, and confirm the device shows online in the admin console.
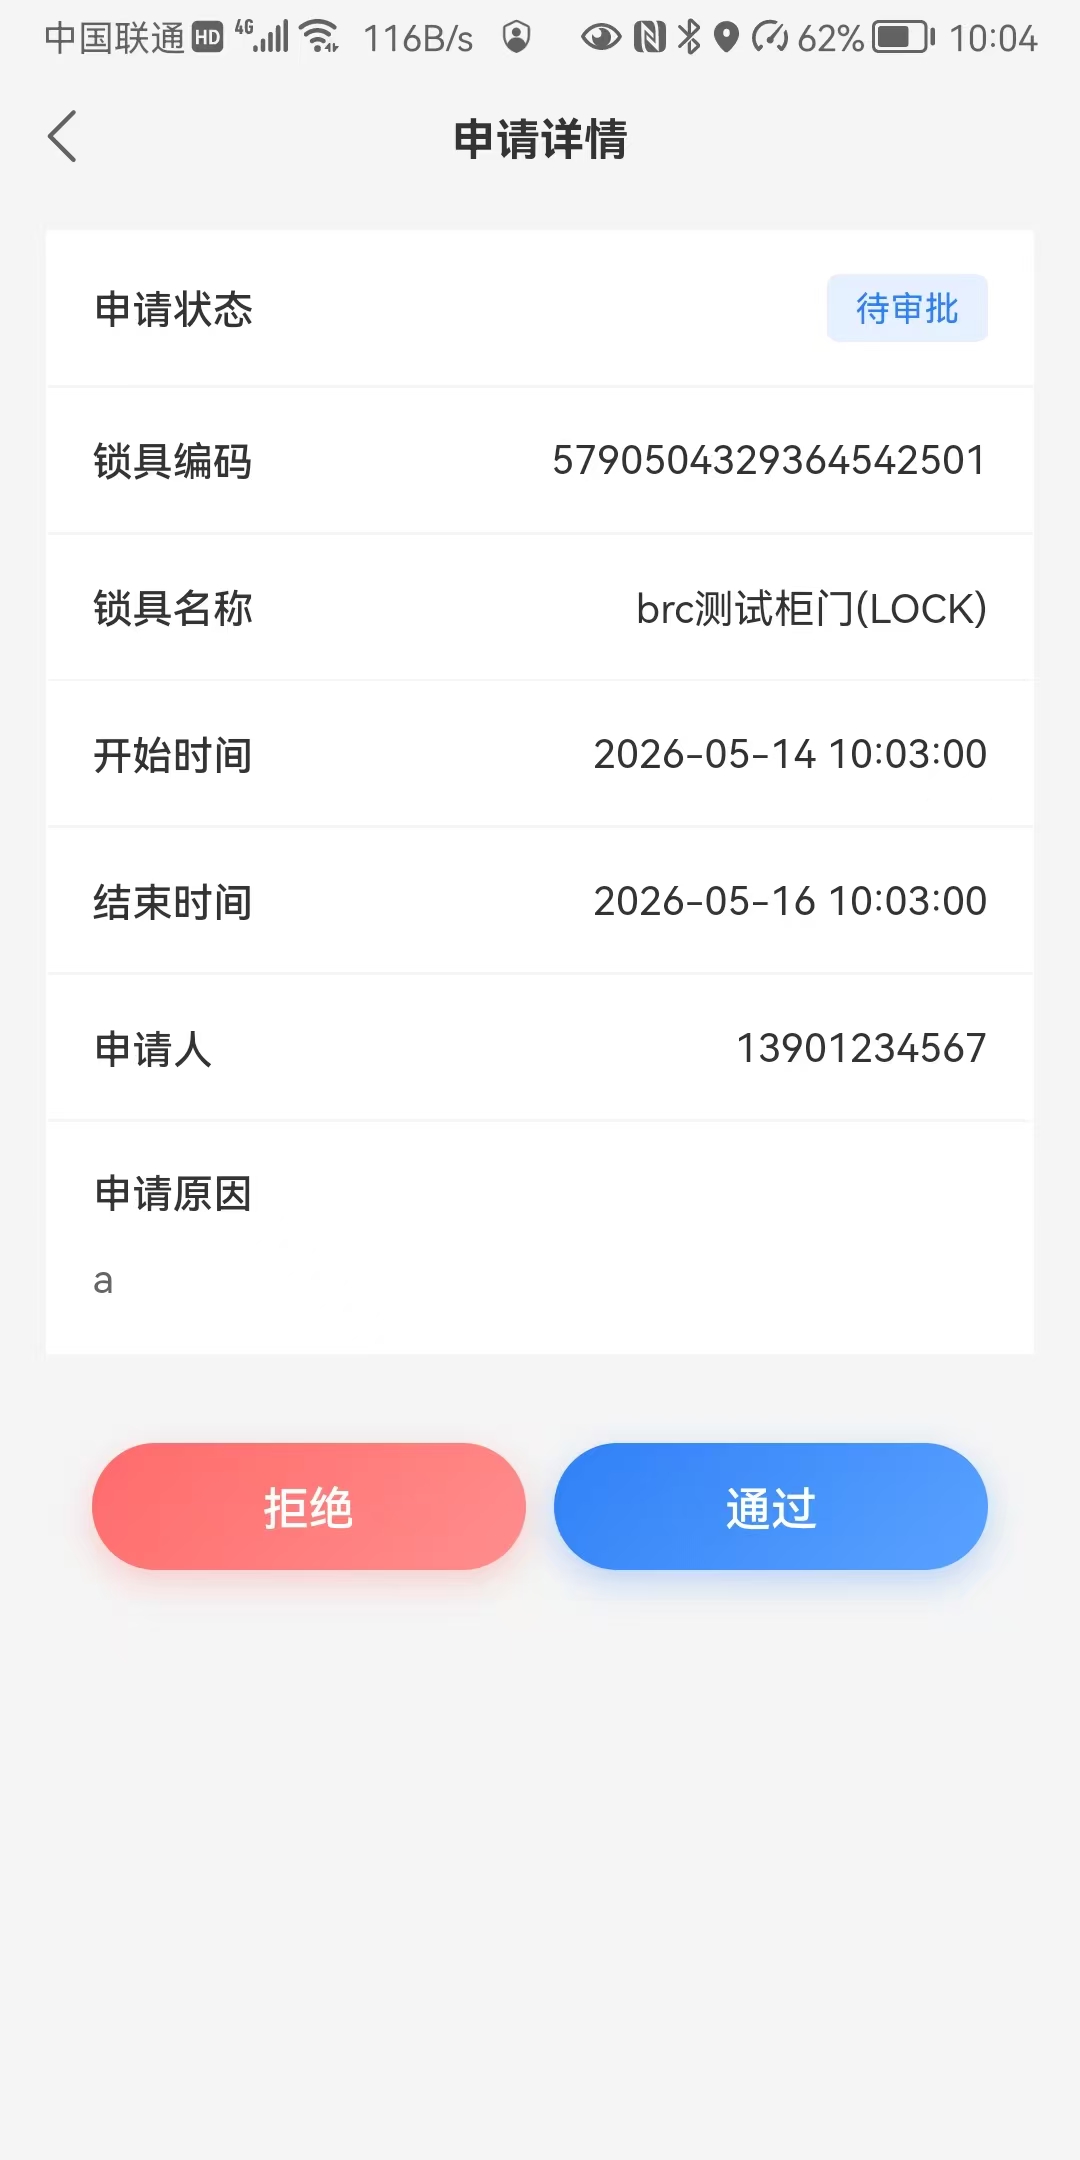
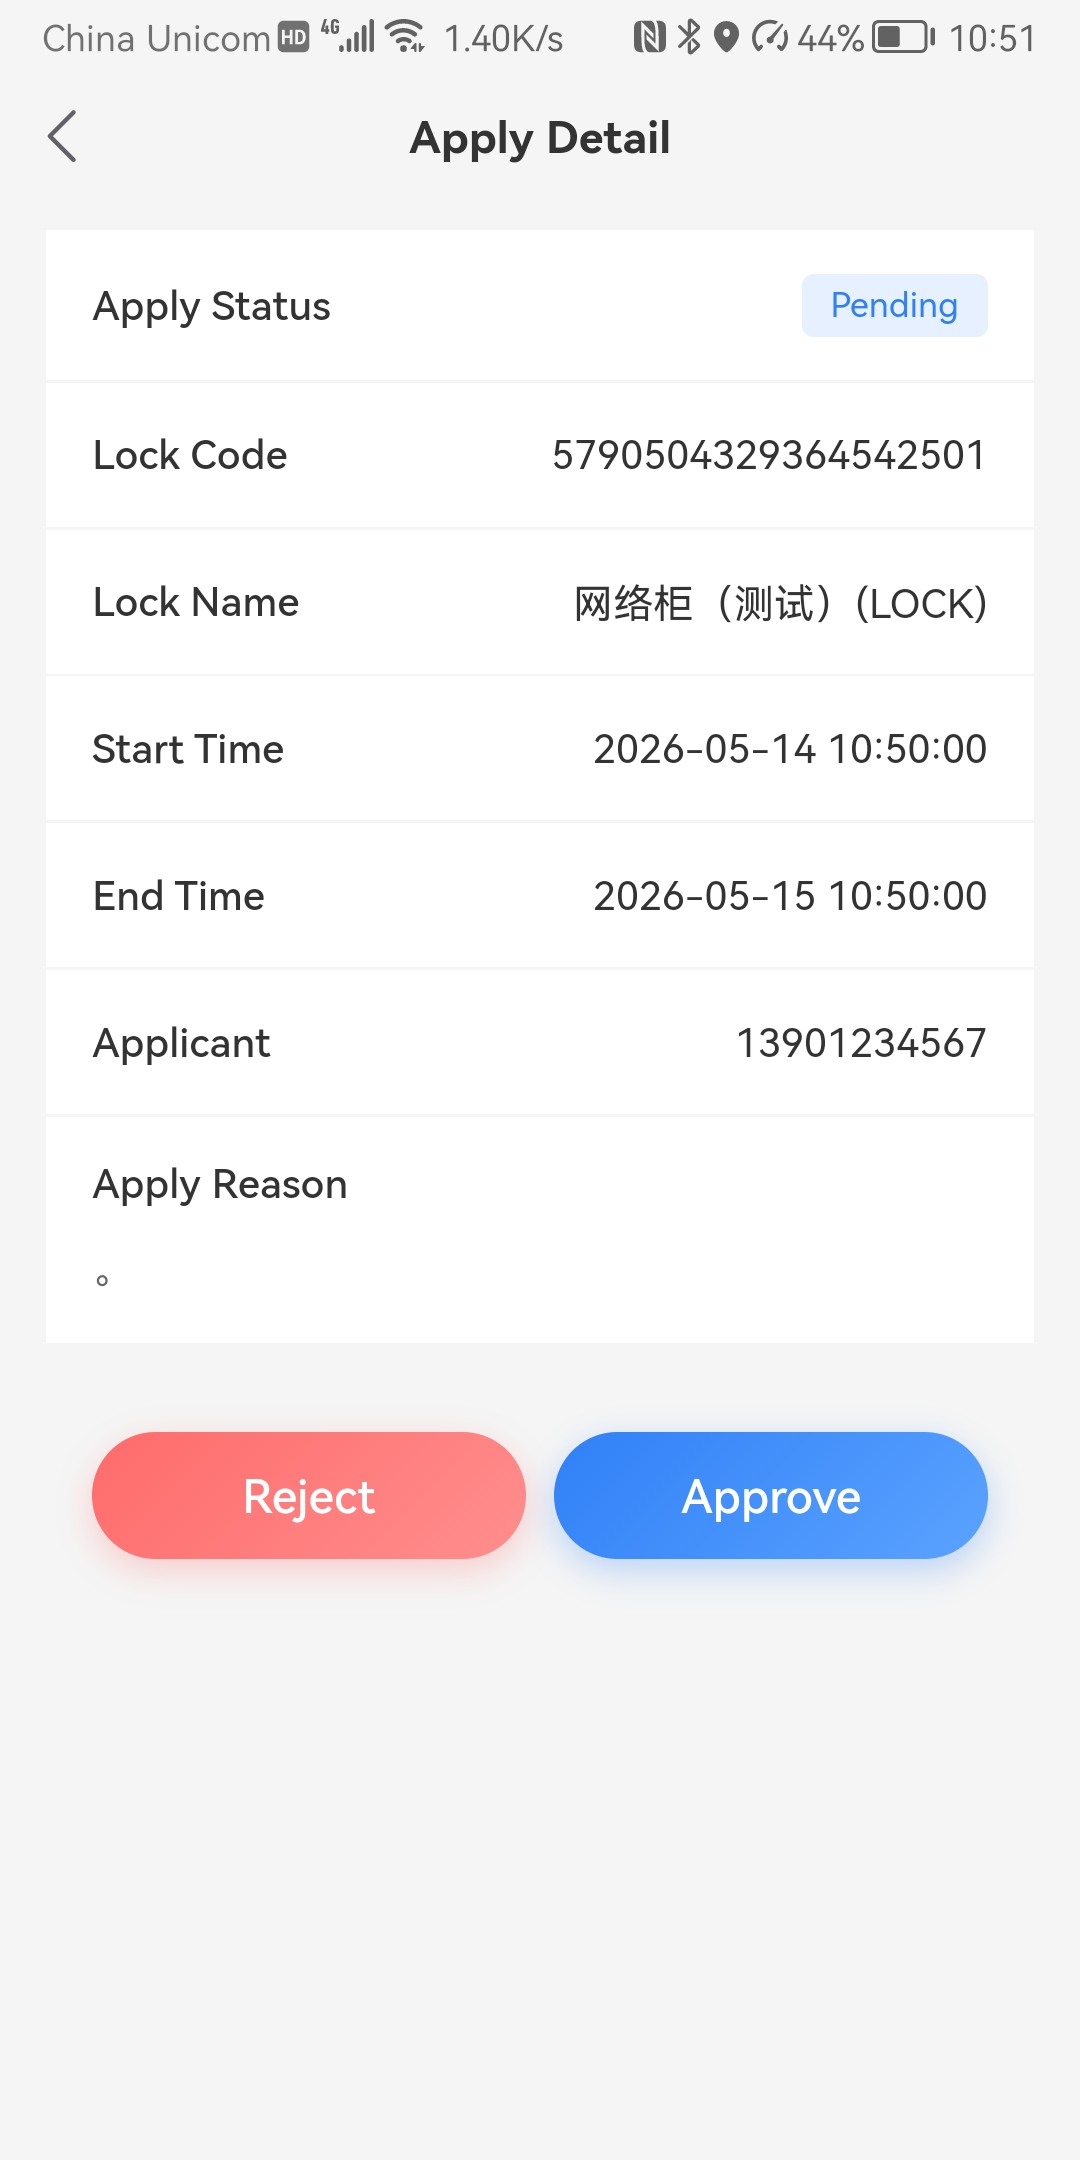
图 5-12:审批通过
步骤 13:正式开锁 Step 13: Production unlock
授权生效后,按日常运维流程执行开锁;所有操作将按策略记入开锁记录(参见《后台操作手册》4.5),便于审计与追责。
After the grant is active, unlock as part of normal operations. Operations are recorded for audit (see Admin Console Guide section 4.5).
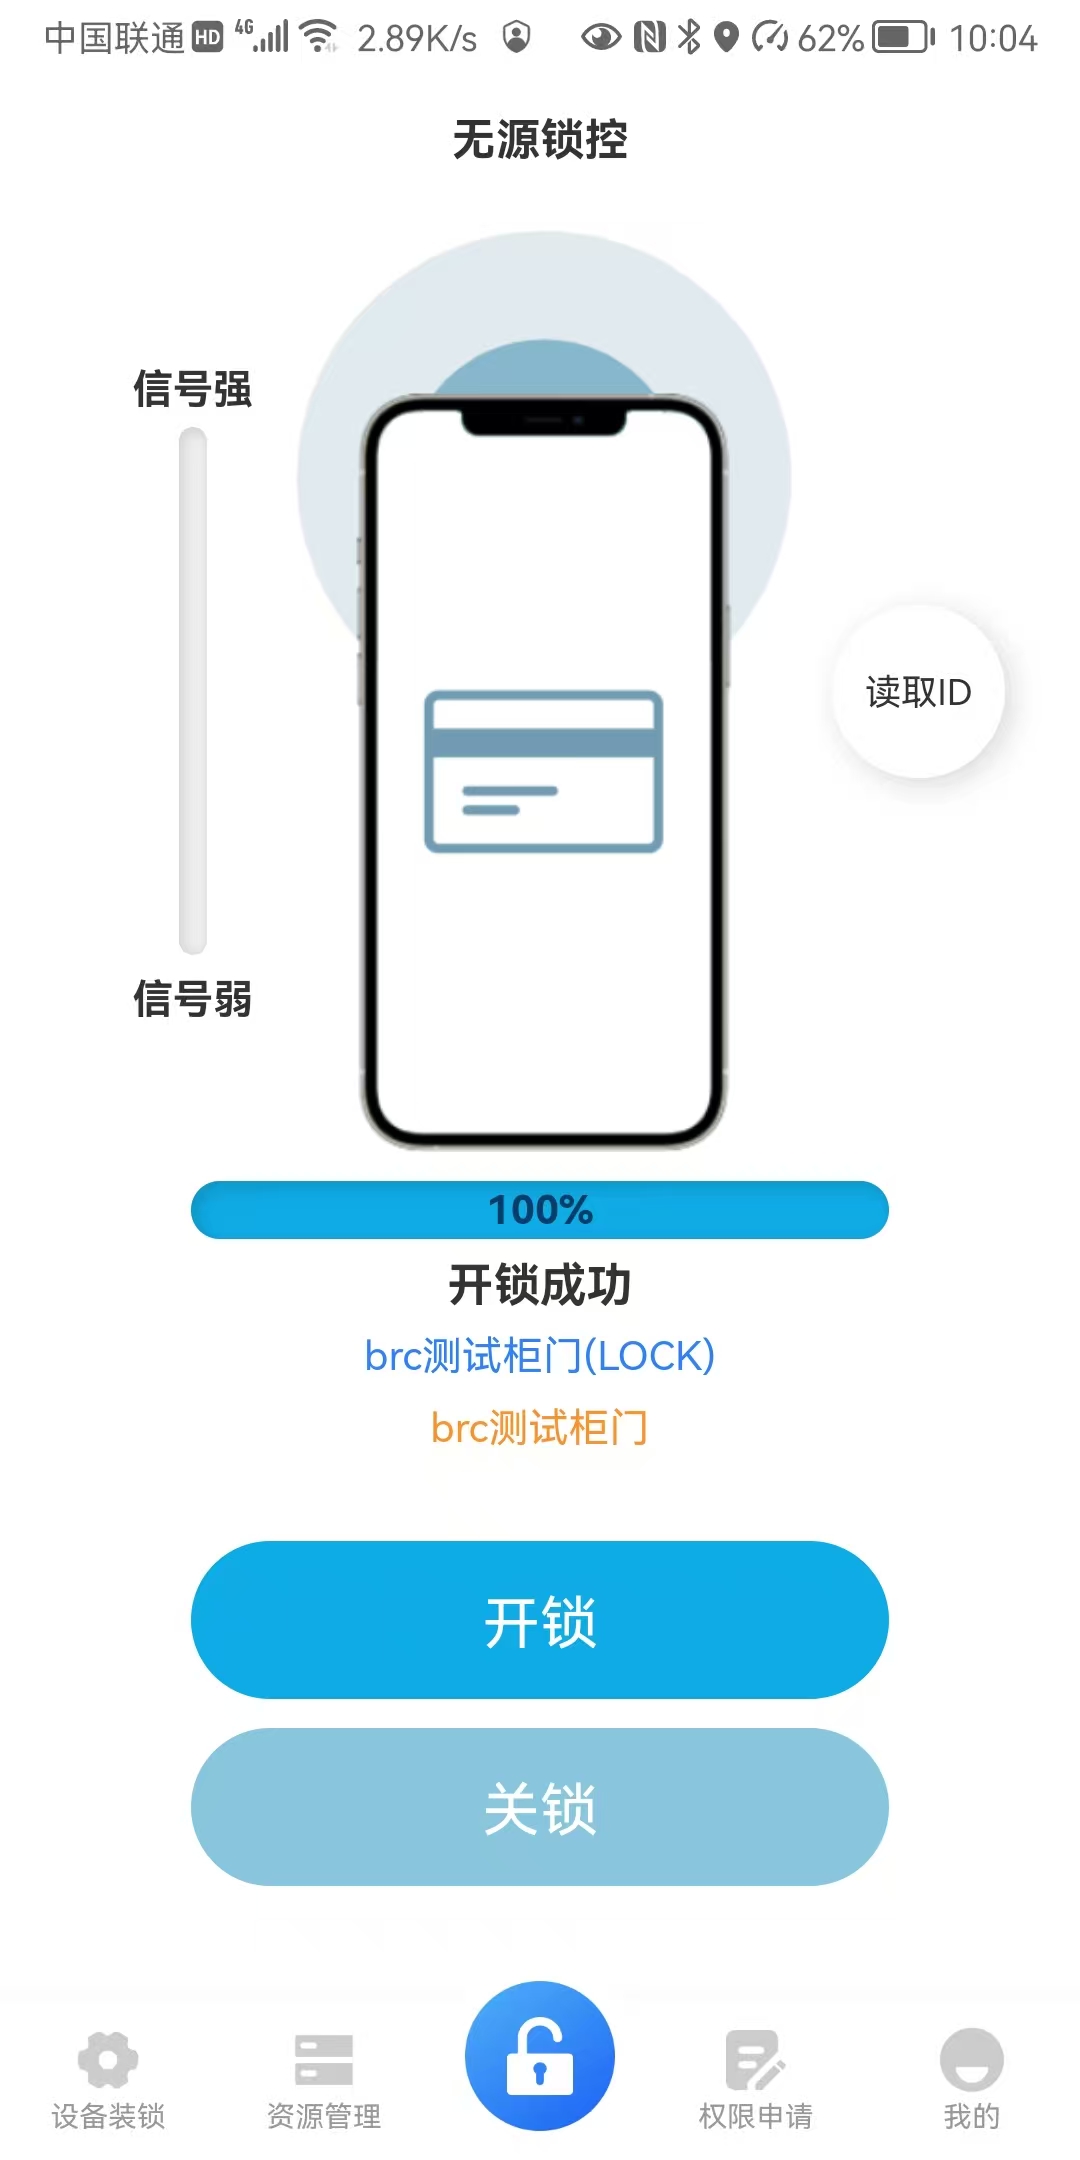
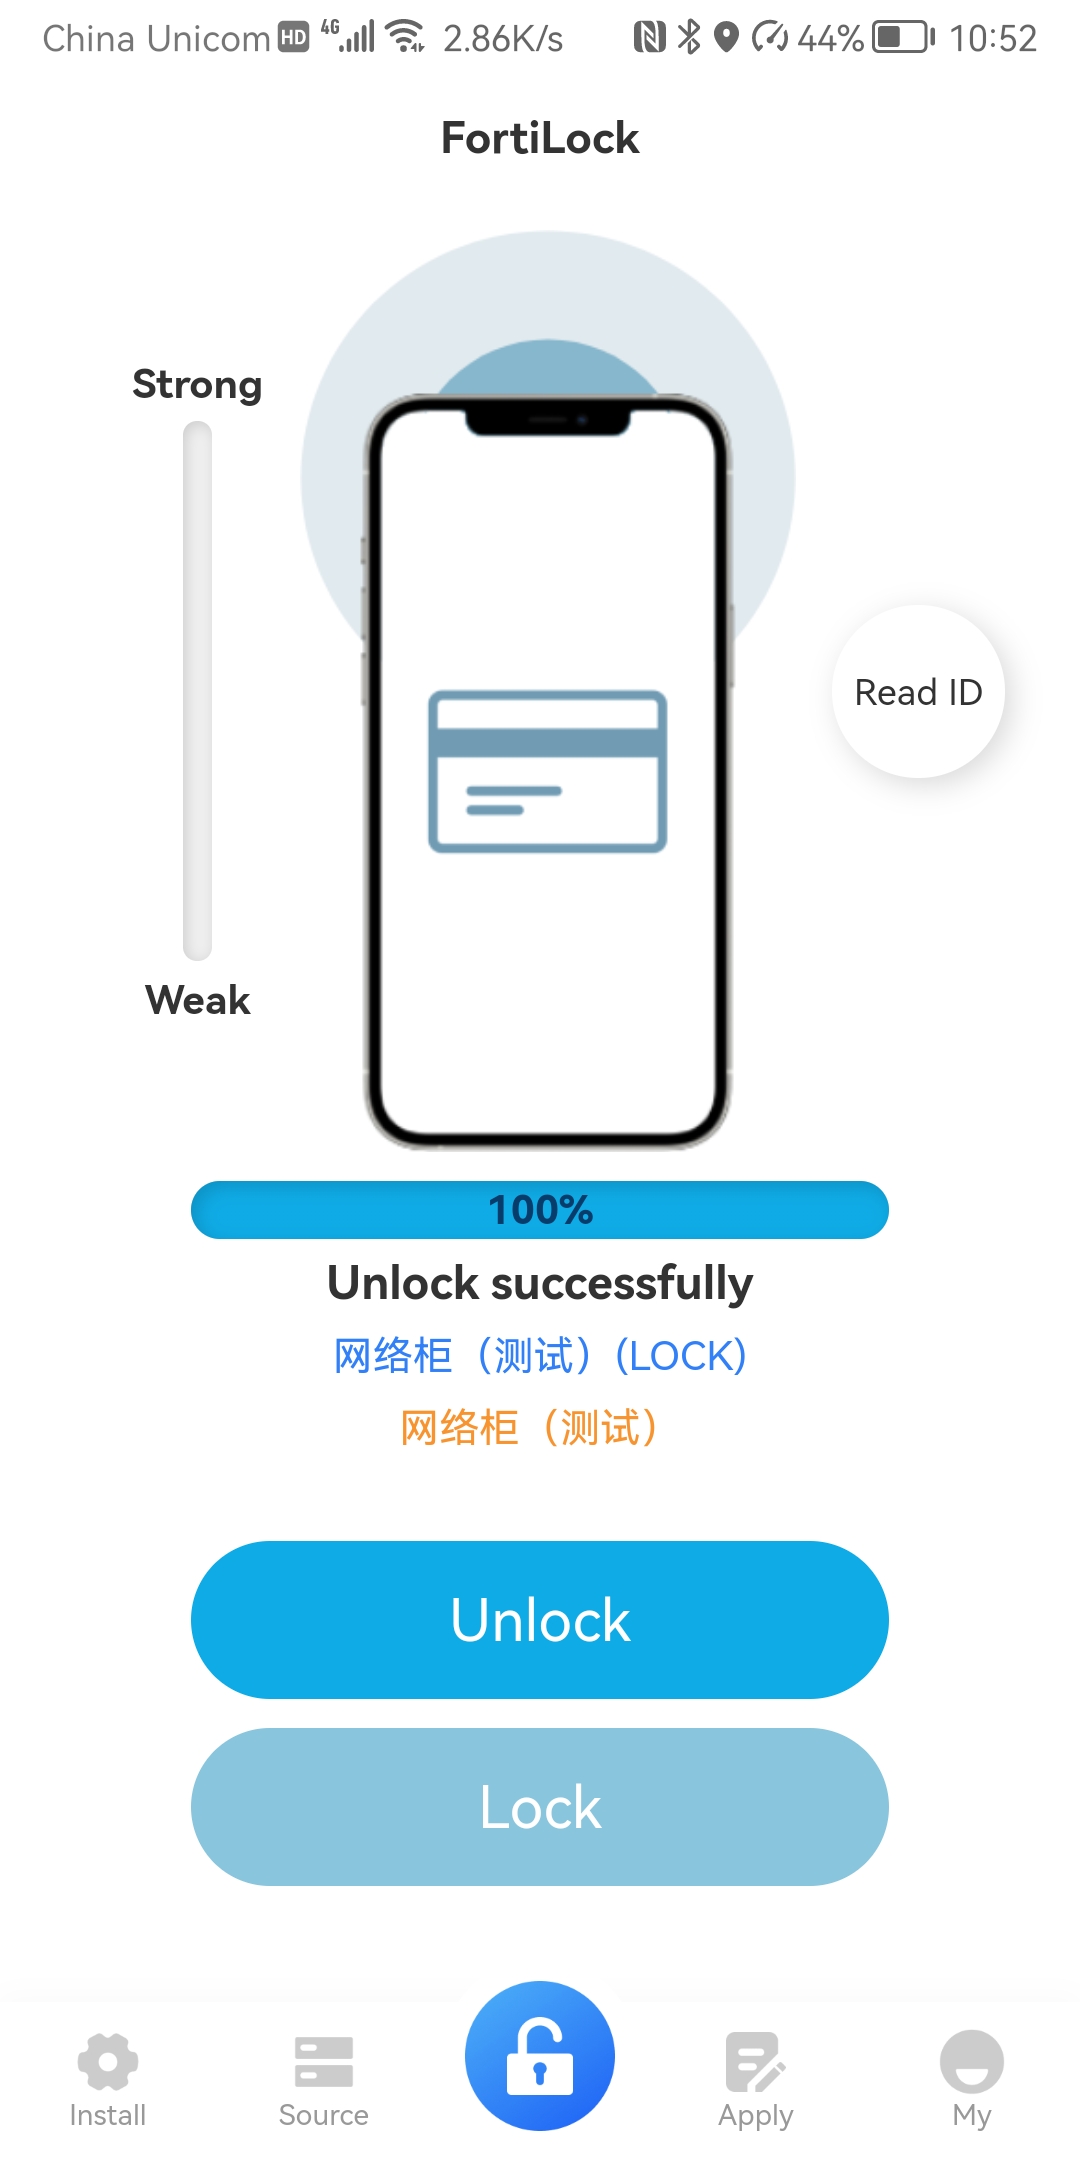
图 5-13:正式开锁
流程主线:登录 → 配地址 → 装锁 → 成功 →(30 分钟任意开锁调试验收)→ 申请并获批授权 → 正式开锁。后台截图路径保持
zh-CN/后台/ 与 en-US/后台/;移动端截图路径为 zh-CN/移动端/ 与
en-US/移动端/。
Main flow: sign in → server URL → install → success → (30-minute open commissioning)
→ request and obtain authorization → production unlock. Admin screenshots stay
under zh-CN/后台/ and en-US/后台/; mobile screenshots under
zh-CN/移动端/ and en-US/移动端/.
常见问题 Frequently Asked Questions
Q: 装锁成功后为什么有时能开锁、有时提示无权限? Q: Why can I unlock sometimes after installation but get permission errors other times?
A: 装锁成功后有约 30 分钟的调试宽限期,期内任意账号均可开锁、关锁以便现场验收;宽限期结束后必须完成授权申请并由管理员审批(或后台直接授权),否则会按最小权限策略拒绝操作。详见《移动端操作手册》步骤 6(装锁成功)及该节「30 分钟调试宽限期」说明。 A: After successful installation there is about a 30-minute commissioning window when any account may lock and unlock for acceptance testing. After it expires you must complete an authorization request and approval (or receive a grant in the admin console); otherwise access follows least-privilege rules. See the Mobile App User Guide, Step 6 (Installation succeeded) and the commissioning window note there.
Q: 忘记密码怎么办? Q: What if I forget my password?
A: 请联系系统管理员进行密码重置。 A: Please contact the system administrator for password reset.
Q: 如何批量导入设备? Q: How to batch import devices?
A: 在设备管理页面点击“导入”,下载模板后按格式填写,再上传即可。 A: Click "Import" on the device management page, download the template, fill it in according to the format, and then upload it.
Q: 授权后用户无法开锁? Q: User cannot unlock after authorization?
A: 请检查:1) 授权是否已生效;2) 设备是否在线;3) 用户APP是否为最新版本。 A: Please check: 1) Whether the authorization has taken effect; 2) Whether the device is online; 3) Whether the user APP is the latest version.
Q: 如何导出开锁记录? Q: How to export unlock records?
A: 在开锁记录页面设置筛选条件后,点击“导出”按钮即可下载 CSV 文件。 A: After setting filter conditions on the unlock records page, click the "Export" button to download the CSV file.
技术支持 Technical Support
使用或部署过程中如需协助、故障排查或文档反馈,请通过邮件联系技术支持:
For deployment help, troubleshooting, or documentation feedback, please contact technical support by email: